The most reliable way to attach cushions to wicker patio furniture is to use a combination of tie-on straps threaded through the weave and hook-and-loop (Velcro) tape on flat contact surfaces. Ties handle the back cushions where wicker bars give you something to loop around, and Velcro handles seat cushions where you need a flat, low-profile grip. Add rubberized grip pads underneath as a backup and most cushions will stay put even in a stiff breeze. The rest of this guide walks you through exactly how to do each method, what to buy, and how to troubleshoot when things still slip.
How to Attach Cushions to Wicker Patio Furniture

Maren Grady
15 Jun 2026
Why cushions slide on wicker in the first place

Before you start buying hardware, it helps to understand why the cushion is moving. Wicker frames are usually rounded, curved, or crisscross-woven, which means there is very little flat surface for a cushion to grip onto. A flat-bottomed cushion sitting on a rounded arm or a lattice seat is basically balanced on a series of ridges, and any sideways force, like someone sitting down hard or a gust of wind, knocks it right off. Add in the fact that outdoor fabric is often slippery (solution-dyed acrylic is notoriously smooth), and you have almost zero friction holding things in place.
The second problem is that most replacement cushions are sold without ties, or the ties are too short to reach the wicker frame properly. Back cushions are especially tricky because wicker backs are often curved and the cushion wants to slide down or forward. Seat cushions tend to creep toward the front edge. Once you know which problem you have, the fix becomes much more obvious.
- Cushion slides forward on the seat: not enough grip on the seat pan, or no front anchor point
- Back cushion slips down or leans forward: no tie point at the top rail, or ties are too long and go slack
- Cushion shifts sideways: attachment is only at center, not at corners or edges
- Cushion pops off entirely in wind: no anchor point at all, relying only on weight
- Ties work at first but loosen over summer: wrong material (cotton stretches, degrades outdoors), or routed through a single weave strand that cuts through over time
Everything you need before you start
Gather these before you sit down with the furniture. Half the frustration of this project comes from stopping mid-install to hunt for scissors or the right width of tape. The good news is that the total cost for most setups runs between $15 and $40 depending on how many cushions you're securing.
| Item | What it's for | Approximate cost |
|---|---|---|
| Outdoor/UV-resistant hook-and-loop tape, 1" or 2" wide | Seat cushion attachment to flat wicker surfaces | $8–$15 for a roll |
| Sew-on hook-and-loop strips (3/4" or 1") | Sewing onto cushion fabric where adhesive won't hold | $5–$10 |
| Nylon or polyester ribbon/webbing, 1/2" to 3/4" wide | Tie-on straps for back cushions | $3–$6 per yard |
| Rubberized grip pad or silicone shelf liner | Friction layer under seat cushions | $5–$10 for a sheet |
| Elastic bungee/anchor straps with S-hooks or clips | Underneath anchor for seats without tie loops | $8–$12 for a set |
| Plastic or stainless steel S-hooks or D-rings | Connecting elastic loops to wicker frame bars | $3–$6 |
| Acrylic-adhesive-backed hook-and-loop (outdoor grade) | Bonding to smooth wicker frame rails | $10–$18 |
| Measuring tape | Positioning cushions accurately before marking | Likely already have |
| Fabric marker or chalk | Marking where Velcro or ties go on cushion fabric | $2–$4 |
| Scissors or rotary cutter | Cutting tape and webbing to length | Likely already have |
| Needle and heavy-duty outdoor thread (or sewing machine) | Sewing on hook-and-loop strips or adding tie loops | $4–$8 |
A quick note on materials: skip regular cotton ribbon for outdoor ties. It absorbs moisture, mildews, and stretches out over a season. Nylon or polyester webbing holds its shape, resists UV, and dries fast. For Velcro, look specifically for acrylic adhesive backing rather than rubber adhesive if you're bonding to a painted or coated wicker frame. Acrylic adhesive handles wider temperature swings and moisture better. Velcro Brand's professional series is rated from -30°F to 110°F, which covers most North American patio conditions without degrading.
Method 1: Tie-on straps and loop systems
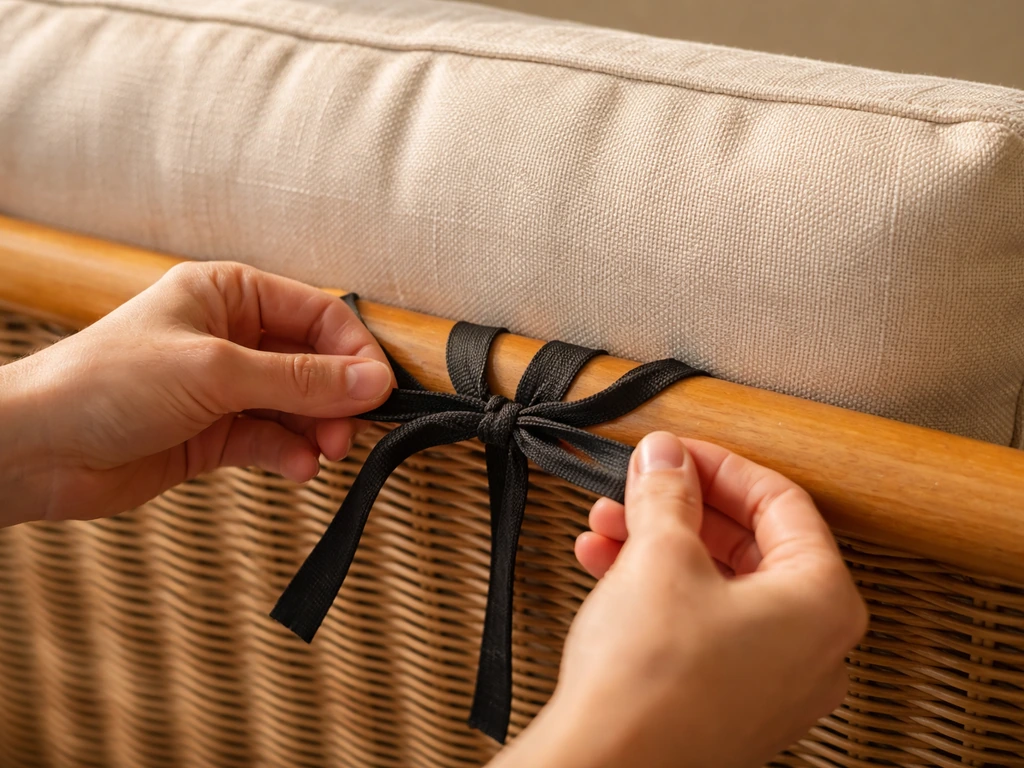
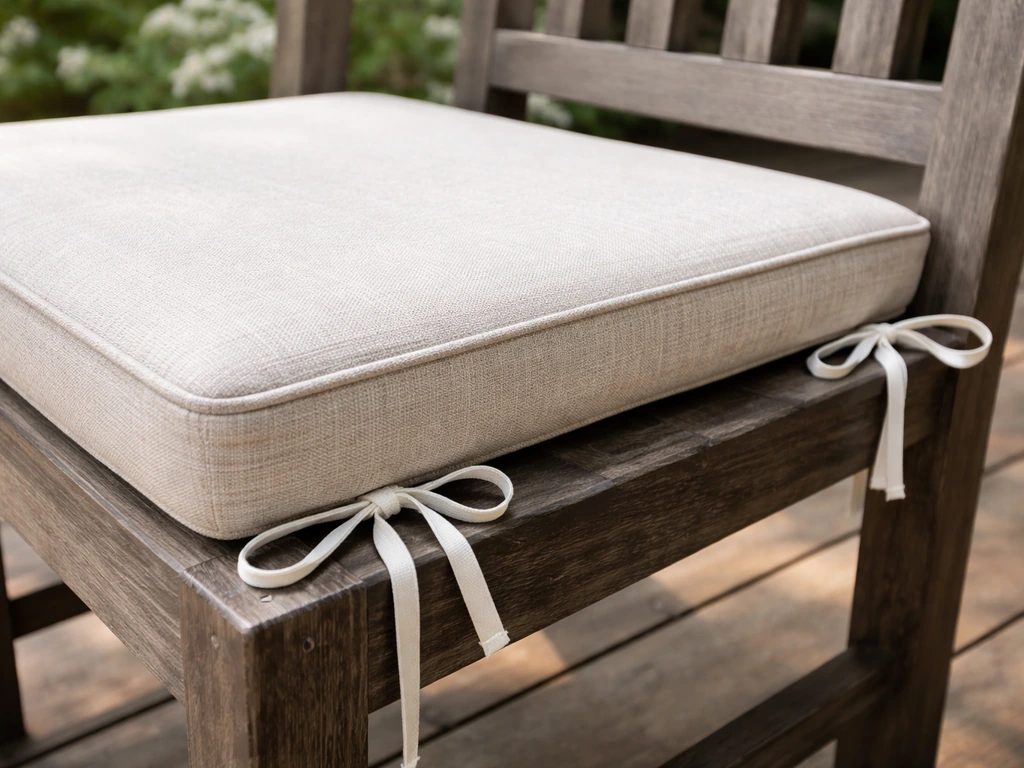
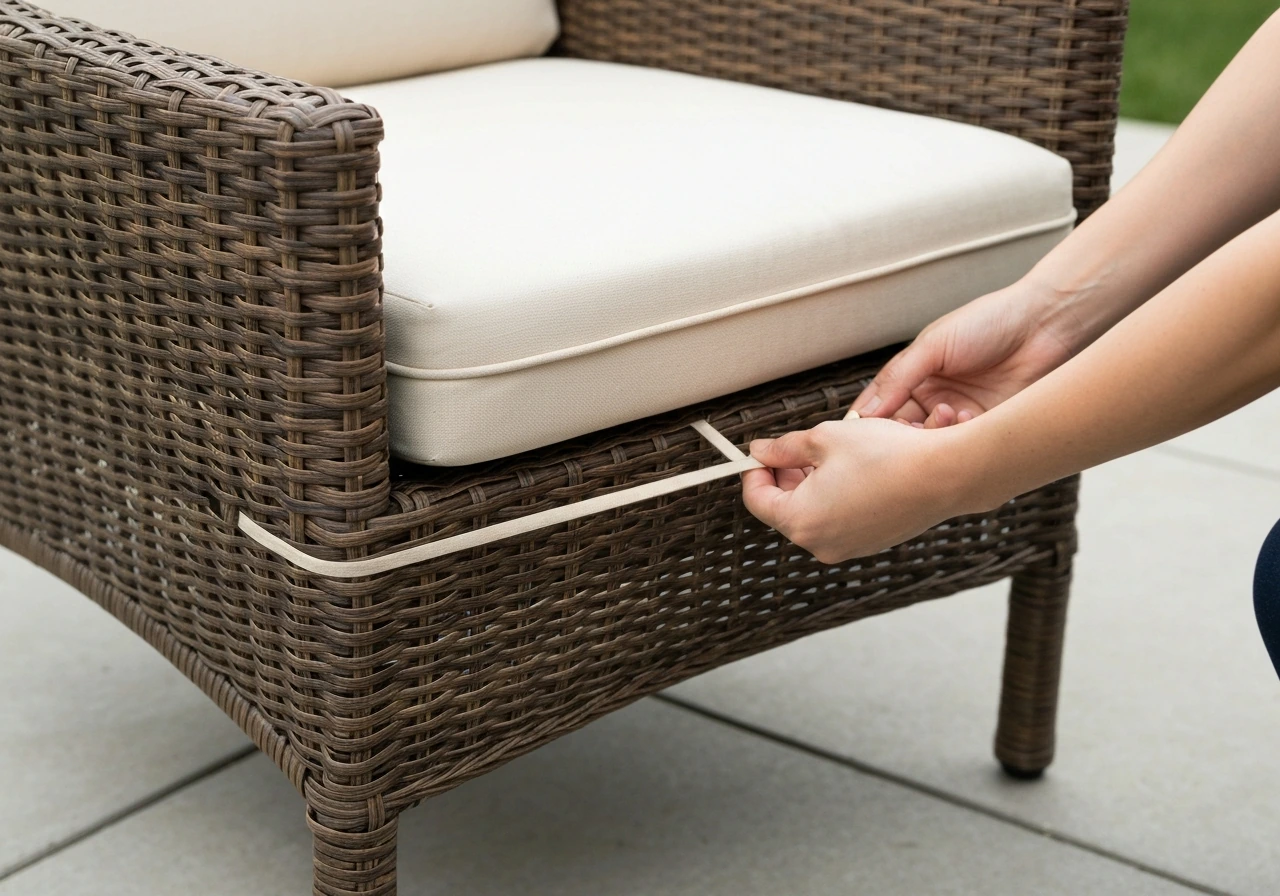
This is the oldest method and still the best one for back cushions on chairs and sofas with exposed horizontal rails. You're literally tying the cushion to the frame the same way a restaurant chair cushion is tied on. It works best when the cushion already has built-in loops or ribbon ties, but you can add them yourself if it doesn't.
If your cushion already has ties
Sit the cushion in its correct position first. Don't tie it down and then adjust, because you'll end up with a crooked cushion and uneven knots. Once it's exactly where you want it, thread each tie around the closest wicker rail or through a section of the weave. The key trick here, especially with open-weave or lattice wicker, is to route the tie through multiple strands rather than a single gap. Threading through one gap concentrates all the tension on one thin strand, which will eventually cut into the weave or let the tie slip through. Going around two or three strands distributes the load and keeps the tie from migrating. Finish with a snug bow, not a granny knot, so you can untie it easily for washing or storage.
If your cushion has no ties (adding them yourself)
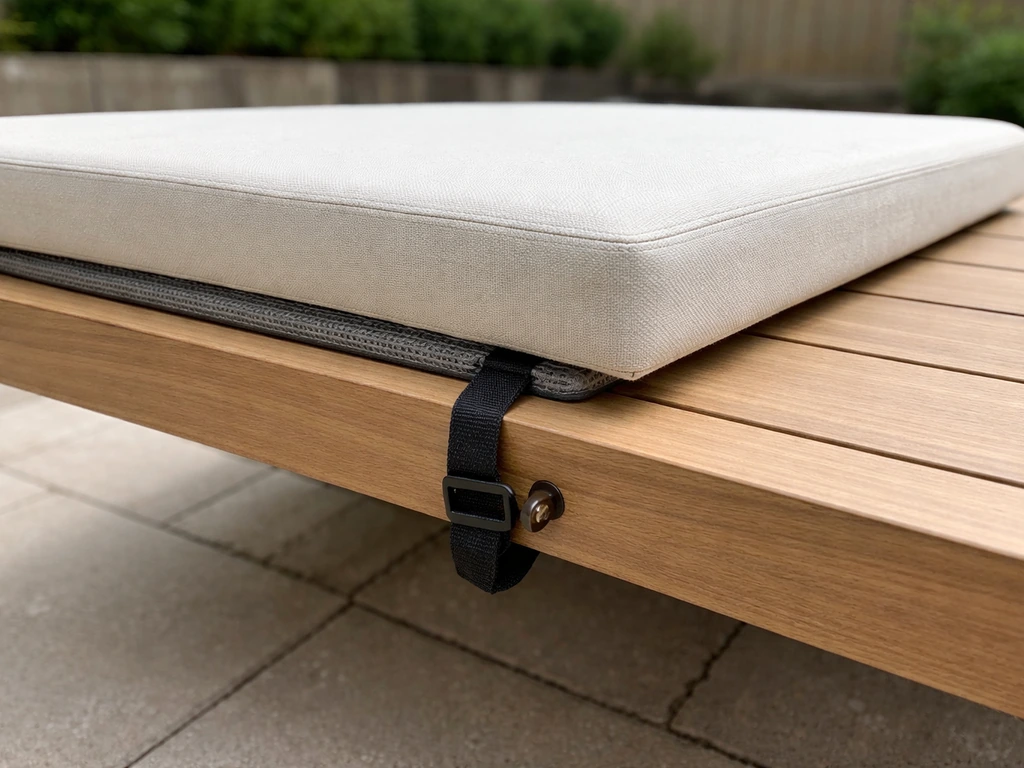
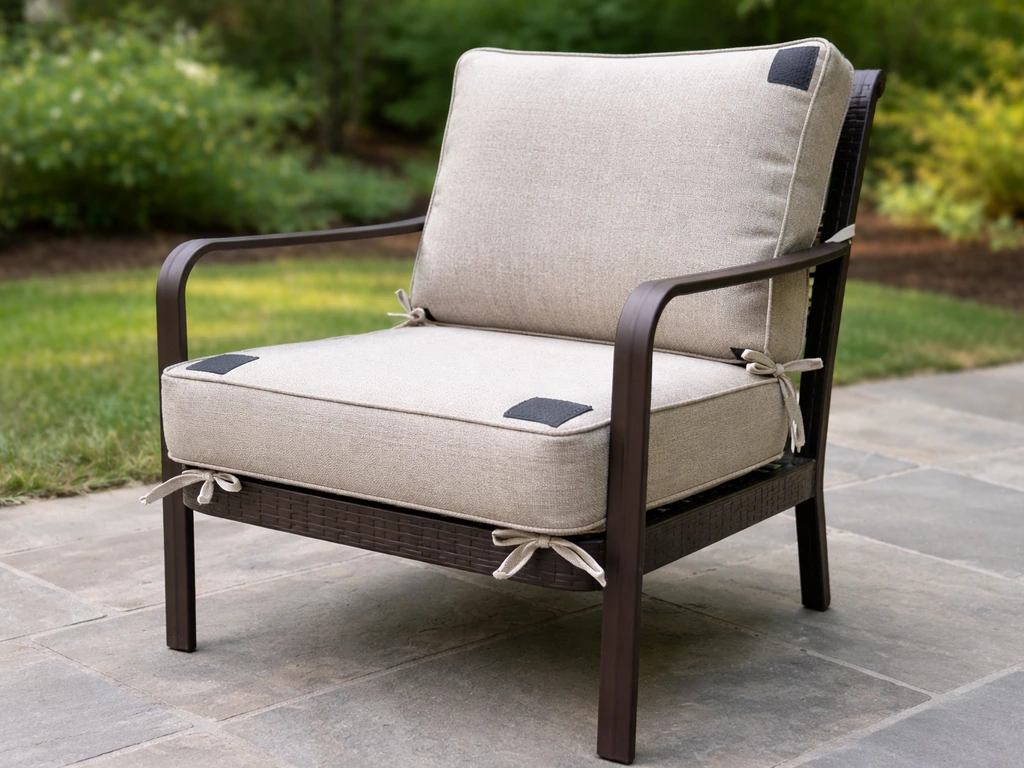
Cut two lengths of nylon webbing or ribbon, each about 18 to 24 inches long. Fold each piece in half to form a loop and sew or staple the folded end securely to the back edge or top corner of the cushion cover. Use a heavy-duty outdoor thread and sew a box stitch (a rectangle with an X through it) for maximum hold. If you have a sewing machine, do two passes. If you're hand-sewing, this will take about 20 minutes but it's worth doing properly. Position the loops so they'll reach the back rail of the chair without pulling the cushion out of alignment. For a seat cushion, attach the loops to the back edge so they tie around the rear frame bar. For a back cushion, attach them at the top corners or top center to tie over the top rail.
Snap buttons and clip systems are a more permanent version of this method. You sew the female snap onto the cushion and mount the male snap or a small screw-in button onto the wicker frame. This is what many manufactured wicker sets use from the factory, and it's what a Reddit user noted works well for seat cushions with an elastic loop hooking onto a frame button. The downside is that drilling or screwing into wicker risks splitting the reeds, so only do this on solid aluminum or resin wicker frames, not on natural wicker. Sew-On Hook and Loop Reclosable Fasteners — Engineered Materials Inc. notes that engineered Materials Inc. describes sew-on hook-and-loop fastening as requiring a mating interlock between hook and loop surfaces; it also notes hook-and-loop is available with adhesive backing.
Method 2: Hook-and-loop (Velcro) systems
Velcro is the go-to for seat cushions on wicker furniture with flatter seat pans, and it works surprisingly well as long as you pick the right type and prep the surfaces properly. For the best results, choose the best velcro for patio cushions that matches your frame material and climate Velcro is the go-to. The mistake most people make is grabbing the cheapest adhesive-backed strip from a dollar store, sticking it on, and wondering why it peels off after two weeks in the sun. Outdoor-grade Velcro is a real product category and it matters here.
Adhesive-backed Velcro on the frame
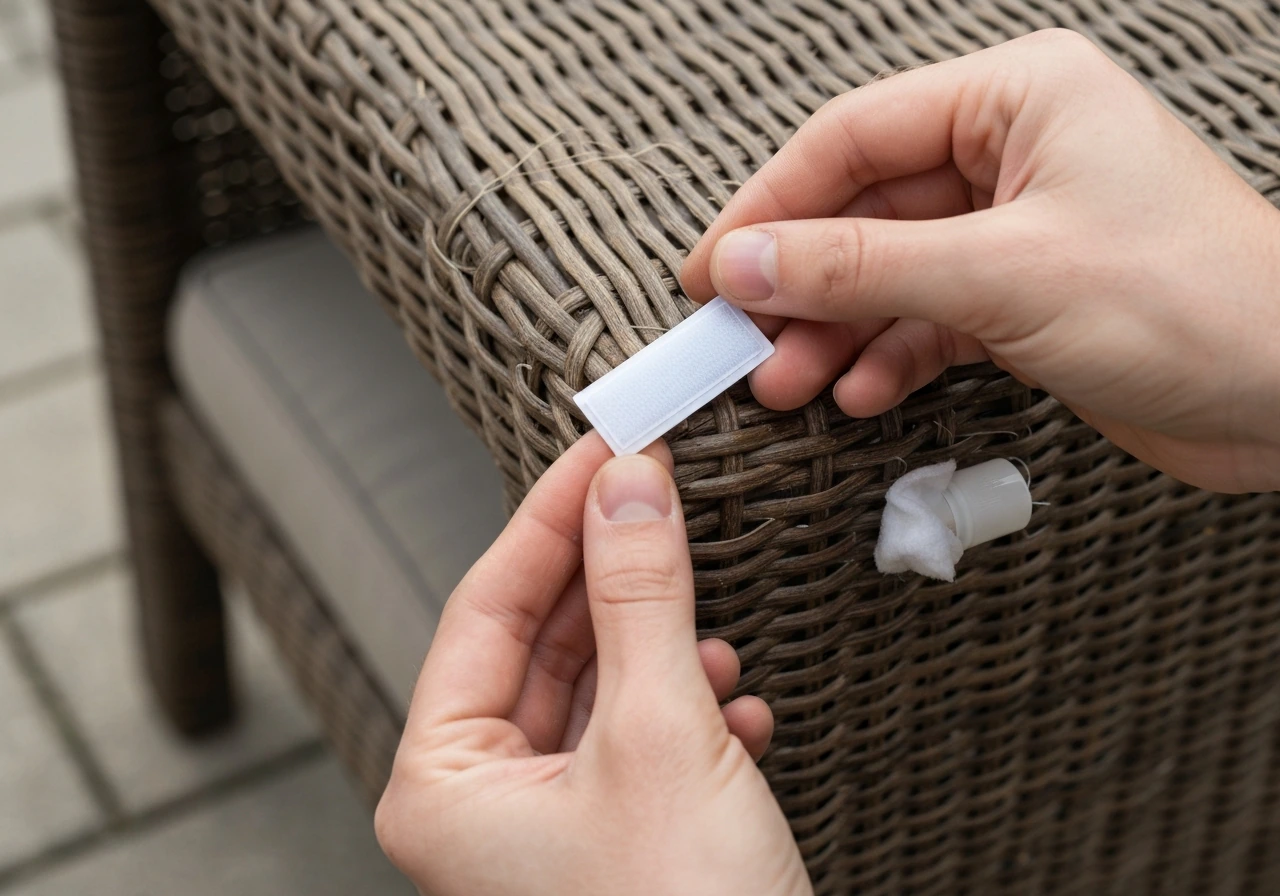
Clean the wicker rail or seat frame surface with isopropyl alcohol first and let it dry completely. Peel the backing off the hook side of your outdoor-grade acrylic-adhesive hook-and-loop tape and press it firmly onto the flat rail of the wicker frame where the cushion bottom will sit. Hold it down with firm pressure for at least 30 seconds per strip, and don't put the cushion on it for at least 8 hours (rubber-based adhesives need that curing time to achieve full bond strength). If your wicker frame is rounded or has a rough texture, the adhesive may not bond well at all, which is a real limitation with this method. In that case, use sew-on Velcro on the frame side, attaching it with zip ties or nylon cord through the weave instead.
Sew-on Velcro on the cushion
For the cushion side, sew-on hook-and-loop is far more durable than adhesive-backed. It comes in 3/4", 1", and 2" widths and gets stitched directly to the cushion fabric. Use the loop side (the soft side) on the cushion and the hook side on the frame, since the hook side on fabric can snag clothing. Sew a 3 to 4 inch strip at each corner of the cushion bottom for a seat cushion, and at the top two corners for a back cushion. That four-point attachment stops both sliding and rotation. If you only put Velcro at the center, the cushion can still pivot like a propeller.
One fair warning about adhesive Velcro on plastic or synthetic wicker: a Reddit thread on this exact problem confirmed what I've seen myself, which is that adhesive Velcro often won't bond properly to textured synthetic resin wicker. If you try it and it peels within a week, don't keep fighting it. Switch to sew-on loop strips on the cushion paired with ties or clips anchored to the frame instead. Combining methods is almost always more reliable than doubling down on one.
Method 3: Elastic bands, anchor straps, clips, and corner restraints
This category covers the hardware you can find at outdoor living stores and marine supply shops, and it's particularly good for people who want a tool-free setup they can take on and off easily, or for sectional sofas where there are lots of cushion pieces to keep aligned.
Elastic anchor straps and S-hooks
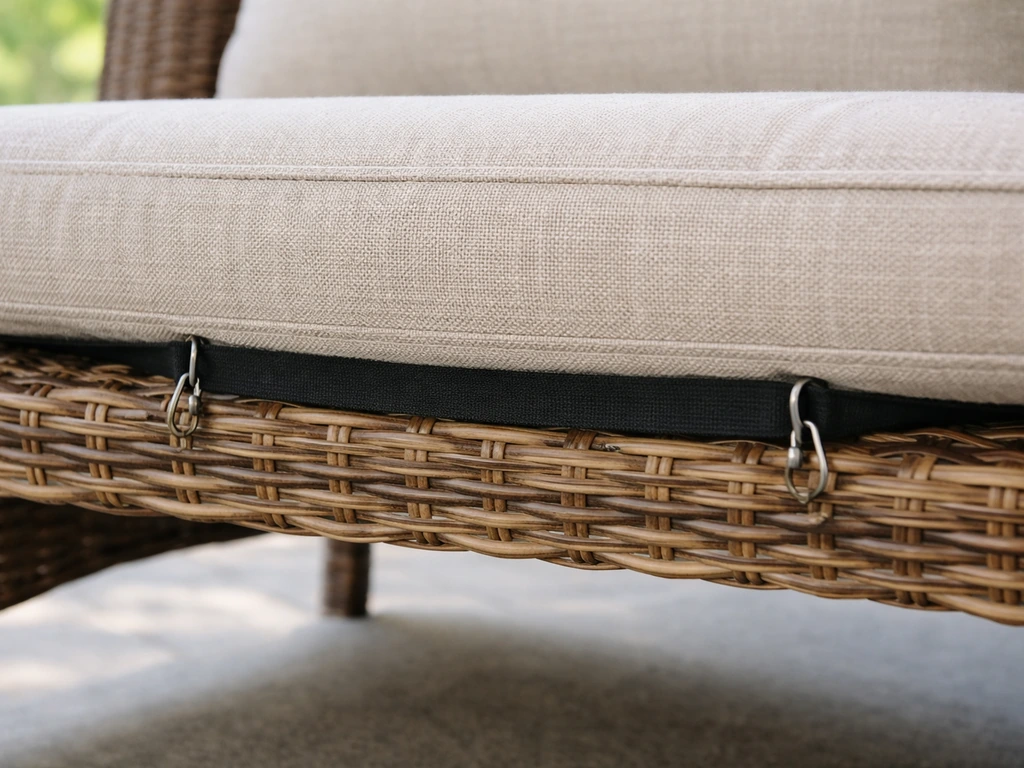
An elastic anchor strap runs underneath the cushion and hooks onto the wicker frame on both sides. The cushion sits on top, and the strap holds it down from below without any attachment to the cushion fabric itself. This is great for loop-free cushions you don't want to modify. Route the strap through the wicker weave or around a frame bar, attach an S-hook or plastic clip to each end, and hook the clips to a firm point on the frame. The tension in the elastic does the work. For back cushions, loop elastic around both the top and bottom rails for a two-point hold.
Plastic anchor chucks and toggle clips
A plastic anchor chuck is a flat or T-shaped plastic piece attached to the end of a strap or elastic band. You push it through an opening in the wicker weave, rotate it 90 degrees, and it can no longer be pulled back through the opening. This is a genuinely non-damaging anchor for open-weave wicker because there's no drilling or gluing involved. Think of it like a hollow wall anchor but for wicker. Once the chuck is seated, you tension the strap over the cushion or through the cover's built-in channel and clip the other end. Some seat cover and cushion cover kits include these, but you can also buy them separately from auto upholstery suppliers.
Grip pads as a base layer
Don't underestimate a simple rubberized grip pad cut to size and placed under the cushion. A piece of silicone shelf liner or a rubberized anti-fatigue mat offcut can add significant friction and reduce sliding by 80 percent on its own for light use. It won't stop a cushion from flying off in wind, but combined with one of the other methods, it makes a meaningful difference and costs almost nothing. Cut it about an inch smaller than the cushion footprint on all sides so it doesn't show.
Step-by-step installation with measurements
Here is the full workflow I'd recommend for a typical wicker chair with a seat cushion and a back cushion. Adjust for sofas or sectionals by repeating for each seat section.
- Set the cushion in its intended position without any attachment hardware. Sit in the chair or press down with your hand to simulate use. Note where the cushion naturally wants to drift: forward, sideways, or downward. This tells you where you need your anchor points.
- Measure the cushion. For a seat cushion, measure the width and depth. For a back cushion, measure the height and width. Write these down.
- Measure the frame contact points. On the seat, identify the rear frame bar and the two side frame bars. On the back, identify the top rail and any mid-rail. These are your anchor points.
- Mark your Velcro or tie positions on the cushion bottom using a fabric marker. For a seat cushion, mark four points: both rear corners and both front corners. For a back cushion, mark the top two corners and optionally the bottom center.
- For sew-on Velcro: cut 3-inch strips of loop-side tape for each marked position. Sew each strip onto the cushion fabric with a box stitch. For adhesive-backed tape on the frame: clean the frame surface with isopropyl alcohol, let it dry, apply the hook-side strips to the exact corresponding positions on the frame, and press firmly. Wait 8 hours before first use.
- For tie-on straps: cut nylon webbing to length. A good starting measurement is the distance around the frame bar you're tying to, plus 12 inches for the bow. Sew the loop end to the cushion corner. Route the free end around the wicker rail threading through at least two or three weave strands, then tie a bow. The tie should be snug but not so tight it deforms the cushion corner.
- For elastic anchor straps: route the strap under the seated cushion, hook the S-clips to the frame bars on each side, and adjust the elastic tension so the cushion sits flat without bunching. The strap should be taut but not stretched more than about 10 percent of its resting length, or it'll fatigue quickly.
- Place the grip pad under the seat cushion as a base layer before sitting the cushion on top.
- Do a tug test: grab the front edge of the seat cushion and pull forward firmly. It should resist. For the back cushion, pull the top forward. It should resist. If it slides, check that your attachment points are at the corners, not just the center.
- Sit in the chair naturally a few times, stand up, and check alignment. Adjust tie lengths or Velcro positions as needed while the adhesive is still fresh (within the first 24 hours).
The most common measurement mistake is cutting ties too short and then over-tightening them to compensate, which pulls the cushion out of square. Always start 2 to 3 inches longer than you think you need. You can always trim or tie off extra length, but you cannot add it back.
Comparing the main methods side by side
| Method | Best for | Difficulty | Durability outdoors | Risk to wicker | Cost |
|---|---|---|---|---|---|
| Tie-on nylon straps | Back cushions, chairs with rails | Easy | High (with polyester/nylon) | Very low | $3–$8 |
| Sew-on Velcro | Seat cushions, flat surfaces | Medium (needs sewing) | High | None | $10–$20 |
| Adhesive-backed Velcro | Smooth frame rails only | Easy | Medium (can peel) | Low if removed carefully | $8–$15 |
| Elastic anchor straps | Any cushion type, no-sew | Easy | Medium (elastic degrades over time) | Very low | $8–$12 |
| Plastic anchor chucks | Open-weave wicker, no-drill | Easy-Medium | High | None | $6–$14 |
| Grip pads only | Light indoor/calm-weather use | Very easy | Low (alone) | None | $5–$10 |
| Snap buttons/clips | Permanent setup, aluminum frames | Hard (needs drilling) | Very high | Medium (drilling risk) | $10–$20 |
My recommendation for most people: combine sew-on Velcro at the corners of the seat cushion, nylon tie straps at the top corners of the back cushion, and a grip pad under the seat cushion as a base layer. This three-part approach covers all the ways cushions move and costs under $25 total for a single chair.
Troubleshooting common problems
Cushion still sliding after attaching
If the cushion is still moving after you've attached it, check the attachment locations first. A single center anchor lets the cushion pivot around that point. You need corner attachments to stop rotation and lateral drift. Also check whether the tie or Velcro is actually making contact with the frame, or just with the air above a curved section of wicker. On rounded frames, ties that aren't pulled snug enough let the cushion float above the attachment point.
Velcro failing or peeling
Adhesive Velcro peels for three reasons: wrong adhesive type, dirty or wet surface at installation, or textured surface that doesn't allow full contact. For synthetic resin wicker with a pebbly surface, adhesive-backed tape almost never holds long-term. Switch to sew-on loop tape on the cushion side and use zip ties or thin nylon cord to lace the hook tape to the frame weave. Also check that you're using outdoor-rated tape, not indoor craft Velcro, which starts breaking down after a few weeks of UV exposure. How to Keep Outdoor Cushions from Sliding: Secure Patio Seating notes that vELOCO (HookandLoop.com) recommends several cushion-securement approaches for outdoor seating—Velcro strips that attach to the cushion underside and the furniture frame, grip-tight cushion clips, and adjustable straps/elastic bands that anchor cushions from underneath.
Ties too long or going slack
Cotton ribbon stretches when wet and dries shorter, which means your ties will be tight after rain and loose during a dry stretch. Replace cotton with polyester or nylon, which maintain consistent length regardless of moisture. If nylon ties are going slack, the issue is usually that they're threaded through a single weave gap and have migrated down as the gap flexed. Re-route through multiple weave strands and retie. If the bow consistently unties itself, finish with a square knot over the bow for outdoor use.
Straps loosening or degrading in heat
Elastic has a lifespan outdoors. Most bungee and elastic anchor straps will start to lose tension after one to two full seasons of UV exposure, especially in hot climates. Check them at the start of each season by stretching and releasing them. If they don't snap back crisply, replace them. This is a $10 fix that takes ten minutes and is much less frustrating than discovering mid-summer that your cushions are sliding around.
Wicker getting scratched or damaged by hardware
Metal S-hooks and hard plastic clips can scratch or dent wicker reeds, especially natural wicker. Wrap any metal contact points with a small piece of foam weatherstripping tape or a rubber cap. For natural wicker specifically, avoid any hardware that cinches tightly around individual reeds. Use flat nylon webbing rather than cord, since cord cuts into reeds under tension, and always route loads across multiple strands of the weave rather than a single strand.
Alignment problems after re-attaching
If you've washed the cushions and reattached them and now they sit crooked, the Velcro positions have shifted or the ties are tied at different lengths. Before sewing or sticking anything down permanently, lay the cushion on the chair and mark the frame positions with a piece of masking tape first. Use a ruler to make sure the cushion is centered (equal distance from each side arm) before you commit. An asymmetrical setup is almost impossible to correct after the fact without removing and repositioning all the fasteners.
Keeping attachments in good shape season to season
At the end of the season before you store the cushions, inspect every tie, strap, and Velcro strip. Velcro loses grip when the hook side fills with lint, grass, and debris. Clean it with a stiff brush or a piece of duct tape pressed and peeled to lift debris from the hooks. Wash sew-on Velcro with the cushion covers in a gentle cycle, and let it air dry fully before storing. Compressed, damp Velcro stored in a bin over winter is a recipe for mold and permanent delamination.
Before storing ties and straps, untie them from the frame and coil them loosely. Storing cushions with ties still attached and compressed against the frame causes the tie fabric to mildew and the knots to tighten permanently. When you bring everything back out in spring, re-route the ties fresh and retie rather than trying to reuse old knots. Check all adhesive-backed strips and repress them firmly after winter storage, since thermal cycling (freeze-thaw over winter) can lift the edges of adhesive-backed tape even on surfaces that were bonded well initially.
If you're in a high-wind area and find that even well-secured cushions are moving, the problem shifts from attachment to wind resistance, which involves strategies like under-seat anchor clips and cross-strapping. Keeping cushions stored during weather events is honestly the most reliable long-term approach, but securing them for everyday use is absolutely solvable with the methods above. If you're still dealing with cushions shifting in storms, it helps to review how to tie down patio cushions for a stronger hold. If you’re dealing with wind, you can use anchor clips and cross-strapping as extra steps to help keep patio cushions in place how to get patio cushions to stay in place. For more ways to deal with wind specifically, use the strategies in our guide on how to keep patio cushions from sliding. For more ways to deal with wind specifically, the topic of how to secure patio cushions from wind goes deeper into that scenario. If you are dealing with heavy gusts, follow the steps for securing patio cushions from wind to keep everything in place how to secure patio cushions from wind.
FAQ
Can I use one Velcro strip in the center of the seat cushion and be done with it?
You’ll usually get sliding or pivoting because a single center point lets the cushion rotate. Use corner or multi-point attachment (for example, 4 corners for a seat cushion, 2 top corners for a back cushion) so lateral drift and turning both have resistance.
What’s the best way to keep ties from cutting into open-weave wicker?
Route tie straps through multiple strands (2 to 3) rather than a single gap. This spreads tension across more of the weave so the tie doesn’t concentrate force on one thin reed and eventually migrate or fray.
How do I attach cushions to wicker that has rounded arms where there’s almost no flat surface?
Rely less on adhesive Velcro on the curved area. A common approach is sew-on loop Velcro on the cushion plus tie straps that go around or through the back rail, and add an under-cushion rubberized grip pad for extra friction on the seat.
If my adhesive Velcro peels off after rain, what should I check first?
Check the installation surface condition and matching adhesive type. Clean with isopropyl alcohol and let it fully dry, then press each strip firmly for at least 30 seconds, and do not put the cushion on until the full curing time has passed. Also confirm you used outdoor-grade acrylic-adhesive Velcro, not indoor craft tape.
Can I drill or screw into natural wicker to add snap buttons or anchor points?
Avoid drilling or screw mounts on natural wicker because it can split reeds. If you need a hardware-style connection, consider non-drilling anchors like clip systems/chucks for open weave, or use straps that lace through the weave instead.
My cushion still slides even with ties. How can I diagnose whether it’s a placement or hardware-length issue?
First, confirm you tied it down with the cushion positioned before fastening. Then verify the tie length reaches the actual frame contact points without pulling the cushion out of square. If the tie is too short, you may end up over-tightening, which shifts alignment and creates a new slipping path.
How do I prevent Velcro hooks from catching on clothing?
Place the hook side on the frame and the loop side on the cushion fabric. Hook on fabric can snag and tear outdoor clothing or delicate upholstery, especially when people sit down quickly or move in and out frequently.
Is it worth adding an anti-slip grip pad if I already use ties or Velcro?
Yes as a low-cost “base layer,” especially on seat cushions. It usually won’t stop a cushion from flying off in strong gusts by itself, but it can significantly reduce everyday creeping and make the other fasteners work less aggressively.
How should I store cushions and attachments at the end of the season to avoid future failure?
Remove cushions from the frame before storage, untie straps, and avoid leaving cushions compressed with ties bound tightly. Store with hook and loop surfaces clean and dry, and after winter re-press adhesive strips firmly because freeze-thaw can lift edges even if they initially bonded well.
What should I do if my cushions come back crooked after reinstalling in spring?
Before making permanent changes, test placement and mark frame positions. Use masking tape and a ruler to center the cushion, then reapply or resew at the marked points. Misaligned corner attachments are hard to correct without removing fasteners.
How often do elastic anchor straps need replacement for outdoor use?
Check them at the start of each season. If they don’t snap back crisply after stretching and releasing, replace them. UV and heat usually reduce tension over 1 to 2 seasons, and weak anchors often look “fine” until cushions start creeping.
What’s the simplest upgrade for heavy wind where cushions still shift?
Add a wind-oriented secondary hold rather than increasing only one attachment. Typical upgrades include under-seat anchor clips plus cross-lacing or cross-strapping so the cushion can’t lift at one edge and pivot away.