To attach Velcro to patio cushions, you either sew it on (the most durable method for fabric covers) or press adhesive-backed strips onto a clean, dry surface and let them cure for 24 to 72 hours. For outdoor use, you need polyester-based or specifically rated outdoor Velcro, not the standard indoor stuff from the craft aisle. The hook side goes on the furniture frame or chair, and the loop side goes on the cushion. Get those two things right and your cushions will stop sliding, flipping, and blowing off even in a decent wind.
How Do You Attach Velcro to Patio Cushions DIY Guide

Maren Grady
19 Jun 2026
Pick the right outdoor Velcro type for patio cushions
This is where a lot of people go wrong first. Standard Velcro from a fabric or craft store is usually nylon-based. Nylon breaks down faster in UV light, weakens when wet, and can lose its grip after a single season outdoors. For patio cushions, you want polyester hook-and-loop or a product specifically rated for outdoor use.
VELCRO Brand Extreme Outdoor Strips and VELCRO Brand Extreme Lock Fasteners are both worth knowing about. They use weather- and UV-resistant adhesive, and the Extreme Lock version reaches maximum strength after 24 hours. One thing to note: the Extreme Lock requires a minimum application temperature of 50°F, so don't try to apply it on a cold morning. HALCO polyester woven hook-and-loop is another solid option if you're sewing rather than sticking, and it's specifically designed for prolonged outdoor and marine use.
No hook-and-loop is truly waterproof, but polyester holds up far better than nylon when it comes to UV exposure and moisture. If your cushions are out in full sun most of the day, polyester is the only choice that will last more than a season or two. The best velcro for patio cushions is typically polyester hook-and-loop because it resists UV and moisture longer than nylon polyester is the only choice.
| Velcro Type | Best For | UV Resistance | Water Resistance | Application Method |
|---|---|---|---|---|
| Standard nylon sew-on | Indoor projects only | Poor | Poor | Sew-on |
| Polyester sew-on (e.g., HALCO) | Outdoor fabric covers, marine | Good | Good | Sew-on |
| VELCRO Extreme Outdoor Strips | Smooth frame surfaces, quick fix | Good | Good (water-resistant) | Adhesive-backed |
| VELCRO Extreme Lock Fasteners | Heavy-duty outdoor hold | Good | Good (water-resistant) | Adhesive-backed |
| Industrial hook-and-loop tape (polyester) | High-stress cushion anchoring | Good | Good | Sew-on or adhesive |
Quick recommendation: if you're attaching Velcro to a fabric cushion cover that you can remove and sew, go with polyester sew-on. If you're sticking Velcro directly to a chair frame or hard surface, use VELCRO Extreme Outdoor Strips or Extreme Lock Fasteners. Don't mix and match without thinking it through.
Prep your cushion surface for maximum hold
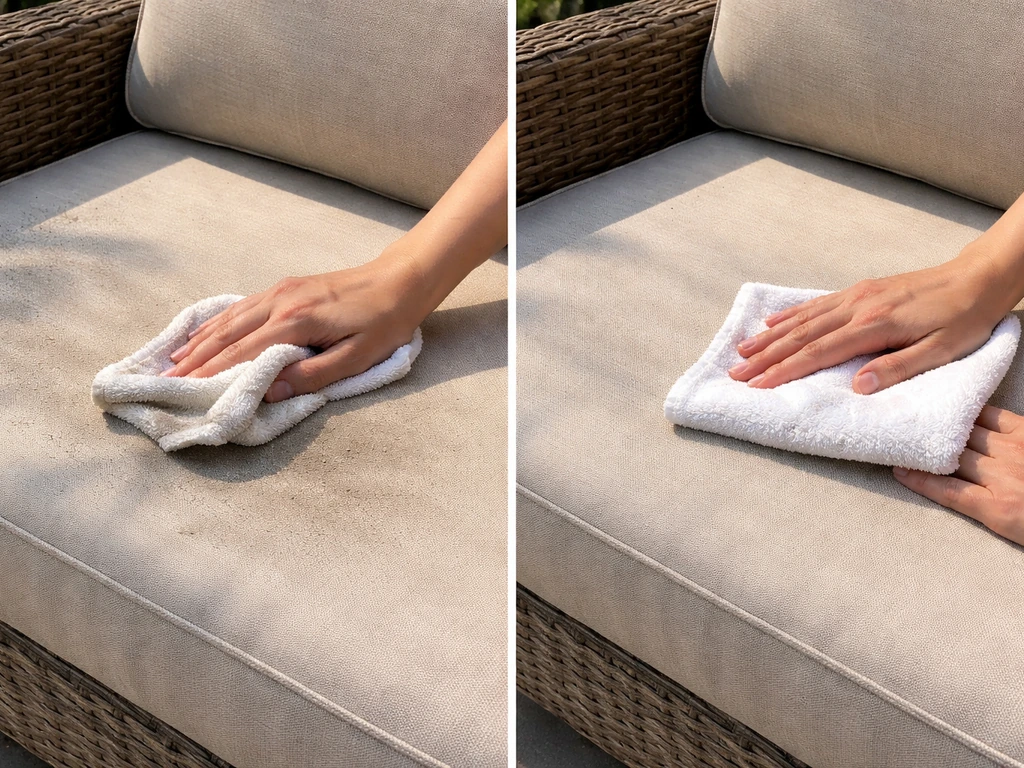
Skipping prep is the number one reason adhesive Velcro fails. I've done it myself, stuck strips straight onto a dusty cushion frame, and watched them peel off within a week. Proper prep takes about 20 minutes and it's the difference between a fix that lasts one season and one that lasts several.
Cleaning fabric cushion covers
For fabric covers, especially popular Sunbrella or acrylic outdoor fabrics, mix a mild soap like Dawn or Woolite with water and spray or sponge it onto the area where the Velcro will go. Scrub gently with a soft brush, then rinse thoroughly and let it air dry completely. Do not try to speed this up with a heat gun or hair dryer near the attachment zone; moisture trapped under adhesive Velcro will cause it to fail. If you see any mildew, use a diluted solution of 1 cup bleach plus 1/4 cup mild soap per gallon of water, rinse well, and again, air dry fully before you touch the Velcro.
Cleaning vinyl or coated surfaces
Vinyl cushions or wicker chair surfaces need a gentler approach. For wicker patio furniture, clean and dry the wicker well first, then apply outdoor-ready hook-and-loop so the cushions stay put how to attach cushions to wicker patio furniture. Use a mild, water-based cleaner and a soft cloth. Avoid anything solvent-based, because solvents can degrade the topcoat on vinyl and actually make adhesion worse, not better. Always test your cleaner on a hidden spot first. Once clean, wipe down with a dry cloth and let the surface breathe for at least an hour before applying Velcro.
Surface texture check
Adhesive Velcro bonds best to smooth, firm surfaces like metal chair frames, hard plastic, or sealed wood. On highly porous or rough surfaces, the adhesive contacts unevenly and the bond is weak from day one. On those surfaces, either roughen a smooth spot lightly with fine-grit sandpaper, or plan to sew rather than stick. Some surfaces, particularly silicone-coated fabrics or heavily treated materials, resist adhesive almost entirely. If you're dealing with a coated surface, sewing is the reliable path.
Method 1: Sew-on Velcro step-by-step
Sewing is the most durable attachment method for cushion covers, and it's more achievable than it sounds even for beginners. You don't need a fancy machine. A basic sewing machine with a heavy-duty needle will handle most outdoor fabrics just fine.
- Cut your polyester sew-on Velcro to length. Leave about a half-inch gap from each end of the seam to reduce stress concentration at the corners.
- Set your sewing machine up with a size 14/90 to 16/100 needle and polyester thread. Polyester thread is UV-resistant and holds up outdoors far better than cotton. A UV-bonded polyester thread like Sailrite's Tex 90 is excellent for this application.
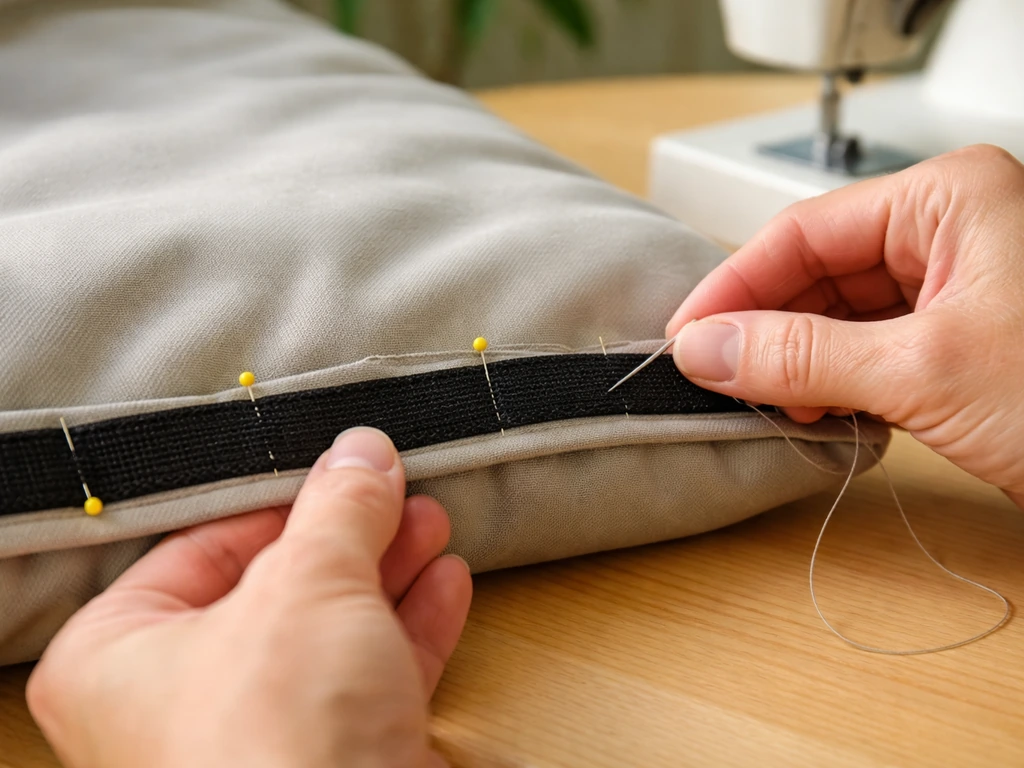
- Pin the loop side (the soft, fuzzy side) to the cushion cover where you want it. Typically this runs along the bottom edge or the opening flap of a removable cover.
- Sew around the perimeter of the Velcro strip using a box stitch, which means sewing all four sides and then an X through the middle. This distributes pull force across the whole patch rather than just the edges.
- Aim for 8 to 10 stitches per inch for a secure, even stitch. Too loose and the tape will work free over time.
- Finish the fabric edge with a zigzag stitch if the cushion cover fabric frays easily. This prevents the fabric from unraveling at the Velcro attachment point over time.
- Repeat for the hook side, placing it on the chair frame fabric, strap, or wherever the mating piece needs to land.
- Test the connection before fully assembling the cushion cover to confirm alignment.
One tip I'll pass along from experience: always separate the hook and loop before sewing. It's tempting to sew them as a pair to make sure they line up, but the hook side will snag everything it touches and is a nightmare to sew through as a double layer. Sew them separately and bring them together at the end.
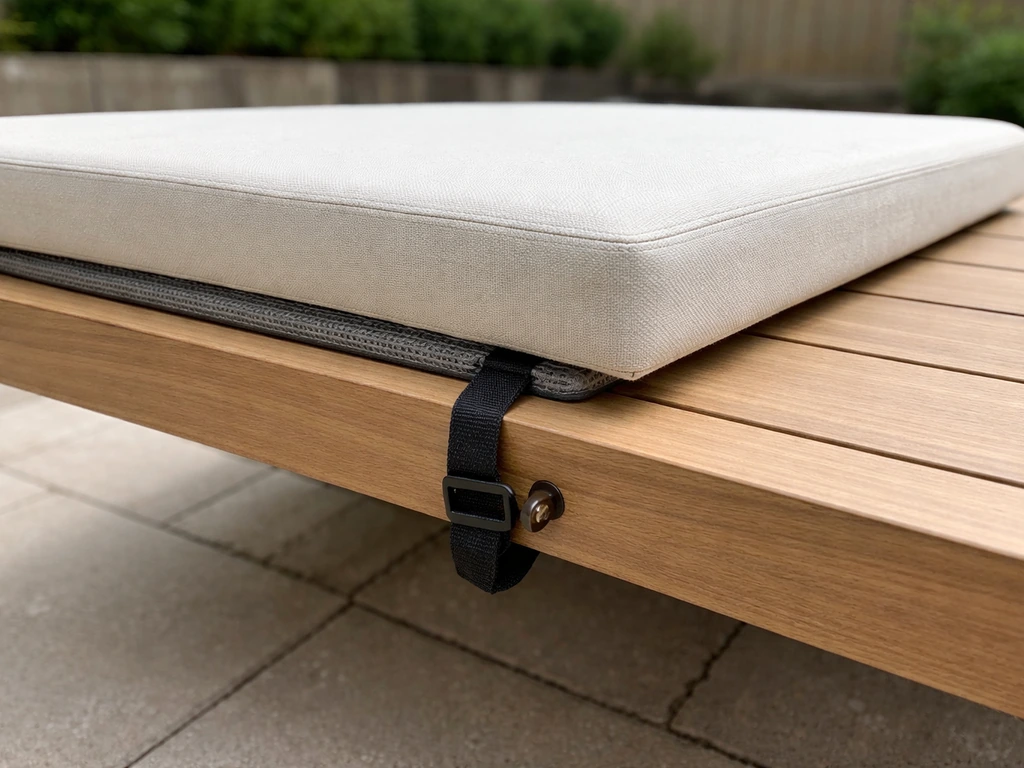
Method 2: Adhesive Velcro step-by-step (and when it works)
Adhesive-backed Velcro is the faster option and it genuinely works well in the right situations. The key situations where it works: bonding to smooth, firm, non-porous surfaces like a metal or aluminum chair frame, plastic furniture, or sealed wood. It is not a great solution for attaching Velcro directly to soft fabric cushions unless you're pairing it with stitching or a contact cement designed for the purpose.
- Clean the surface thoroughly as described in the prep section above. Any dust, grease, or moisture will compromise the bond.
- Make sure the temperature is at least 50°F before you start. Applying adhesive Velcro in cold conditions is a common failure cause. The recommended ideal range is 59 to 77°F.
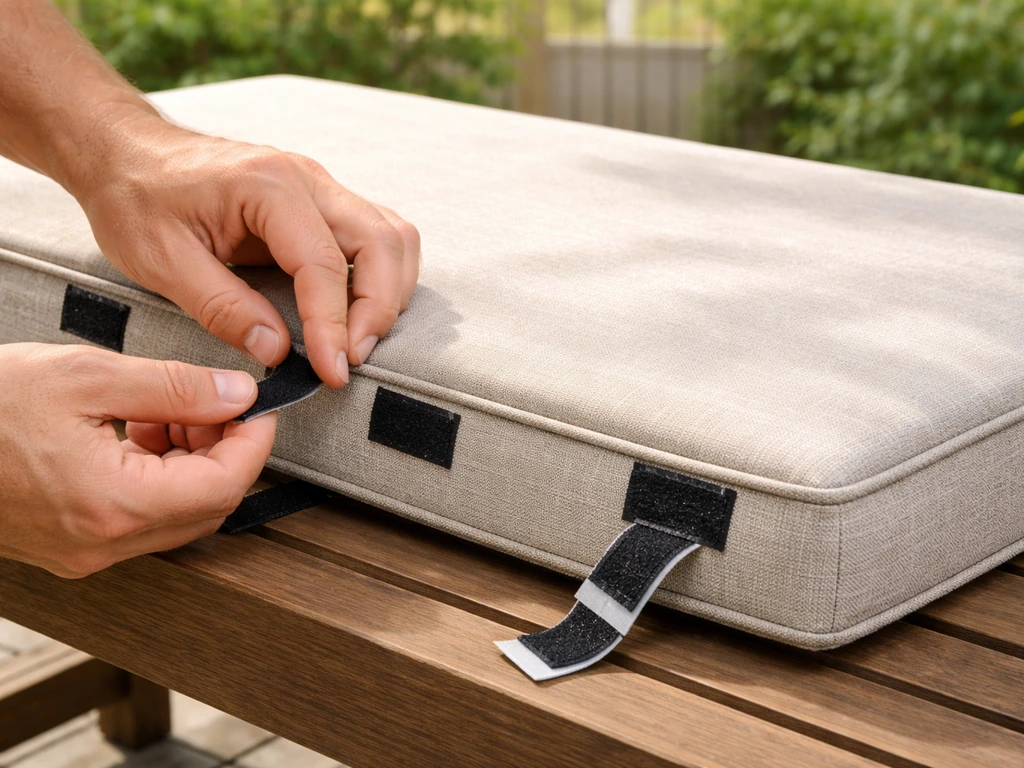
- Cut your strips to size before peeling the backing. Once the adhesive is exposed, work quickly and precisely.
- Peel the backing off the adhesive side and position the strip carefully. You generally don't get a second chance to reposition without losing adhesive strength.
- Press the strip firmly into place. Don't just lay it down. Apply firm, even pressure along the entire length for at least 30 seconds.
- For the matching piece, repeat on the corresponding surface (typically the cushion's bottom panel or a sewn-on fabric tab).
- Let the bond cure for a full 24 hours before using the cushion. Some adhesives, particularly in cooler or more humid conditions, need up to 72 hours for maximum strength. Putting load on the bond too early is one of the most common reasons adhesive Velcro fails.
When to avoid adhesive Velcro: skip it on soft or stretchy fabric surfaces, on any surface that will flex significantly when in use, on vinyl covers that haven't been tested for adhesive compatibility, and in any situation where you can't guarantee the cure time window. If you're not sure whether adhesive will work on your specific surface, test a small piece in an inconspicuous spot and check it after 48 hours before committing to the full application.
Placement strategy and alignment tips
Even the best Velcro will fail if it's in the wrong place or misaligned. Good placement means thinking about where the force actually comes from when the cushion moves, which is usually wind lifting the front edge or the cushion sliding forward when someone sits.
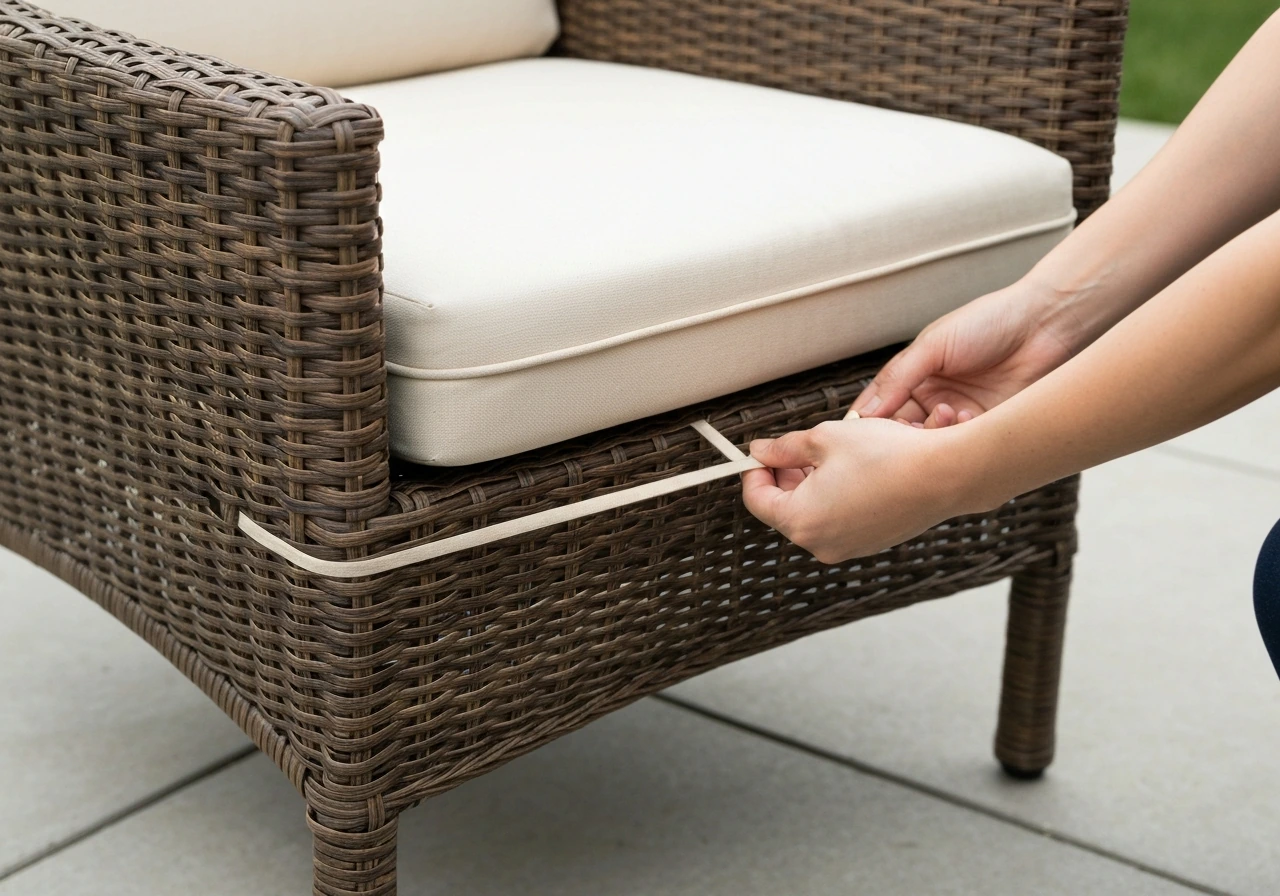
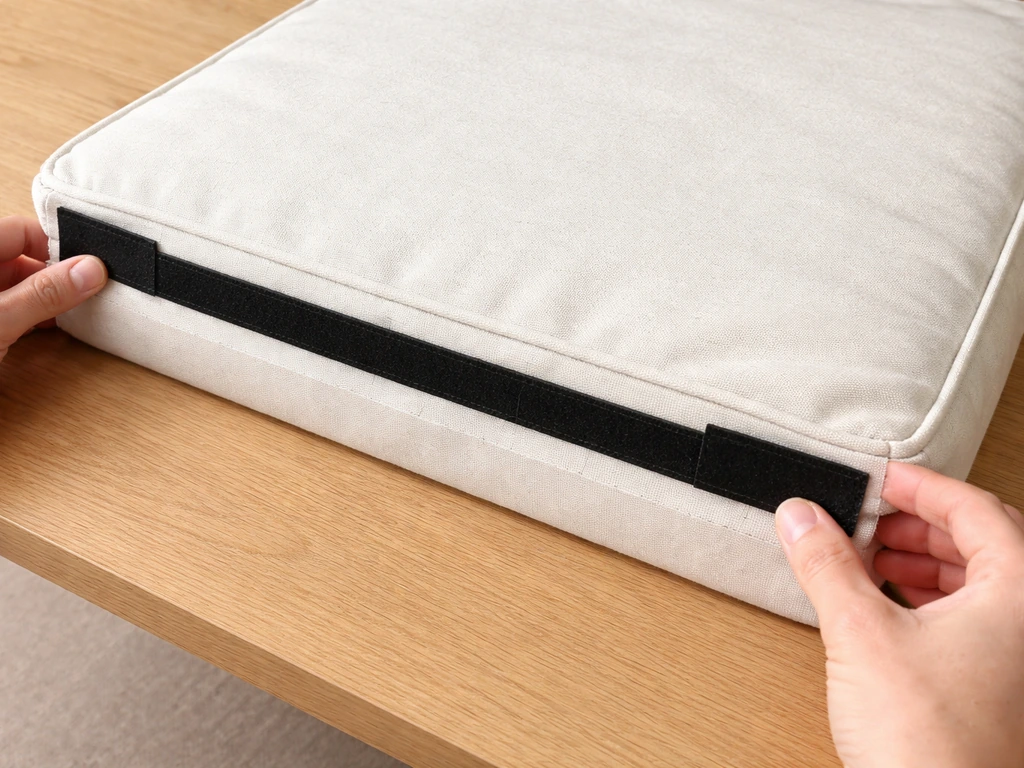
- Place Velcro at the back edge and both side edges of the cushion bottom, not just the center. Wind gets under the corners first, so that's where you want anchor points.
- For seat cushions, a strip along the full back edge plus two short side strips near the front corners gives you the best coverage without overcomplicating things.
- For back cushions, place horizontal strips near the top and bottom of the cushion. If the cushion is tall, add a middle strip too.
- Always attach the hook side (the scratchy, plastic side) to the chair frame or hard surface, and the loop side (soft and fuzzy) to the cushion cover that sits against it. This keeps the scratchy side away from skin and fabric it could snag.
- Before permanently attaching anything, do a dry run. Hold the Velcro in place, connect both sides, and test whether the cushion sits flat, looks right, and opens or removes easily.
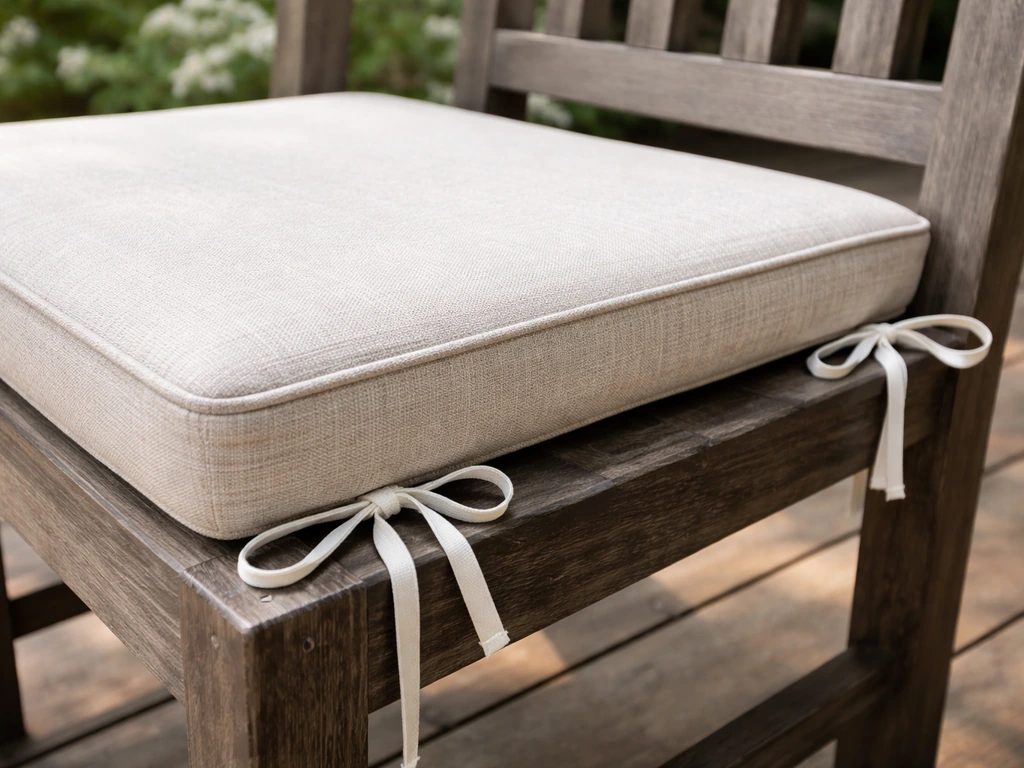
- For removable cushion covers, place Velcro at the opening flap or zipper alternative so the cover can be taken off for washing without the Velcro catching the fabric.
- If the cushion cover has seams, sew the Velcro slightly inside the seam line rather than right on top of it. Seam areas are already under stress; adding Velcro directly on the seam can cause puckering or tearing over time.
Alignment is easiest if you mark your positions with chalk or a fabric marker before you attach anything. When installing a cushion cover, follow the document reminder that the cushion cover should be oriented with the cover facing up before you align and fasten it cushion cover facing up. Stick the hook and loop sides together first, position the whole unit where you want it, then separate them and attach each side to its respective surface. To keep your cushions from shifting, make sure the Velcro attachment is aligned and fully bonded before use tie down patio cushions. This guarantees they match up perfectly when brought together.
Troubleshooting: peeling, lifting, and weak adhesion solutions
If your Velcro is peeling, lifting at the edges, or just not holding, there's usually a fixable reason. Here's how to diagnose and address the most common issues.
Adhesive strips are peeling at the edges
This almost always comes down to surface prep or cure time. If the surface wasn't completely clean and dry before application, the adhesive never got a proper grip. Remove the strip (VELCRO adhesive products can leave residue when peeled, so use a mild adhesive remover to clean up the area), clean the surface again thoroughly, let it dry fully, and reapply with a new strip. Press harder and longer this time, and don't stress the bond for at least 24 hours. If the surface is porous or rough, consider applying a thin layer of a compatible primer or sealer to create a smoother bonding surface before reapplying.
Velcro holds at first but loses grip after a few weeks
This is usually a material compatibility problem. Some outdoor fabrics, coated materials, and treated surfaces are simply not compatible with pressure-sensitive adhesives. The adhesive degrades where it can't properly bond to the substrate. The solution here is to switch to sew-on Velcro, or if sewing isn't an option, use a contact cement rated for your specific fabric type alongside the Velcro strip. On a silicone-coated or highly finished surface, adhesive alone rarely lasts regardless of brand.
Sewn Velcro is pulling away or the stitching is tearing
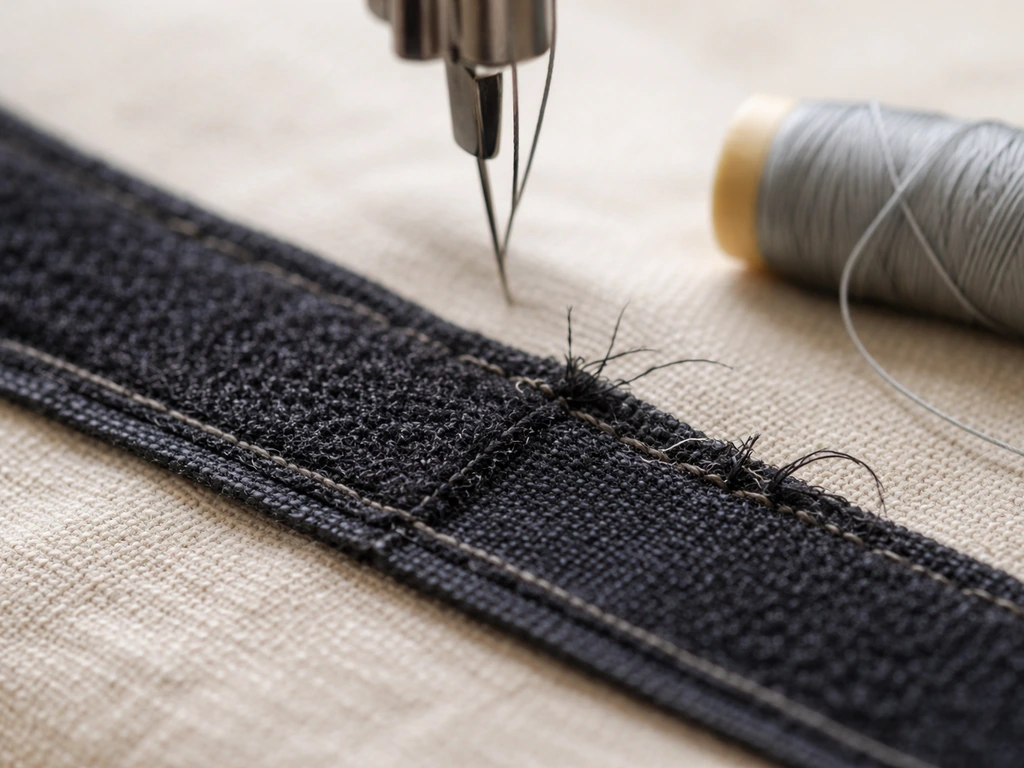
If the stitching itself is failing, the thread gauge was probably too light for the fabric, or the stitch density was too low. Re-sew with a size 16/100 needle and UV-bonded polyester thread at 8 to 10 stitches per inch, using a box stitch pattern with the X through the middle. If the fabric itself is tearing around the stitches, the Velcro strip is too small for the load. Use a wider strip to distribute the pull across more fabric, or reinforce the area with an iron-on interfacing patch on the back side of the fabric before re-sewing.
The hook and loop sides aren't gripping each other well anymore
Debris, pet hair, and compacted dirt are the usual culprits. Clean the hook side by running a stiff brush or even a fine-tooth comb through it to remove embedded fibers. The loop side can be rinsed with water and mild soap, then air dried. If the hooks themselves are bent or the loops are flattened from heavy use, the strip has reached the end of its life and needs to be replaced. This is normal after extended outdoor seasons.
Maintenance and seasonal care to make it last
A little routine maintenance goes a long way toward extending the life of your Velcro attachments through multiple seasons. To keep patio cushions from wind damage, make sure your Velcro is firmly secured and stays weatherproof year-round how to secure patio cushions from wind. This doesn't have to be complicated.
During the season, rinse the Velcro zones when you clean your cushions. Use the same mild soap and water approach recommended for Sunbrella and similar outdoor fabrics, a gentle scrub, a thorough rinse, and air dry. Avoid harsh chemical cleaners near adhesive-backed Velcro because they can break down the adhesive bond over time. Let connected Velcro surfaces air dry before closing them up, especially after rain, since trapped moisture slowly degrades both adhesive and fabric.
At the end of the season, before you store your cushions, inspect every Velcro strip. Press down on any edges that feel loose. If a strip is starting to peel, this is the time to replace it while you have time to let the new adhesive cure properly before the next season. Peeling a strip off for replacement can leave adhesive residue, so keep a mild adhesive remover on hand. Clean the surface after removal, let it fully dry, and apply fresh strips.
When you store cushions for winter, connect the hook and loop sides together. This keeps debris out of both sides and prevents the loops from getting crushed or pulled out of shape by other items in storage. Store cushions in a dry location if possible. Moisture sitting on the Velcro through a cold winter isn't catastrophic for polyester, but it's not ideal either.
One optional upgrade worth considering if you're doing any cushion cover restoration: add matching Velcro panels along the entire opening edge of a removable cover instead of just at the corners. This creates a fully secure closure that's still easy to remove for washing, and it looks intentional rather than like a quick fix. If keeping cushions in place in wind is your main goal, pairing Velcro with ties or non-slip pads underneath the cushion gives you a belt-and-suspenders solution that holds even in gusty conditions. If you want the best results for how to get patio cushions to stay in place, use wind-ready steps like ties or non-slip pads along with your Velcro keeping cushions in place in wind.
FAQ
Can I use indoor Velcro to hold patio cushions in place?
You can, but it is a common failure point. Indoor Velcro is often nylon and usually degrades faster under UV and moisture. For outdoor cushions, choose polyester-based hook-and-loop or a product explicitly rated for outdoor or marine exposure, especially if your cushions get full sun most of the day.
What’s the best way to attach Velcro if my cushion cover zips off and I want it removable?
Sew-on Velcro is the safest approach for removable covers. If you prefer adhesive, consider sewing a small backing onto the cover first (or use a purpose-rated contact cement), because pressure-sensitive adhesive on soft, washable fabric often won’t survive repeated removal and wash cycles.
How do I handle Velcro on a textured surface like rough wood or some plastic finishes?
Adhesive performs poorly when it cannot contact evenly. Either roughen a small bonding area lightly with fine-grit sandpaper and clean thoroughly, or plan to sew the Velcro. If the surface is heavily treated or coated, test adhesion first or switch to sewing, since some coatings resist pressure-sensitive bonds almost entirely.
How long should I wait before using the cushions after applying adhesive Velcro?
Even if it feels secure, give it time to fully cure. Follow the product guidance, and as a practical rule, avoid loading or tugging on the bond for at least 24 hours. For maximum strength on some outdoor strips, cure can take up to 72 hours and the best results require the stated minimum application temperature.
What should I do if my adhesive Velcro peels after a week?
Treat it as a prep or compatibility issue in most cases. Peel off the strip carefully, remove any leftover adhesive residue with a mild adhesive remover, clean the surface again, let it dry completely, then reapply using a new strip. Press firmly longer during application, and if the surface is porous, consider using a compatible primer or sealing step before trying again.
Can I speed up adhesive curing with heat or a hair dryer?
Avoid it near the attachment zone. Heat can trap moisture or warp fabric and does not replace proper cure time. Let the surface air dry fully, and do not apply if the material is damp, recently cleaned, or still has humidity trapped under the adhesive area.
How do I clean the hook and loop so the Velcro keeps grabbing?
Debris on the hook side is a common reason Velcro loses grip. Brush the hooks with a stiff brush or fine-tooth comb to remove embedded fibers. For the loop side, rinse with mild soap and water, then air dry completely before reusing, since trapped moisture can reduce performance.
Should I sew the hook and loop together, or separately?
Sew them separately. Sewing them as a joined pair can cause the hook side to snag, and it becomes harder to stitch through. Separately align each side to its attachment point, then connect them when everything is mounted.
How can I prevent the Velcro from being placed in the wrong spot?
Mark alignment points before you attach anything. Position the hook and loop together first, mark around the placement area, then separate them and attach each side to its correct surface. This reduces the risk of the cushion “almost” catching, which can still lead to slipping under wind or when someone sits.
Is Velcro strong enough by itself for heavy wind, or should I use additional tie-downs?
Velcro helps, but wind loads can exceed what adhesive or small corner placement can reliably handle. For gusty conditions, use belt-and-suspenders steps like ties or non-slip pads underneath the cushion. Place Velcro where the force is likely to act, usually the leading edge from wind lift or sliding.
Will Velcro hold on vinyl cushions or vinyl covers?
It depends on adhesive compatibility. Vinyl and certain sealed or coated materials may degrade or resist pressure-sensitive bonding, so test a small hidden area first and evaluate after 48 hours. If adhesion is uncertain or the vinyl surface is solvent-sensitive, sewing is usually more reliable.
How do I extend the life of outdoor Velcro across seasons?
Do a quick seasonal inspection. Press down any lifting edges, rinse Velcro zones using the same mild soap and water method you use on the fabric, and air dry before closing or storing. Replace early if edges start peeling, since replacement is easier when you have time to clean residue and allow fresh adhesive to cure.