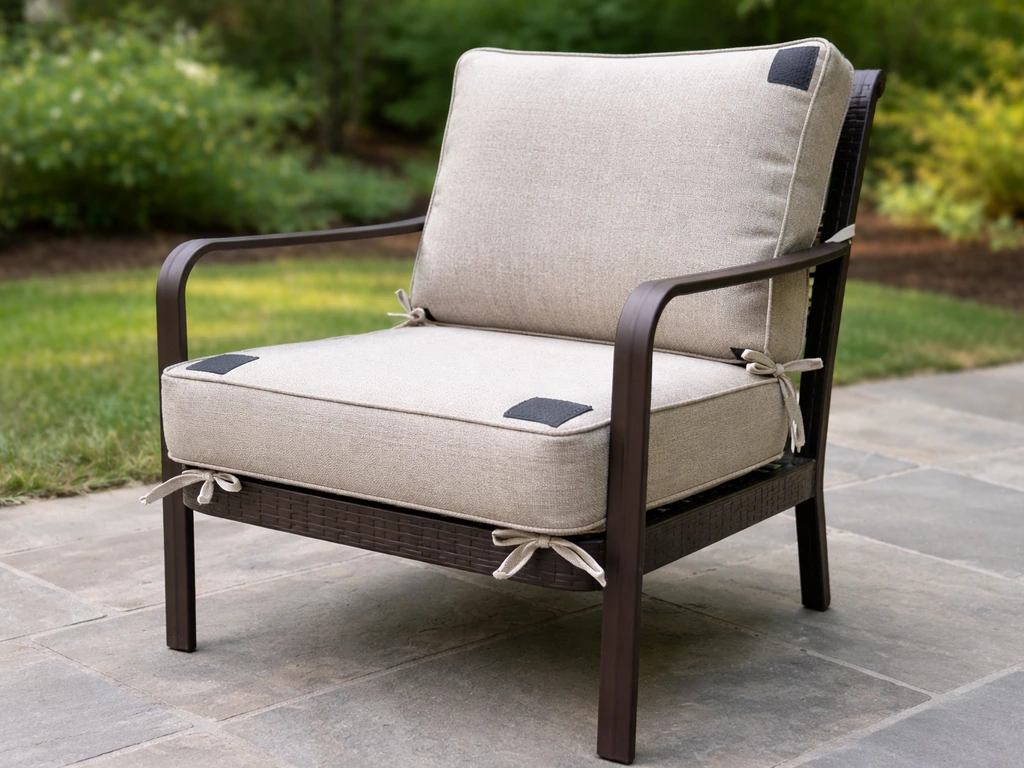
The fastest fix for sliding patio cushions is a sheet of rubberized shelf liner cut to fit the seat and placed between the cushion and the furniture frame. That alone solves the problem for most people in about five minutes and costs under $10. But if your cushions are sliding off entirely, shifting badly in the wind, or slipping on a slick painted metal or plastic frame, you need something more permanent, like hook-and-loop strips, sewn tie-downs, or a combination of both. This guide walks through every scenario so you can pick the right fix for your specific chair, sofa, or lounger today.
How to Keep Patio Cushions From Sliding: DIY Fixes

Maren Grady
3 May 2026
Quick diagnosis: why your patio cushions keep sliding
Before you buy anything, figure out why the cushion is moving. The cause determines the fix, and buying the wrong product is just wasted money. Most sliding problems come down to one of four things.
- Slick furniture surface: Powder-coated metal, painted wood, and glossy plastic frames give cushions almost nothing to grip. Even heavy cushions will creep forward over time on these surfaces.
- Wrong cushion size: A cushion that's even an inch too small for the seat slides around constantly because there's no edge contact to anchor it.
- Worn or missing ties: Many cushions ship with fabric ties that fray, stretch out, or snap after a season or two. Once those go, there's nothing holding the cushion to the frame.
- Smooth cushion bottom: Some cushion covers, especially vinyl, olefin, and solution-dyed acrylic fabrics with a tight weave, are slippery on the underside. Pair that with a smooth frame and you've got a sliding problem baked in.
There's also a moisture factor. Rain and morning dew make every surface slicker, which is why cushions that stay put on a dry day slide around after a night of rain. And if your furniture is under trees, debris like leaves and pollen act like ball bearings under the cushion. Once you know which of these you're dealing with, the solution gets much more obvious.
Non-slip quick fixes you can buy today
These are the solutions you can grab at a hardware store, a big-box home improvement store, or even a dollar store and have working within the hour. None of them require sewing, drilling, or any special tools.
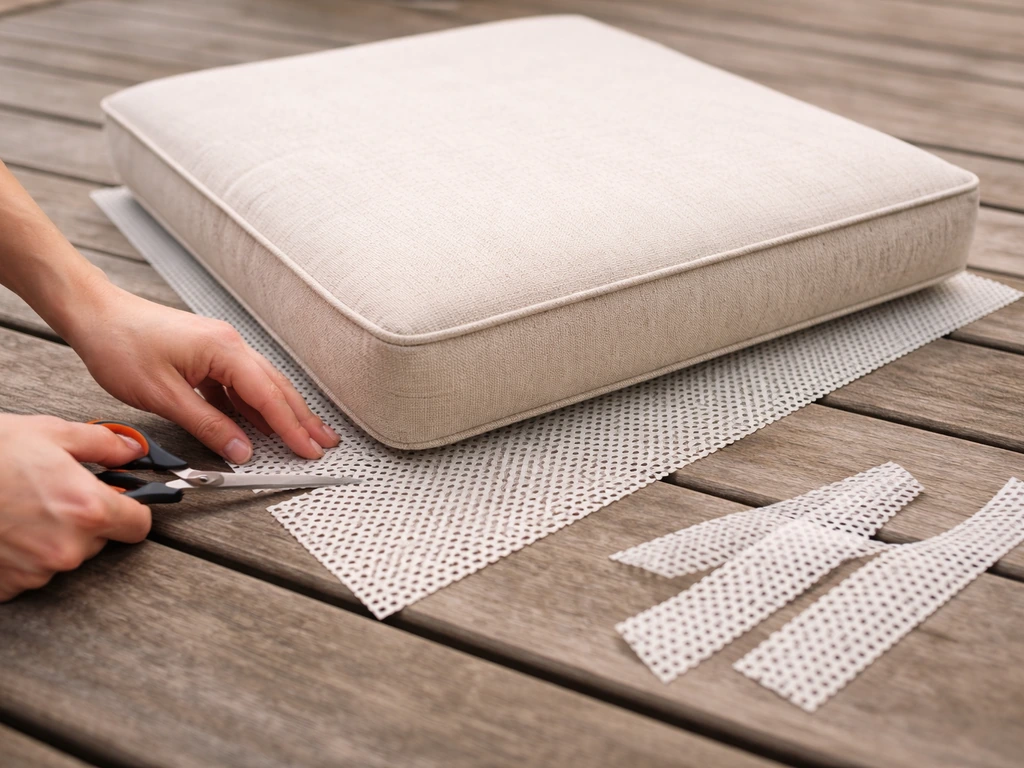
Rubberized shelf liner or anti-slip rug pad
This is the go-to starting point. Cut a piece of rubberized shelf liner or an outdoor rug pad (like the StayPut Outdoor pad, which uses a rubber-coated knitted polyester scrim designed to be weather resistant) to roughly match the seat dimensions and lay it between the cushion and the frame. The rubber texture grips both surfaces and friction does the rest. It costs $5 to $15 depending on how much you need. The dual-sided grip of products like Gorilla Grip's PVC rug liner works the same way and is easy to trim with scissors. Just cut it slightly smaller than the cushion footprint so it doesn't stick out past the edges where it can catch wind or water.
Anti-slip tape
For furniture with slat-style frames where a full sheet of liner would sag between the gaps, anti-slip tape is a better choice. Uline's anti-slip tape uses a rubber hot-melt adhesive and is rated for both indoor and outdoor use with grease and water resistance. You stick strips directly onto the frame slats, and the cushion bottom grips against the textured tape surface. Clear versions are nearly invisible once installed. This works especially well on teak and eucalyptus slatted chairs where you don't want to see your solution.
Carpet installation tape and rug gripper pads
Double-sided carpet tape like ROBERTS Max Grip (acrylic adhesive, indoor/outdoor rated) can be applied to the seat surface and the cushion bottom to create a temporary bond that holds well but still allows you to remove the cushion for storage or cleaning. Keep in mind that rug-gripper performance depends heavily on matching the product to the right surface. For example, 3M says its Dual Lock product family uses blank" rel="noopener noreferrer">pressure-sensitive adhesives intended for indoor and outdoor use, with different options depending on the strength you need for your conditions. A gripper designed for smooth hardwood won't hold as well on a slick painted metal frame, so read the product specs before you buy.
Secure attachment methods: ties, straps, anchor points, and Velcro
If the quick fixes above aren't cutting it, or if your cushions are blowing off entirely in wind, you need actual attachment. These methods physically connect the cushion to the furniture rather than just increasing friction.
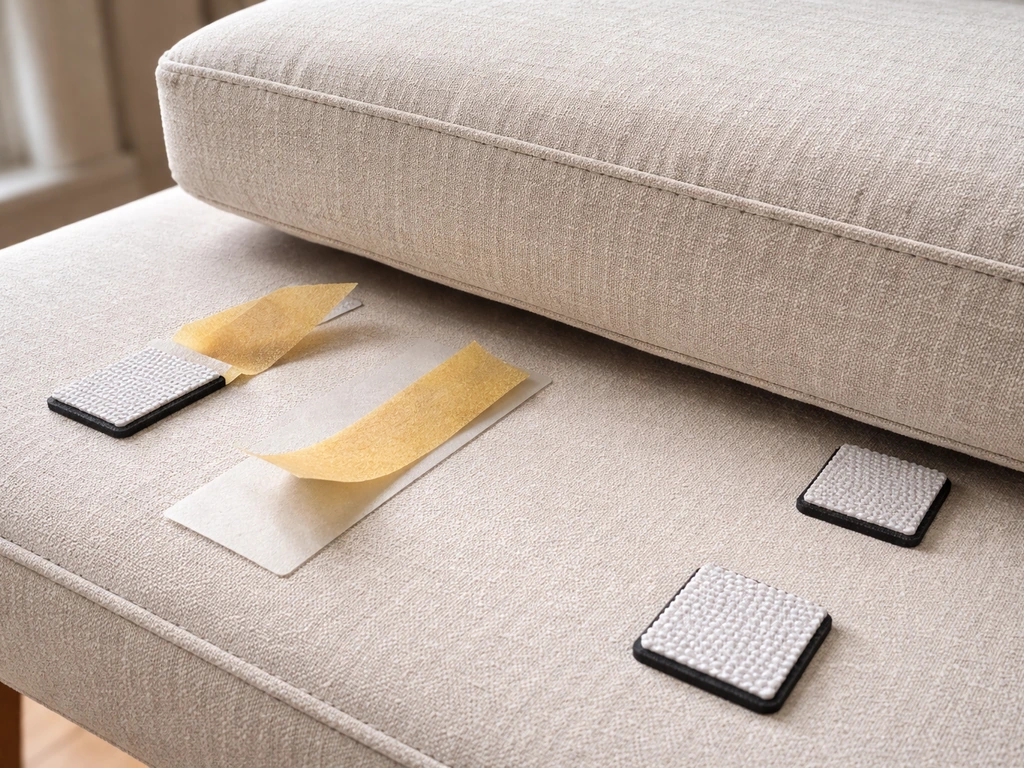
Hook-and-loop (Velcro-style) strips
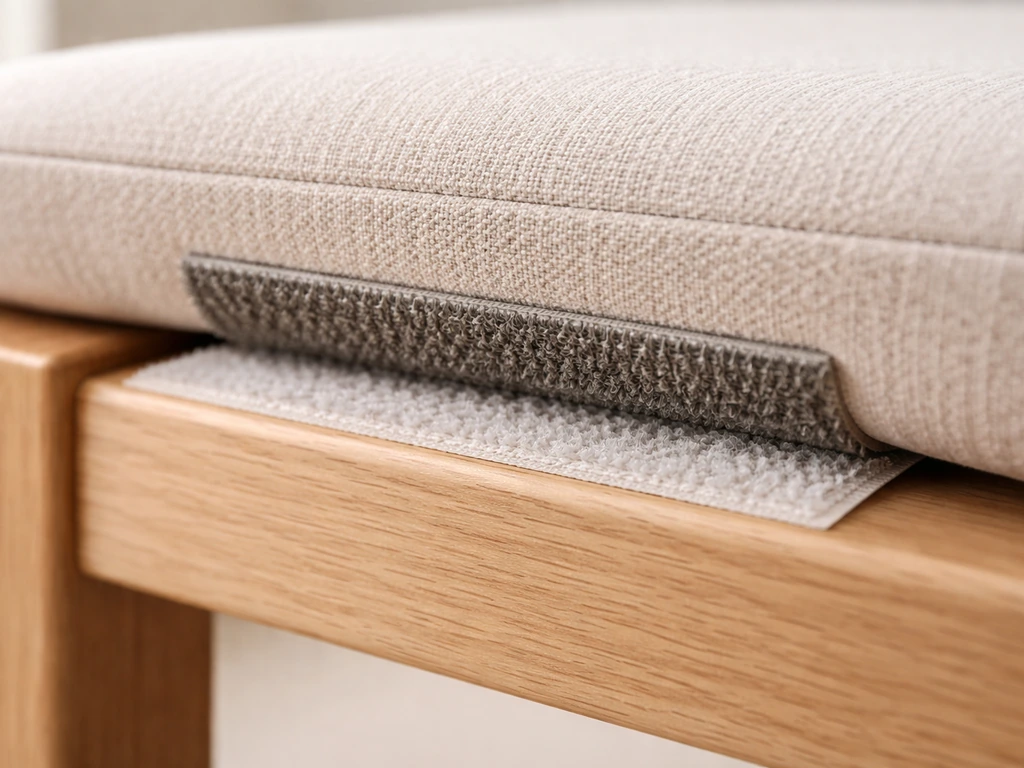
Hook-and-loop is probably the most popular permanent fix. You attach one strip to the underside of the cushion and the matching strip to the furniture frame, and the two lock together when the cushion is placed. For outdoor use, you want a product that's specifically rated for the elements. VELCRO Brand Extreme Lock fasteners are water and UV resistant with an operating range of -40 to 194 degrees F, which covers any climate you're likely sitting outside in. The adhesive-backed version bonds to smooth surfaces like painted metal, plastic, and sealed wood.
Installation technique matters a lot here. Clean and completely dry both surfaces before applying. Press the adhesive strip down firmly for at least 30 seconds. If your strips have pointed corners, round them off with scissors. Pointed corners are the first place adhesive peels back, especially outdoors where heat, UV, and moisture cycle constantly. After applying, let the adhesive cure for 24 hours before stressing the bond. Placement matters too: position your strips close to where the tie or attachment point is on the chair, since that's where the leverage is.
Fabric ties and sewn loops
Most dining chair cushions come with fabric ties built in at the back corners. If yours are worn out or missing, you can replace them. Cut two strips of outdoor-rated ribbon or twill tape, each about 18 inches long, fold each in half, and hand-stitch or machine-stitch them securely to the back corners of the cushion cover. For the chair, the ties wrap around the back legs or spindles. Position the ties as close as possible to where they'll actually attach on the frame, because tie-downs that have to span a big gap don't hold nearly as well.
If your chair has no natural tie-off points at all, you can add them. Sew or glue small fabric loops onto the underside of the cushion at all four corners. Then use short bungee cords or elastic bands looped through those anchors and around the chair legs or frame rails to hold everything down. This approach works especially well for larger, deeper lounge cushions where standard ties aren't long enough to do the job.
Combining methods for the best hold
The most secure setup combines two approaches: a non-slip interface layer (shelf liner or anti-slip tape) to prevent horizontal shifting, plus ties or Velcro to prevent the cushion from lifting off. Many homeowners also look for the best velcro for patio cushions so the attachment stays secure through sun, rain, and wind. Using just one method handles one type of movement. Cushions on windy patios especially benefit from this layered approach since wind lifts from below while sitting weight pushes forward.
Surface and cushion prep for better grip outdoors
Here's where a lot of people waste money: they apply a non-slip product to a dirty, greasy, or damp surface and wonder why it peels off or fails to grip within a week. Prep is the unsexy part of this job, but skipping it means redoing everything.
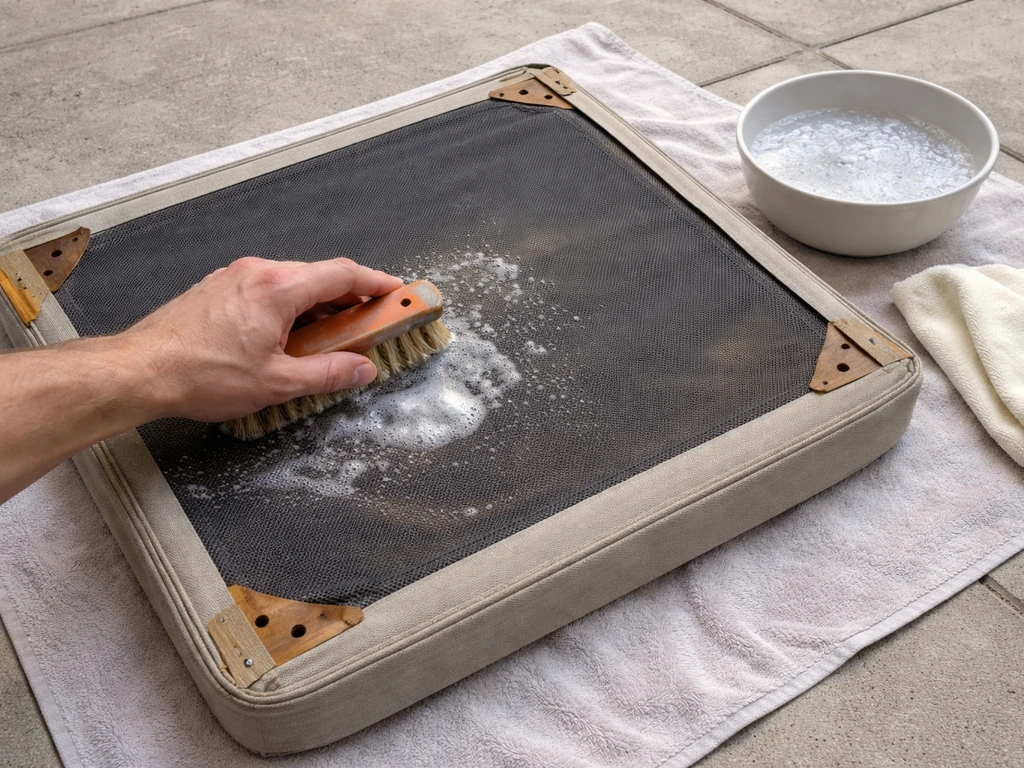
Cleaning the furniture surface
Before applying any adhesive-backed product, wash the furniture surface with a cleaner like Moldex Non-Bleach Outdoor Wash or Simple Green OxySolve Total Outdoor Cleaner. Both use oxygen-foaming action to cut through mildew, algae, and mold, which are the main culprits behind slick outdoor surfaces. The key rule with both products: don't let them dry on the surface. Rinse thoroughly before they set, then let the surface air dry completely. Applying anti-slip tape or Velcro over residue is asking for failure.
Cleaning the cushion bottom
The underside of the cushion cover needs the same treatment. Spot clean with a soft brush using about 1/4 cup of mild soap per gallon of warm water, scrub gently, then rinse with warm water and let the cover air dry completely before reinstalling. On vinyl or olefin-bottom cushions, check for any residue from previous anti-slip products or mildew that could prevent a new non-slip layer from bonding. If you're attaching hook-and-loop to the cushion, sew-on versions anchor better to fabric covers than adhesive-backed strips, which can pull away from fabric over time.
Surface-to-fix matching
| Furniture Surface | Best Non-Slip Interface | Best Attachment Method |
|---|---|---|
| Powder-coated metal | Anti-slip tape on frame | Velcro Extreme Outdoor strips + ties |
| Painted wood slats | Rubberized shelf liner | Fabric ties + shelf liner combo |
| Wicker or resin weave | Cut rug liner beneath cushion | Ties looped through weave openings |
| Teak or hardwood slats | Anti-slip tape on slats | Velcro strips or fabric ties |
| Plastic/resin frame | Rug liner or PVC gripper pad | Velcro Extreme Outdoor (clean surface first) |
Make-the-fit adjustments: size, inserts, and replacing worn hardware
Sometimes the reason a cushion slides has nothing to do with grip products and everything to do with fit. A cushion that's too small for its seat will always migrate, no matter how many non-slip layers you stack underneath it.
Checking and correcting cushion size
Measure your seat opening carefully: width at the widest point, depth from front edge to back rail, and the height of the back if you have a back cushion. A well-fitting cushion should be snug against the back rail with minimal gap at the sides. If your current cushion is more than an inch short in any dimension, it's worth either replacing it with a correctly sized one or cutting a piece of foam insert to make up the difference. Foam insert strips tucked inside the cover at the back or sides can fill gaps and stop forward migration.
Replacing worn ties and fasteners
Fabric ties stretch, fray, and weaken after a season or two of UV exposure and repeated wet-dry cycles. If your ties are thin, frayed, or have lost their elasticity, replace them before adding any other fix. Outdoor-rated polypropylene ribbon (look for it in boating supply sections) is tougher than the cotton twill that most cushions come with and holds up much better in sun and rain. Stitch new ties directly through the cushion seam at back corners using a heavy-duty needle and UV-resistant thread. For hook-and-loop that's lost its grip, fully remove the old strip, clean the surface, and apply fresh strips rather than layering new over old.
Adding anchor points to cushions without them
If your cushion has no ties at all and you don't want to sew, a no-sew option is to use outdoor-rated fabric glue to bond ribbon loops at the corners. Press firmly, clamp if possible, and allow 24 to 48 hours to cure before putting any stress on the bond. It won't be as strong as stitching, but it holds well for light-duty use on dining chairs. For heavier lounge cushions, sewing is worth the effort or worth paying a local upholstery shop $20 to $30 to do.
Troubleshooting when your solution stops holding in wind or rain
You put in the work, everything looked great, and then after the first rainstorm or windy afternoon the cushion is across the patio again. Here's how to figure out what went wrong.
Moisture is the most common culprit
Water gets under any interface layer and acts as a lubricant. If your non-slip liner or pad is trapping moisture between the cushion bottom and the furniture seat, that standing water destroys grip and eventually grows mold and algae, which makes the surface even more slippery. Check underneath your liner after rain. If water is pooling, switch to a perforated or open-weave anti-slip product that lets water drain through rather than trap it. Also, mildew on either the cushion bottom or the furniture seat will re-slicken a surface that you've cleaned, which is why regular maintenance cleaning matters.
Adhesive failure
Adhesive-backed Velcro and tape fail outdoors when the surface was damp, dusty, or oily at application time, or when the product isn't rated for outdoor UV and temperature cycling. If your strips are peeling, it's almost always one of those two causes. Remove everything, clean both surfaces again, let them dry for a full day in sun if possible, and re-apply with a product specifically rated for outdoor use. Pointed-corner strips peel first, so trim all corners to a rounded shape before reapplying.
Wind is a different problem from sliding
Wind lifts cushions from below rather than pushing them horizontally, which means a non-slip mat alone won't stop it. If your cushions are flying off in wind, you specifically need vertical restraint: ties, hook-and-loop strips at multiple points, or bungee-cord anchor loops. For more details on vertical restraint and other wind-specific steps, see how to secure patio cushions from wind. If you prefer a simple, reliable system, learning how to attach cushions to wicker patio furniture with hook-and-loop strips can keep them secure through wind and rain. For a deep dive into wind-specific strategies, the guide on how to secure patio cushions from wind covers that scenario in more detail. If you want more detail on stopping cushions from sliding, see the full guide on how to tie down patio cushions. If you also need tips for general staying power, follow the steps for how to get patio cushions to stay in place how to secure patio cushions from wind. If you want a more detailed approach, follow the steps in this guide on how to secure patio cushions from wind. The general rule: the more anchor points you have, the less wind can get purchase on the cushion edge.
Diagnosing why nothing seems to work
- Confirm the surface is completely clean and dry before re-applying any product.
- Check that the non-slip product you chose is actually rated for outdoor use, not just indoor.
- Verify cushion size: a significantly undersized cushion will defeat every grip solution.
- Add a second attachment method if one isn't enough: combine a liner with ties or Velcro.
- For persistent wind problems, add anchor loops at all four corners, not just the back.
Seasonal maintenance to keep your solution working long-term
The fixes in this guide aren't install-and-forget. Outdoor conditions are hard on everything, and a solution that worked great in May can be failing by August if you don't do a little upkeep.
Monthly checks during season
Once a month, lift the cushions and inspect whatever anti-slip layer or attachment hardware you're using. Look for peeling Velcro edges, torn ties, accumulated debris under liner pads, or mildew growth on the furniture seat surface. Wipe down the seat surface with a damp cloth, let it dry, and replace anything that's showing wear. Catching a peeling Velcro strip early means a 10-minute re-application job instead of starting over after it's completely delaminated.
Cleaning cushion covers through the season
Rinse cushion covers with warm water and a mild soap solution every few weeks, scrubbing gently with a soft brush. Rinse completely and let them air dry fully before putting them back. Never store or re-use a damp cushion: mildew is almost always a moisture issue rather than a fabric quality issue, and a mildewy bottom surface will slide on anything. If your furniture is under trees, clear debris off and from under the cushions regularly since leaf litter and pollen buildup contributes directly to mildew and reduced grip.
End-of-season weatherproofing before storage
Before you put cushions away for winter, give both the cushion covers and the furniture seats a thorough wash with an outdoor cleaner, rinse completely, and air dry for at least 24 hours. This is the single best thing you can do to prevent mildew from establishing itself during storage and to ensure your anti-slip products are ready to work again next spring. Check Velcro strips: if the hook side is clogged with fabric fibers or debris, clean it with a stiff brush. Inspect tie attachments for fraying and replace any that are borderline before you start the next season with worn hardware. Spray fabric cushion covers with an outdoor fabric protector spray to help water bead off rather than soak in, which keeps the underside drier and maintains grip throughout the following season.
FAQ
How can I tell if my cushion problem is horizontal sliding or wind lifting?
Start by checking whether the cushion is moving side to side or lifting up. If it shifts horizontally, add an anti-slip layer under the cushion. If it scoots forward or blows off in gusts, you need vertical restraint (ties, hook-and-loop at multiple points, or bungee anchors), because friction alone cannot stop wind lift.
Why does my cushion still slide after rain even when I use a non-slip mat?
Peel test it. After your first rain or hose rinse, lift the cushion slightly and feel the pad surface. If you detect dampness, the top of the liner may be trapping water. Switch to an open-weave or perforated anti-slip pad (or use a liner product designed to drain) so water doesn’t sit between surfaces.
Can I glue or tape Velcro directly onto the cushion fabric instead of the furniture frame?
Yes, but only if the cushion cover material allows bonding. For adhesive hook-and-loop, sew-on typically holds better on fabric covers, while adhesive versions work best on smooth, sealed surfaces. If your cushion bottom is fabric, plan on using sewn loops or tie-downs rather than relying on adhesive strips.
What’s the best way to re-apply anti-slip tape or Velcro when it fails?
Avoid layering new adhesive strips over old residue. Remove the old product completely, then clean both surfaces and let them dry fully (not just “dry to the touch”). Residual oils, cleaner film, or mildew can prevent reattachment and cause the new layer to peel within days.
Should the non-slip liner pad be cut exactly to size, or is “close enough” fine?
Not always. Some outdoor anti-slip solutions grip best when the liner is cut to match the footprint closely and does not extend beyond the edges. If it hangs out, wind can catch it and lift the cushion or wrinkle the pad, reducing contact.
What do I do if the cushion keeps creeping even after adding non-slip material?
If the cushion is too small, no friction product will reliably stop migration because there is less surface contact and less leverage to resist movement. Fill gaps with foam insert strips inside the cover (especially at the back or sides) or replace the cushion with the correct dimensions if it is more than about an inch short.
How do I know whether my cushion ties are actually the cause of the problem?
Use outdoor-rated, flexible ties and confirm they wrap around actual chair structures. If your ties have to span a large unsupported gap, they will stretch and lose effectiveness. Replace thin, frayed, UV-damaged ties before you add other fixes so you are not fighting weakened hardware.
What’s different about fixing sliding cushions on slatted chairs?
On slat-style frames, don’t use a full sheet of rubber pad if it will sag into gaps. Instead, apply anti-slip tape strips to the slats (or choose a purpose-built product that won’t bridge and lift). This keeps the cushion bottom contacting the grip surface where it matters most.
How often should I check or replace the anti-slip layers and tie-downs?
If you frequently leave cushions outside, plan maintenance. Inspect once a month for peeling edges, torn ties, and debris buildup under pads. Wipe down the seat surface, let it dry, and replace worn pieces early so you do not end up restarting the full prep and re-application later.
What’s the most reliable setup if I want to prevent both sliding and blowing off?
For maximum hold, use a layered system that addresses both failure modes: a non-slip layer for horizontal movement, plus at least one attachment method to prevent lifting off. Place attachments near the leverage points (close to the tie or frame attachment area) rather than centered only under the middle of the cushion.