For most patio cushion projects, sew-on hook-and-loop tape is the best Velcro for the job. It holds through rain, UV exposure, and repeated washing without peeling off the way adhesive-backed strips eventually do on fabric. If you're attaching cushions to a hard frame or smooth plastic furniture surface, VELCRO® Brand Extreme Outdoor adhesive strips are the top adhesive pick. But if you're closing a cushion cover, securing a slipcover, or keeping a pad on a chair seat, stitch it in. For most wicker patio furniture, the easiest way to attach cushions is to use sew-on or high-grade outdoor Velcro matched to the surface material attach cushions to wicker patio furniture. That one decision saves you from redoing the whole thing six months from now.
Best Velcro for Patio Cushions: Buy and Install Guide

How to Choose the Right Velcro Type for Outdoor Cushions
The biggest mistake people make is grabbing whatever hook-and-loop tape is on the hardware store shelf without checking whether it's rated for outdoors. Standard indoor Velcro uses adhesives that soften in heat, absorb moisture, and eventually let go. For patio use, you need to think about three things: the attachment method (sew-on vs adhesive), the material (nylon vs polyester vs polypropylene), and the width or load rating.
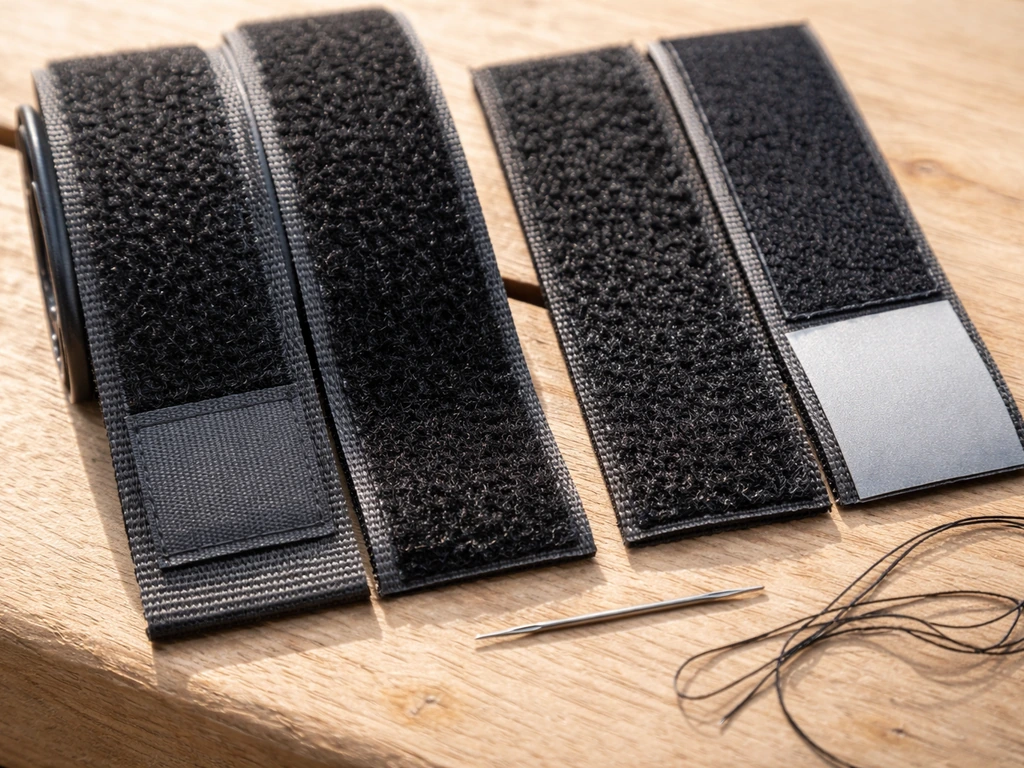
Sew-on tape is non-adhesive by design and gets stitched directly into the fabric. This makes it the go-to for cushion covers, slipcovers, and any application where the surface is soft or flexible. VELCRO® Brand specifically recommends sew-on over adhesive whenever the substrate is a soft or flexible material, and that advice holds up in real-world use. Adhesive-backed strips, on the other hand, work best bonding to rigid, smooth, non-porous surfaces like plastic chair frames or powder-coated metal.
For outdoor material, look for woven polyester construction rather than nylon. Woven polyester hook-and-loop (like HALCO's UV and marine-grade tape) resists UV fading and performs reliably when wet. Nylon works fine in covered patios but can weaken with prolonged direct sun. For adhesive-backed options, look for water and UV-resistant adhesive backings, not the standard pressure-sensitive adhesive you'd use inside. If you want the strongest outdoor-oriented option, VELCRO® Brand compares products including water and UV-resistant adhesive variants when discussing what holds best water and UV-resistant adhesive backings.
Strip Width and Load Strength
Width matters more than people realize. For lightweight chair cushions (thin pads, around 2 inches thick or less), a 3/4-inch or 1-inch wide strip is usually plenty. For heavier seat pads (thick foam, weighted cushions, anything over 3 lbs), go with 1.5-inch or 2-inch wide tape to get enough contact area. VELCRO® Extreme Outdoor strips list a holding claim around 6.8 kg per fastener pair, but that's on a clean, prepared hard surface. On fabric or in humid conditions, real-world hold is lower, so always err toward wider tape or more strip length when in doubt.
Best Velcro for Patio Cushions by Use Case
There's no single best product for every situation. Here's how to match the product to the job:
| Use Case | Best Product Type | Why It Works |
|---|---|---|
| Closing a removable cushion cover | Sew-on polyester hook-and-loop (1 inch wide) | Stays attached through washing and folding; no adhesive to peel |
| Keeping a cushion pad on a chair seat | Sew-on tape on cushion bottom + adhesive strip on chair frame | Stitched side is durable; adhesive side bonds to smooth frame |
| Attaching a pad to plastic/resin furniture | VELCRO® Brand Extreme Outdoor adhesive strips | Rated -18°C to 65°C, UV resistant, designed for outdoor smooth surfaces |
| Securing covers on a windy exposed deck | Wide sew-on tape (1.5–2 inch) + supplemental cushion strap | More contact area for grip; strap adds wind resistance |
| Slipcover or reupholstery project | Sew-on tape, corners rounded before stitching | Integrated into seams for flush finish; no adhesive failure risk |
| Heavy foam seat pad (3+ lbs) | 2-inch sew-on tape at multiple anchor points | Distributes load; prevents single-point peel or tear |
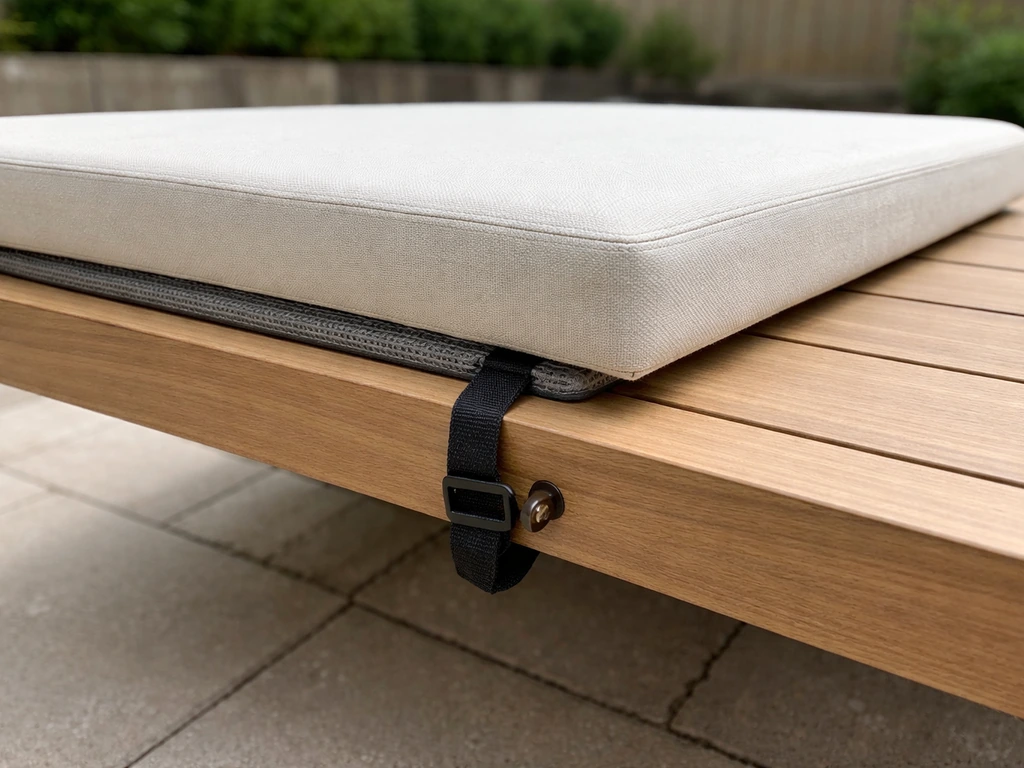
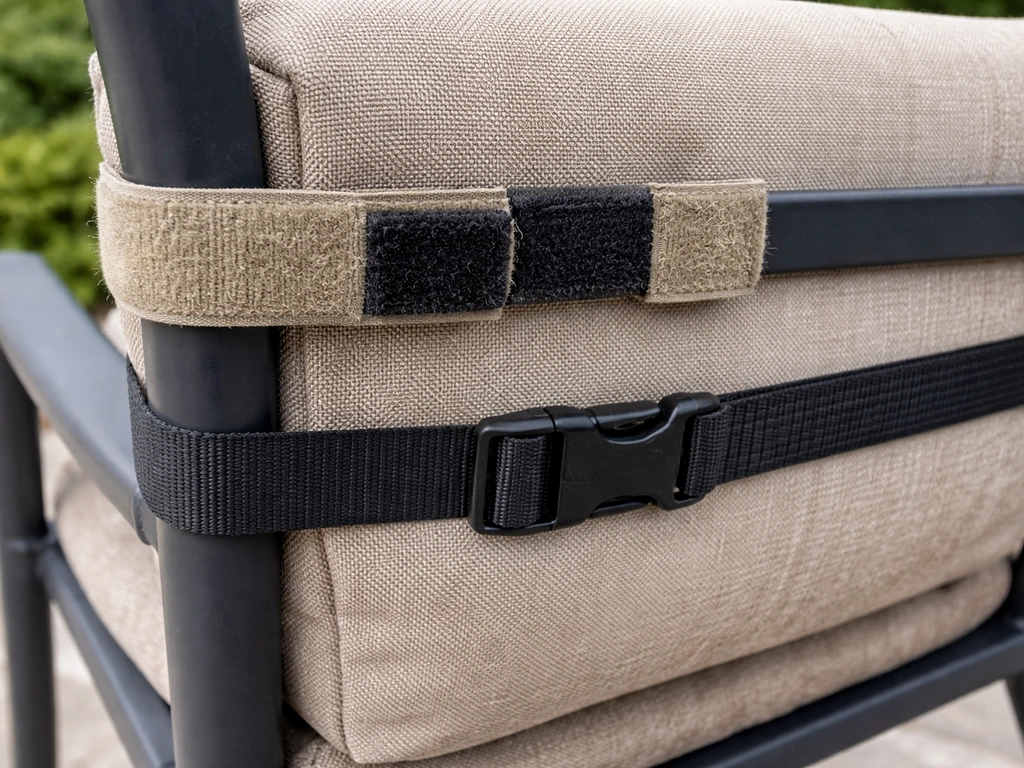
For wind-prone situations on an exposed deck, Velcro alone may not be enough. Combining sewn-in Velcro with cushion clips or adjustable straps gives you a belt-and-suspenders approach that actually works in gusty conditions. If you want, you can also use extra methods like cushion clips or adjustable straps to keep patio cushions from shifting in windy conditions patio cushions to stay in place. That combination is worth considering if your cushions have a habit of ending up in the yard after every storm.
Recommended Products
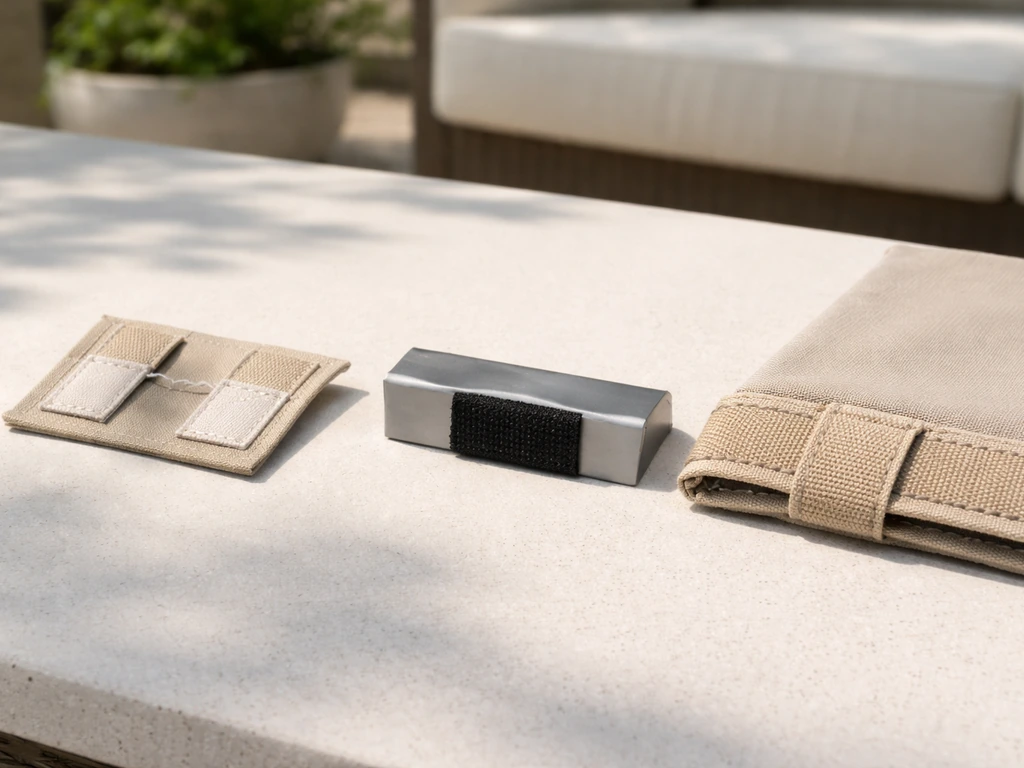
- VELCRO® Brand Extreme Outdoor Strips: best adhesive-backed option for hard frame attachment, UV and water resistant
- HALCO® Woven Polyester UV/Marine Grade sew-on tape: best sew-on option for covers exposed to direct sun and rain
- VELCRO® Brand sew-on hook-and-loop strips (non-adhesive): reliable, widely available, good for covered patio or moderate exposure
- JT&T 12-inch hook-and-loop strip-tie with buckle: good supplemental strap option for securing pads to chair frames without sewing
Installation Steps: Sewing vs Adhesive vs Strip Placement
Sewing Velcro onto Cushion Covers
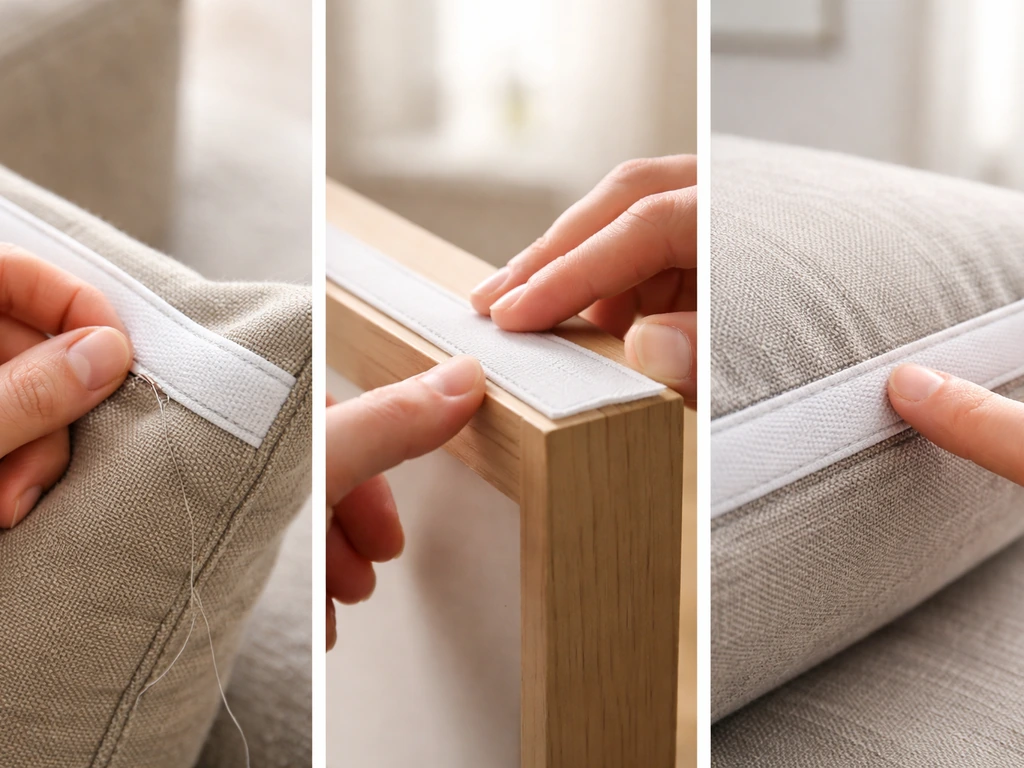
Sewing is the most durable method and it's not as intimidating as it sounds. You can do it by hand with a heavy-duty needle and upholstery thread, or with a sewing machine set to a longer stitch length (3–3.5 mm works well on thick outdoor fabric). Here's the process step by step:
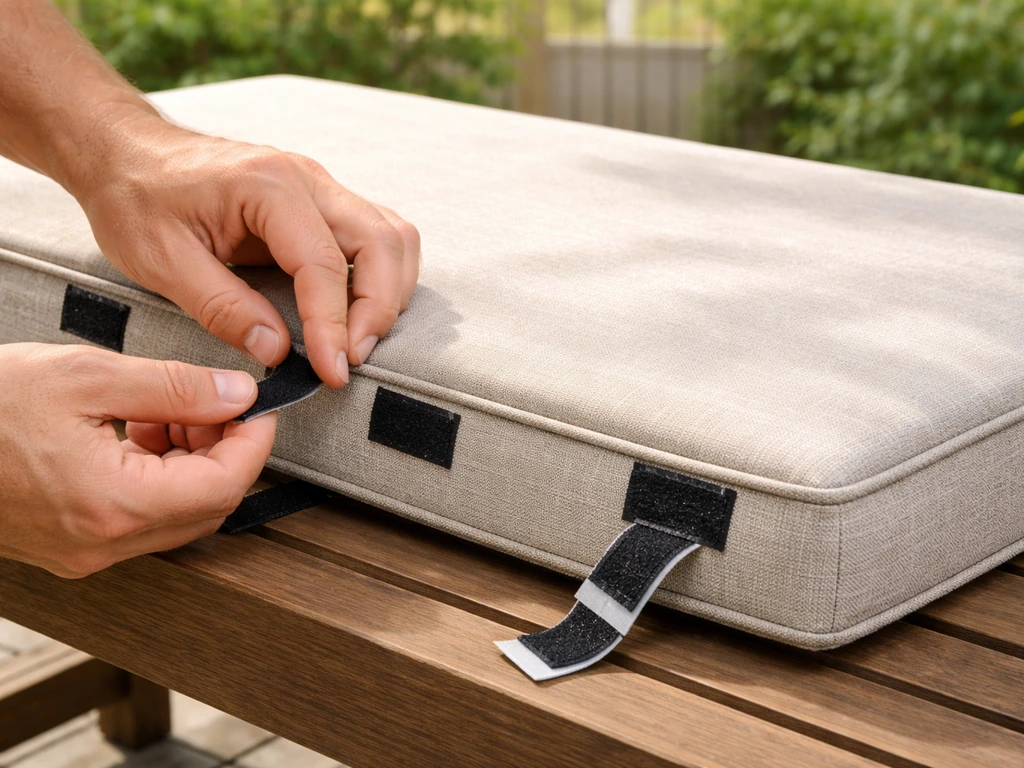
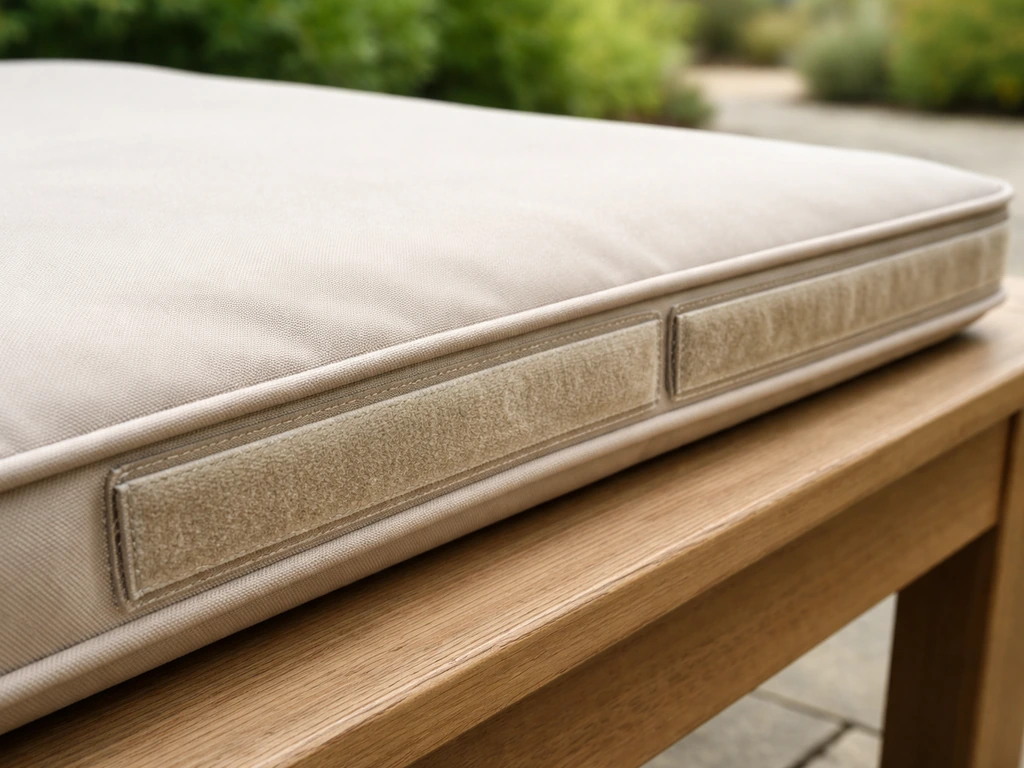
- Cut your sew-on tape to length. Round the corners with scissors before you sew. Sharp corners are a common failure point, and rounding them reduces stress on the stitching at the ends.
- Pin the tape in position on the fabric. For a cover closure, place the hook side on the overlap flap and the loop side on the underlap. Keep both pieces aligned so they meet squarely when the cover is closed.
- Stitch around all four edges of the tape with a straight stitch. Stitch the perimeter first, then add an X stitch across the middle for heavier pads. This prevents the tape from buckling and peeling away from the center.
- Backstitch at the start and end of every seam. This is the most skipped step and the reason most DIY Velcro seams unravel at the corners first.
- Test the closure before putting the cushion inside. Press the hook and loop together firmly, then peel apart and check that the stitching at all four corners is holding flat.
Applying Adhesive-Backed Strips to Hard Frames
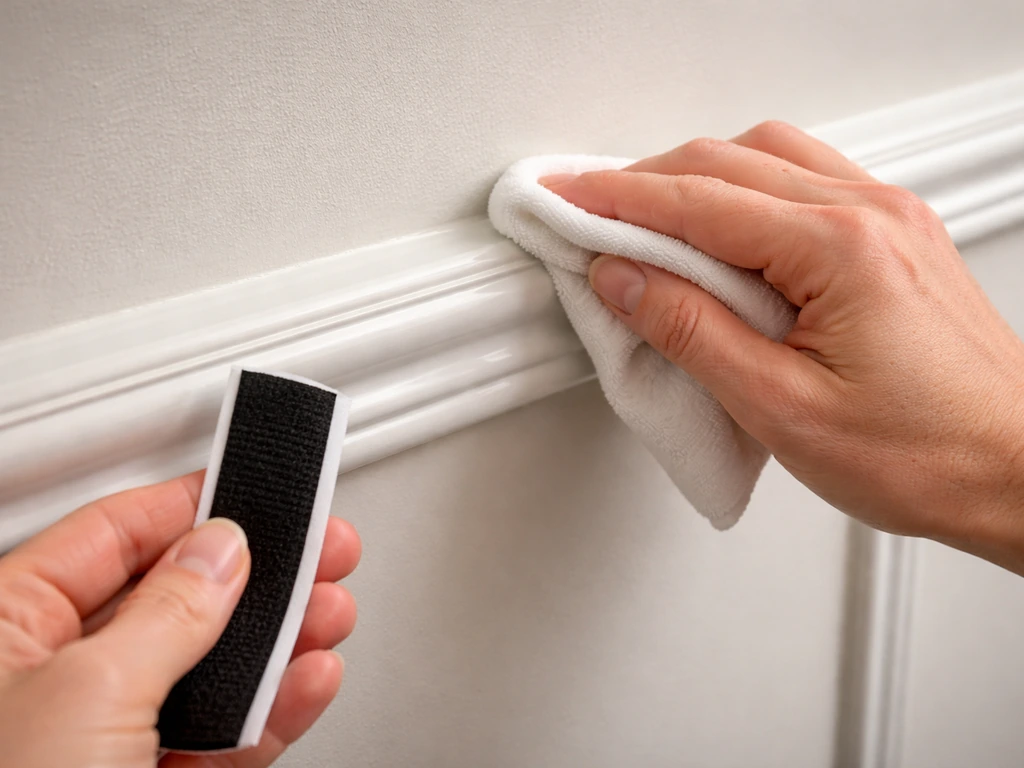
Adhesive prep is everything. I've seen people slap Extreme Outdoor strips straight onto a dirty chair rail and wonder why they fell off in a week. The adhesive needs a clean, dry, non-porous surface to bond properly. Here's what actually works:
- Clean the bonding surface thoroughly. Use isopropyl alcohol or a mild degreaser and let it dry completely. Don't skip this step even if the surface looks clean.
- If the surface is porous (unfinished wood, rough concrete, textured plastic), apply a primer or sealer first. Porous substrates absorb the adhesive before it can bond.
- Cut the strip to length and round the corners. Pointed corners peel first, every time.
- Peel the backing and press the strip firmly onto the surface using consistent, even pressure across the full length. Press for at least 30 seconds.
- Allow the adhesive to cure before loading it. Check the product's curing time (usually 24 to 72 hours for full strength). Cycling the fastener or placing weight on it before it cures will weaken the bond significantly.
- Apply the mating piece (loop or hook) to the cushion bottom. If the cushion has a fabric base, sew this half in rather than relying on adhesive on fabric.
Getting the Placement Right
Alignment is something people underestimate until they've sewn a strip crooked and had to unpick the whole thing. Before you commit, mark the placement with fabric chalk or painter's tape on the frame. For cushion covers, use a two-strip layout: one strip near each end of the opening, measured to match the cover dimensions as VELCRO® describes in their cushion-cover instructions. For chair-to-cushion attachment, place one strip at the back and one at the front center of the seat so the cushion can't slide forward or rotate sideways. To tie down patio cushions securely, use a two-strip layout so the cushion cannot slide forward or rotate.
Weather Durability: Waterproofing, Cleaning, and When Velcro Fails
Outdoor Velcro degrades in a pretty predictable order. First the adhesive goes (if you used it on soft surfaces), then the hook side fills with debris and loses grip, then UV exposure weakens the fiber structure over time. Knowing this helps you catch problems early and maintain the system instead of replacing it every season. If your patio cushions keep getting blown around, these same durability and maintenance tips will help you secure them against wind maintain the system instead of replacing it every season.
What to Expect from Each Type
- Sew-on polyester tape in direct sun: expect 3 to 5 seasons with decent grip before the hooks start to flatten noticeably
- Sew-on nylon tape on a covered patio: similar lifespan but degrades faster if exposed to UV
- VELCRO® Extreme Outdoor adhesive strips on clean plastic or metal: 1 to 2 seasons of reliable hold if applied correctly; reapplication may be needed after the first winter in freeze-thaw climates
- Standard indoor adhesive Velcro used outdoors: don't bother; it often fails within weeks in heat and humidity
How to Clean Velcro So It Keeps Gripping
The number one reason outdoor Velcro loses grip isn't wear, it's dirt. Grit, dust, pet hair, and fabric lint pack into the hook side and physically prevent it from catching the loop side. Clean hook-and-loop tape the same way you'd clean the cushion fabric: use a soft bristle brush with a mild soap and warm water solution (about 1/4 cup of soap per gallon of water works well, which is also what Sunbrella recommends for their fabric). Scrub the hooks gently in the direction of the fibers to dislodge debris, rinse thoroughly, and let it air dry completely before closing the fastener. Never close a Velcro fastener and then machine wash it while open, or you'll embed lint from everything else in the load.
Signs That Velcro Has Actually Failed
- The hook side looks flattened or matted under magnification: the hooks have deformed and won't recover
- The adhesive backing is lifting at the corners or edges: the bond has broken and reapplication is needed
- The tape peels away from the fabric it was sewn to: the stitching has unraveled or the fabric has frayed at the attachment point
- The fastener holds momentarily but releases under light tension: hooks are clogged with debris or the loop fibers have worn smooth
Compatibility with Cushion Fabrics and Covers
Not all outdoor fabrics behave the same way when you're sewing or bonding Velcro to them. Getting this wrong means the Velcro pulls free or damages the cover material, so it's worth spending a minute on this before you cut anything.
Sunbrella and Acrylic-Coated Fabrics
Sunbrella is the most common premium outdoor cushion fabric, and it's sewing-friendly. Use a heavy-duty needle (size 16 or 18) and polyester thread rather than cotton. Sew-on Velcro tape stitches into Sunbrella without puckering if you use a longer stitch length. Do not use adhesive-backed tape directly on Sunbrella. The woven surface is slightly porous and the adhesive won't bond reliably, plus you risk leaving residue on the fabric when it eventually fails. Fraying at cut edges is a real issue with Sunbrella, so seal any raw edges with a flame or seam sealant before stitching Velcro over them.
Canvas, Polyester, and Duck Cloth
These heavier utility fabrics hold stitched Velcro very well. Canvas in particular gives you a dense weave to stitch into. The challenge is that they're stiff enough that a standard sewing machine needle may skip stitches. Use a jeans or denim needle with polyester upholstery thread and slow down at corners. Adhesive tape will not bond reliably to any of these soft fabric surfaces, so always sew.
Foam Cushion Bases (Without a Cover)
If you're attaching Velcro to bare foam (not a fabric cover), adhesive-backed tape can work if the foam surface is firm and non-porous, but foam is usually too soft and compressible for a reliable bond. The better approach is to wrap the foam bottom in a thin layer of outdoor fabric or non-slip mat and stitch or staple the Velcro to that layer. This gives the adhesive or stitching a solid substrate to grip.
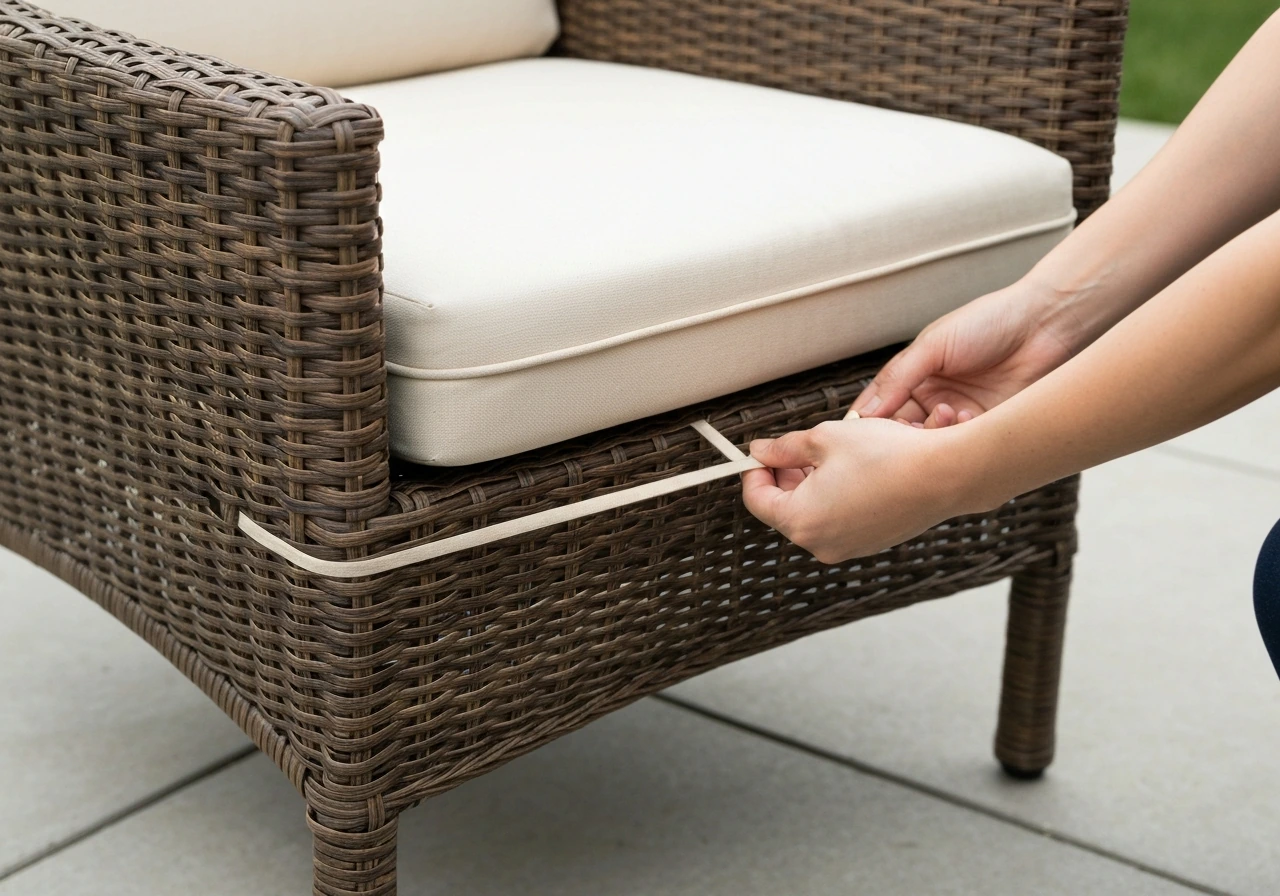
Wicker and Textured Resin Frames
Wicker and textured resin are the hardest surfaces for adhesive-backed Velcro. The texture creates air gaps under the adhesive, which kills bond strength. On wicker especially, sewing small fabric loops directly onto the cushion cover and then threading them around the wicker strands is often more reliable than any adhesive approach. If you're looking at how to attach cushions to wicker patio furniture specifically, that technique deserves its own deep dive. If you want a general answer for any type of patio furniture, follow the same approach for attaching cushions securely with Velcro how to attach cushions to wicker patio furniture specifically.
Quick Fixes and Upgrades: Replacing Worn Velcro, Improving Grip, and Preventing Peeling
Replacing Existing Velcro on Old Covers
Here's where I messed up the first time: I tried to sew new tape directly over old worn tape without removing it first. The result was lumpy, misaligned, and the old tape's remaining hooks kept catching on the new loop side in the wrong places. Do the removal properly.
- Use a seam ripper to remove the stitching holding old sew-on tape. Work slowly at corners where stitching is densest to avoid tearing the cover fabric.
- For adhesive residue on hard surfaces, use an adhesive remover product or isopropyl alcohol. Let it soak for a few minutes, then scrape gently with a plastic scraper. A citrus-based cleaner works well for stubborn residue without damaging most finishes.
- Check the fabric underneath for fraying or weakening where the old stitching was. If you see fraying, back the area with a small patch of matching outdoor fabric ironed on with fusible tape before restitching. Sewing into frayed fabric is how new Velcro pulls out in the first season.
- Cut new tape slightly shorter than the original so you're sewing into undamaged fabric, not the same needle holes.
- Stitch the new tape in with the perimeter-plus-X pattern described above and backstitch at every corner.
Improving Grip on Existing Velcro
If your Velcro feels weak but isn't visibly damaged, clean it before you replace it. A thorough scrub with a soft brush and soapy water removes the debris that's cutting your holding power in half. If cleaning doesn't restore grip, inspect the hook side closely. Hooks that are flattened or bent don't bounce back, and no amount of cleaning fixes that. Replacement is the only real solution at that point.
For a quick strength upgrade without replacing the tape, add extra stitching. Run a second row of stitching just inside the original perimeter row. This re-anchors the tape edges, which is almost always where the peeling starts. You can do this by hand with upholstery thread in about 15 minutes per strip and it noticeably extends the tape's useful life.
Preventing Adhesive Peeling Before It Starts
If you've chosen adhesive strips for a hard frame application, a few habits will dramatically extend the bond life. Always close the Velcro when the cushions aren't in use so the adhesive strip isn't being flexed open and exposed to weather. At the end of each season when you bring cushions in, press each strip firmly back into place. Reapply if you see any corner lifting, because partial adhesion is worse than no adhesion: a partially bonded strip acts as a lever that peels the rest away faster.
If you're in a freeze-thaw climate, know that the VELCRO® PS14 rubber-based adhesive is rated down to -15°C, but repeated freeze-thaw cycles still stress the bond at edges over time. Bringing cushions indoors for winter and reapplying strips fresh in spring is a smarter long-term strategy than hoping adhesive holds through multiple seasons outdoors. It takes less than ten minutes per chair and you'll stop fighting peeling strips entirely.
When Velcro Isn't Enough on Its Own
Heavy cushions on a windy exposed deck will test any Velcro system. For those situations, treat Velcro as part of a layered retention system rather than the whole solution. Add cushion ties or straps through the chair frame as backup, or use non-slip backing material between the cushion bottom and the seat. Combining these approaches is genuinely more reliable than doubling up on Velcro alone, and it also reduces wear on the Velcro by sharing the load. If keeping patio cushions from sliding in the wind is your main battle, that's a problem worth tackling from multiple angles at once.
FAQ
Can I use regular Velcro from the hardware store for patio cushions?
Most “indoor” hook-and-loop sets rely on standard pressure-sensitive adhesive, which softens and loses grip with heat and moisture. For patio cushions, stick to outdoor-rated tape, or sew it on when the base is fabric, wicker, foam, or anything textured.
Is adhesive-backed Velcro ever okay for patio cushion covers?
Yes, but you usually must stitch after it fails. Adhesive strips can be used on rigid, non-porous surfaces only, and only if the adhesive is specifically water and UV resistant. On soft cushion fabrics, adhesive bonding tends to be unreliable.
My patio cushions still stick, but not as well, what should I clean first?
Clean the hook side, not just the loop side. Use a soft bristle brush with mild soap and warm water, scrub gently in the direction of the hook fibers, rinse thoroughly, then fully air dry before reconnecting so lint does not get locked into the hooks.
What sewing settings work best when attaching Velcro to outdoor cushion fabric?
For outdoor fabrics, use the right needle and thread. A heavy-duty needle (commonly size 16 or 18) plus polyester thread, and a longer stitch length around 3 to 3.5 mm, helps prevent puckering and missed stitches.
Should I leave Velcro connected when I remove cushions for storage?
Avoid placing hook tape on top of loop fabric, and do not keep the fastener closed when the cushion is not installed. Closing and opening flexes the adhesive and exposes it to weather for longer than you think, which accelerates edge lifting.
Can I sew new Velcro directly over old Velcro to save time?
Don’t sew over old worn tape. Remove the old fastener completely before reattaching, otherwise leftover hooks can grab the wrong loop areas, causing lumps and misalignment.
How do I tell whether I should clean or replace outdoor Velcro?
If your holding is weak but the tape looks intact, check hook integrity after cleaning. Bent or flattened hooks often do not recover, and replacement is the only reliable fix once the hook tips lose their bounce.
What’s the fastest way to strengthen Velcro if it’s already stitched on?
Use extra stitches at the edges, not just through the center. A second row of stitching slightly inside the perimeter re-anchors the high-stress points where peeling usually starts.
Will Velcro alone stop patio cushions from blowing off in wind?
Yes. For fabric covers that need to stay put on windy decks, use a layered retention approach like cushion straps or clips in addition to Velcro. Velcro alone often cannot handle gusts and rolling loads on heavier seat pads.
Where should I place Velcro on a chair seat to prevent shifting?
For fabric-to-chair attachment, place strips so the cushion cannot slide forward or rotate. A common layout is one strip at the back and one at the front center of the seat to limit both forward creep and sideways rotation.
What should I do differently in freeze-thaw weather?
Yes, for freeze-thaw climates. Repeated freeze-thaw cycles stress adhesive bonds at the edges, so bringing cushions in during winter and reapplying fresh adhesive strips in spring generally outperforms trying to keep adhesive through multiple seasons.
Why does adhesive Velcro fail on wicker patio furniture, and what’s the better approach?
If the adhesive bond keeps failing on wicker or textured resin, it is usually because the surface texture prevents full contact. Sewing small loops or using a sewn routing method around the wicker strands is typically more reliable than relying on adhesive strips.
Can I attach Velcro directly to bare foam cushions?
On foam, adhesive-backed Velcro can work only if the foam surface is firm and non-porous, but most patio foams are compressible. A more reliable method is to wrap the foam bottom with a thin outdoor fabric or non-slip mat and stitch or staple the Velcro to that layer.
How do I choose the right Velcro width for thick or heavy patio cushions?
Plan tape width based on cushion weight and contact area. Thin, lightweight pads often do fine with narrow strips, while thicker or heavier cushions usually need wider tape (or more total strip length) to maintain grip.