The fastest fix for sliding patio cushions is to clean the contact surfaces, let them dry completely, and add either non-slip grip pads underneath or hook-and-loop (Velcro) strips between the cushion and the frame. That combination stops about 90% of sliding problems in under an hour, costs less than $15, and works on most common patio chairs and sofas. But if your cushions are still moving after that, there's usually a specific reason why, and once you know it, the right fix becomes obvious.
How to Get Patio Cushions to Stay in Place

Maren Grady
2 Jun 2026
Why patio cushions slide in the first place
Before you buy anything or drill anything, it helps to figure out which problem you're actually dealing with. Sliding cushions usually have one of a handful of root causes, and slapping a solution on the wrong cause is how you end up frustrated and back at square one.
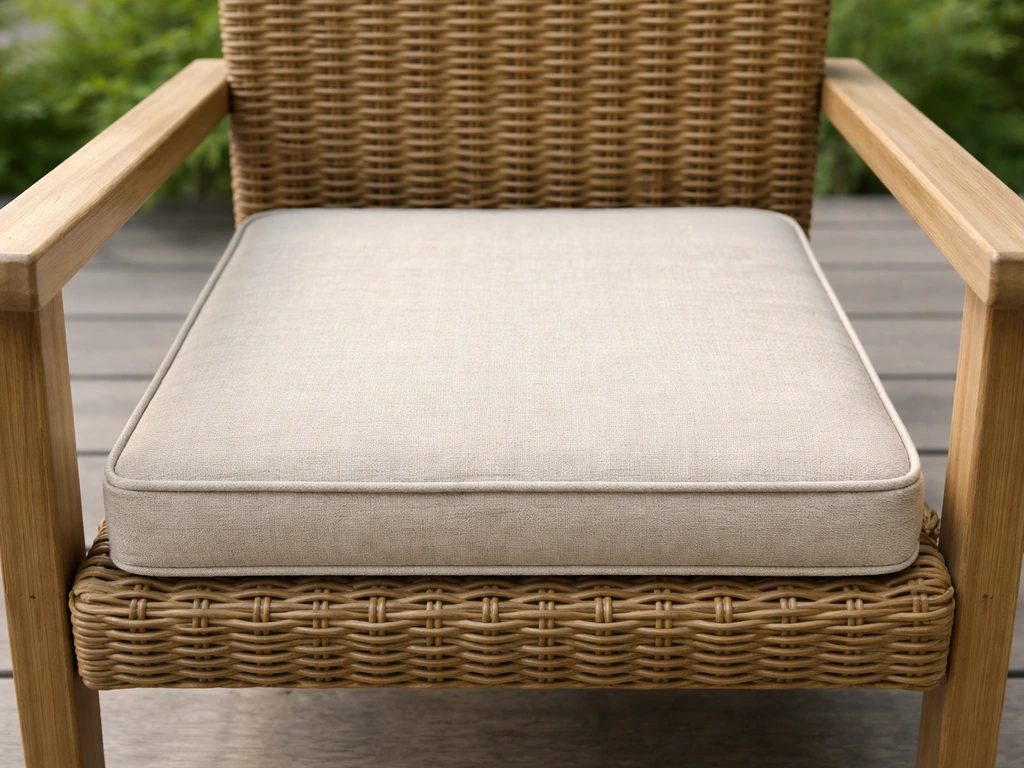
- Poor fit between cushion and frame: If the cushion is too small for the seat, it shifts around in the gap every time someone sits down or gets up. This is the most common culprit.
- Smooth or slick frame surfaces: Metal, resin wicker, and powder-coated aluminum frames are notoriously slippery. There's very little friction to hold a cushion in place without some help.
- Worn or smooth cushion backing: Over time, the fabric on the bottom of a cushion wears down and gets slicker. A new cushion grips better than a three-year-old one, simply because the texture is gone.
- Wet and rainy conditions: A damp cushion bottom on a wet metal frame is like ice on ice. Moisture strips away nearly all the natural friction that keeps cushions seated.
- Wind: Even a modest gust catches the edge of a loose cushion and uses it like a sail. Cushions that sit on outdoor furniture with any elevation are especially vulnerable.
- Moving furniture: Swings, gliders, and rocking chairs are a whole different level of challenge. The furniture itself moves, which means the cushion is fighting constant momentum on top of gravity.
- Wrong orientation: Some cushions are designed to be placed with the ties or notched corners in a specific direction. Flip them around or place them backwards and they're almost guaranteed to migrate.
Take thirty seconds to look at your specific setup before you do anything else. Is the cushion clearly too small for the frame? Are the surfaces wet or dirty? Is there wind in the equation? Is this a glider or rocker? Your answer narrows down the best fix immediately.
Quick fixes you can do right now
Good news: you can make a real difference today with zero purchases, just by doing a few things most people skip.
Step 1: Clean everything
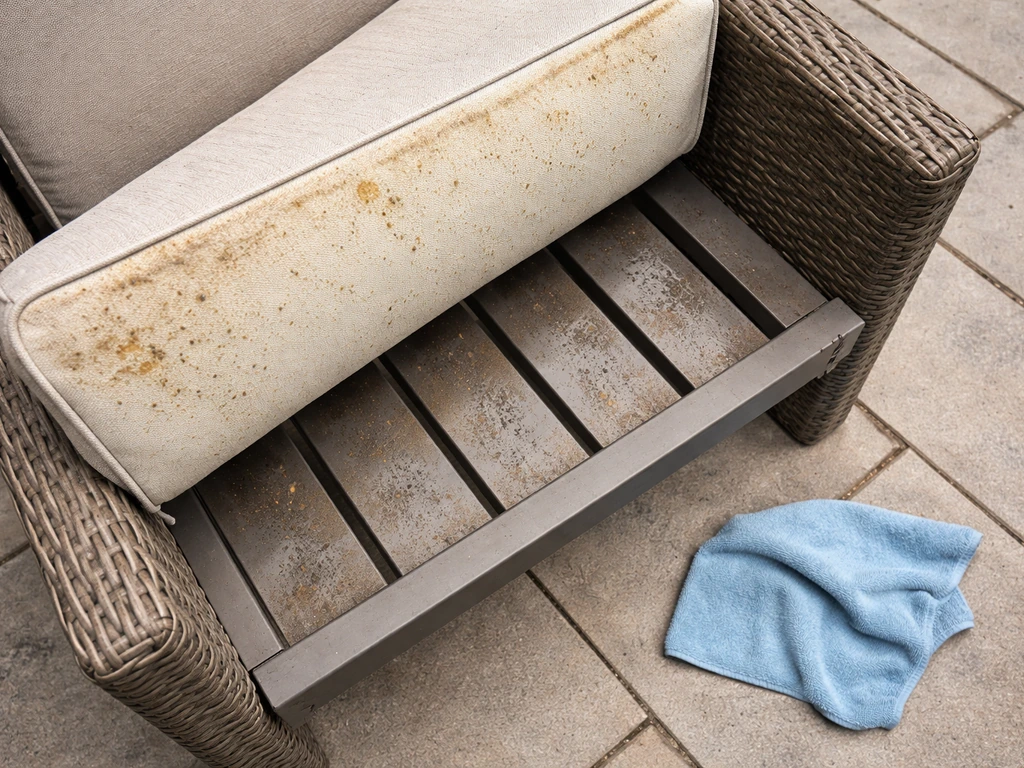
Flip the cushion over and wipe down the bottom fabric with a damp cloth. Do the same to the chair frame or slats where the cushion sits. Dirt, pollen, dried rain residue, and sunscreen buildup all act like a lubricant that makes sliding worse. Adhesive-backed grip products and Velcro strips simply won't bond reliably to a dirty surface, so even if you're planning to add hardware, cleaning first is not optional. Let everything dry fully before moving on.
Step 2: Reposition the cushion correctly
Place the cushion back on the chair so it sits evenly, with equal contact on all sides of the frame. A cushion that's even slightly off-center creates a wedge effect where one edge rides higher, which makes the whole thing want to slide toward the lower side. If your cushion has a notch cut out for chair back legs, make sure those notches are actually seated around the legs. It sounds obvious but a lot of people set cushions down fast and never check.
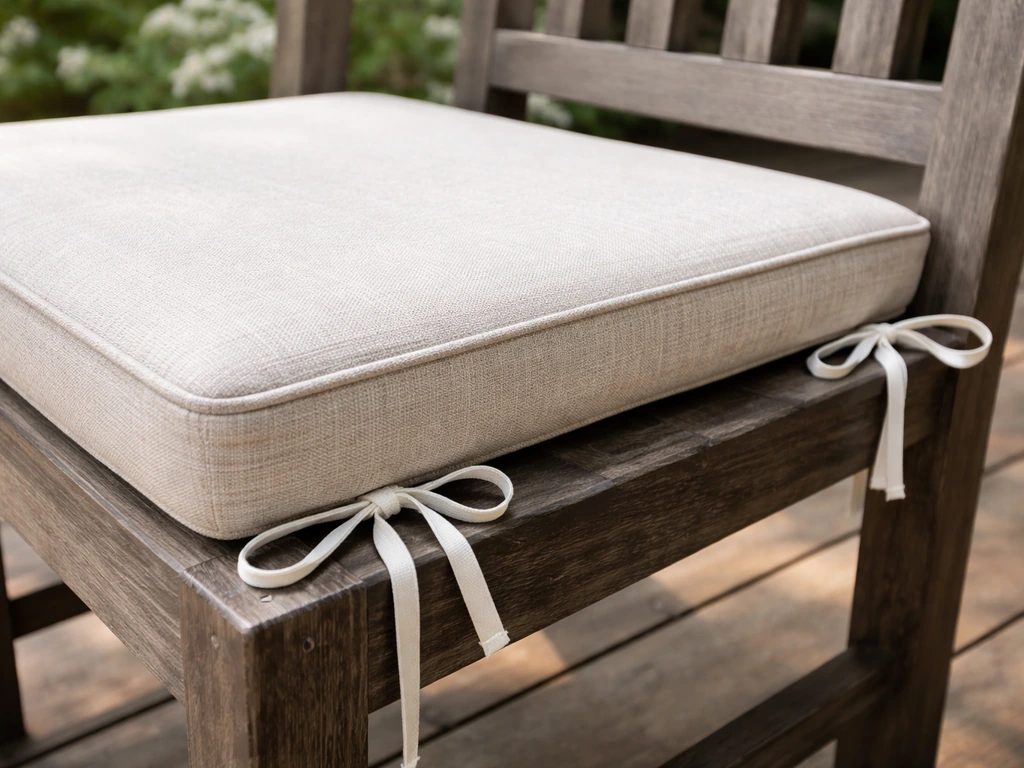
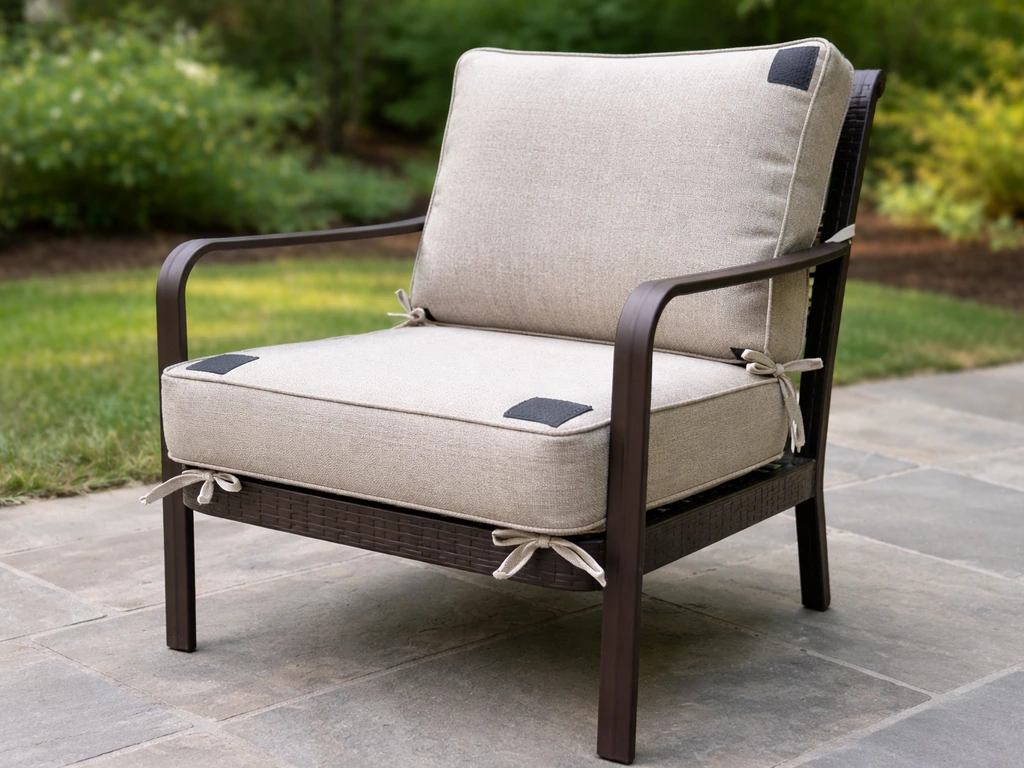
Step 3: Use existing ties if your cushion has them
Many outdoor cushions come with fabric ties sewn into the corners or back edge. These are meant to be looped around the chair's frame rails or through slats and tied off. A huge number of people never use them, or use them once and then stop when it feels like extra work. If your cushions have ties, commit to using them every single time. It takes about 20 seconds and eliminates most shifting immediately.
Best ways to anchor cushions with straps, ties, and fasteners
If the quick fixes above aren't enough, or your cushions don't have built-in ties, these methods give you a more permanent solution. Most of these are beginner-friendly and take less than 30 minutes.
Hook-and-loop (Velcro) strips
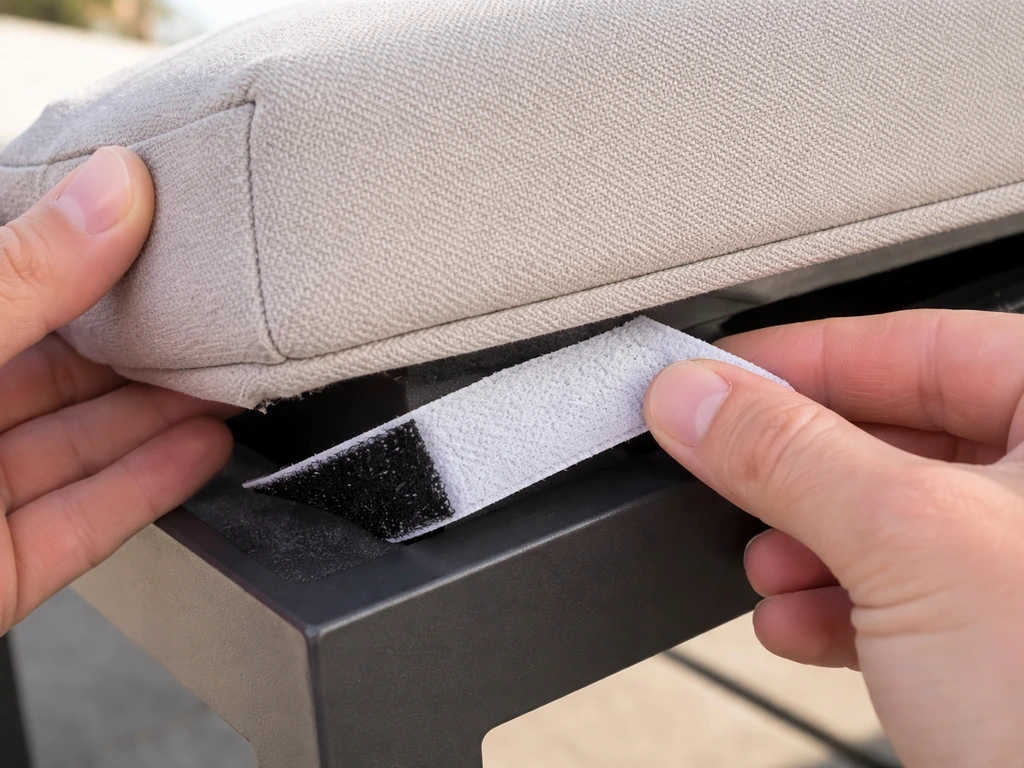
This is the most versatile and widely used DIY method. You apply one side of an adhesive-backed hook-and-loop strip to the cushion bottom and the matching side to the chair frame. When you press the cushion down, the strips lock together and hold it firmly. Here's how to do it right:
- Buy outdoor-rated hook-and-loop tape, not the indoor variety. Look for products labeled 'extreme outdoor' or 'outdoor grade.' Indoor Velcro uses a weaker adhesive that fails quickly in sun and humidity.
- Wipe both the cushion bottom and the frame surface with an alcohol prep pad. This removes oils and residue that prevent adhesion. Let both surfaces dry for at least 5 minutes.
- Cut strips to your preferred length. For a standard seat cushion, two strips of about 3 to 4 inches placed near each corner is usually enough. Avoid cutting sharp pointed corners on the tape—rounded or straight cuts hold better because sharp corners are where peeling starts.
- Peel the backing and press each strip firmly to the cushion bottom first. Apply steady pressure for 30 seconds per strip. Smooth out any air bubbles.
- Repeat the process to attach the matching side of each strip to the frame. Press firmly.
- Let the adhesive cure for 24 hours indoors before moving the cushion outside. This is where most people rush and then wonder why the tape peeled off after a week.
- Press the cushion down onto the chair firmly so the hook-and-loop sides connect. You should hear and feel them click together.
One thing worth knowing: the hook side of Velcro tape picks up lint, pet hair, and debris over time, which fills in the hooks and reduces grip. Every few weeks, brush the hook side with an old toothbrush or rinse it out. This keeps the bond strong throughout the season.
Sew-on Velcro for removable cushion covers
If your cushions have removable, zippered covers that you wash regularly, adhesive-backed tape is going to peel off every time the cover goes through the laundry. In this case, use sew-on hook-and-loop tape instead. Nylon and polyester versions hold up well outdoors and under tension. Sew a strip to the inside bottom of the cover, then attach the matching side to the chair frame with the adhesive-backed version. You get all the holding power with none of the laundry-cycle peeling.
DIY fabric ties
If your cushion didn't come with ties and you're comfortable with basic hand-sewing, you can add your own. Cut two 12-inch lengths of outdoor-rated ribbon or nylon webbing and hand-stitch each one to a back corner of the cushion using a few passes of heavy-duty upholstery thread. Loop the ties around the chair's back post or through a frame slat and tie them off. This is one of the most secure options available because there's no adhesive to fail.
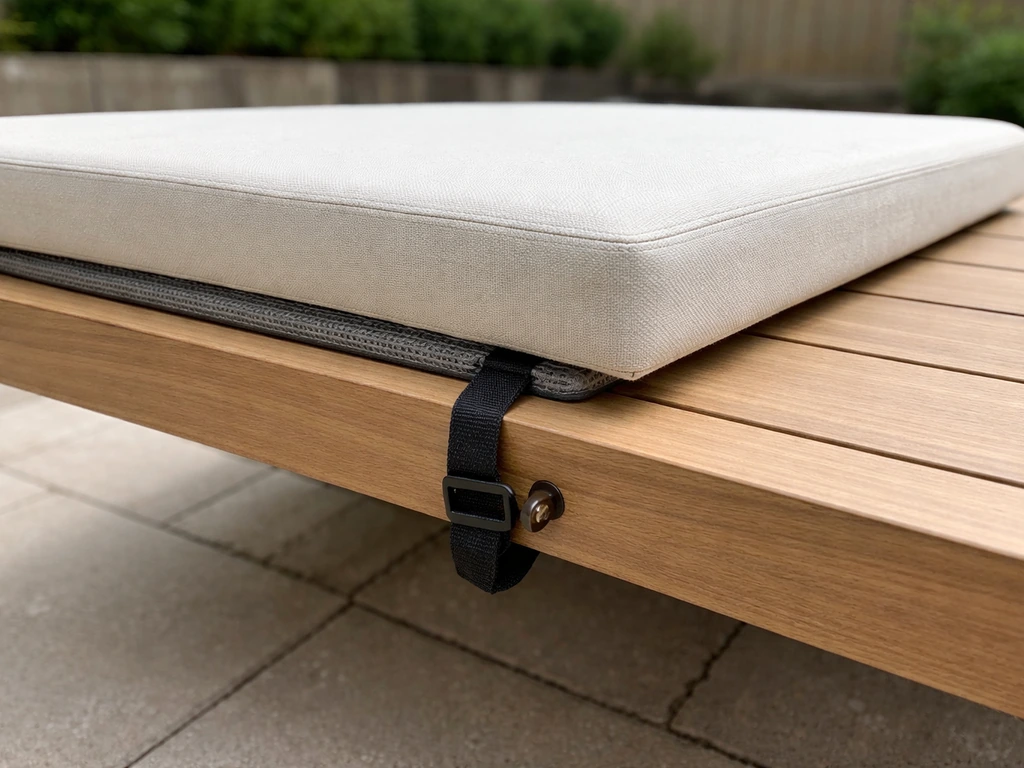
Bungee cord or strap anchors for windy spots
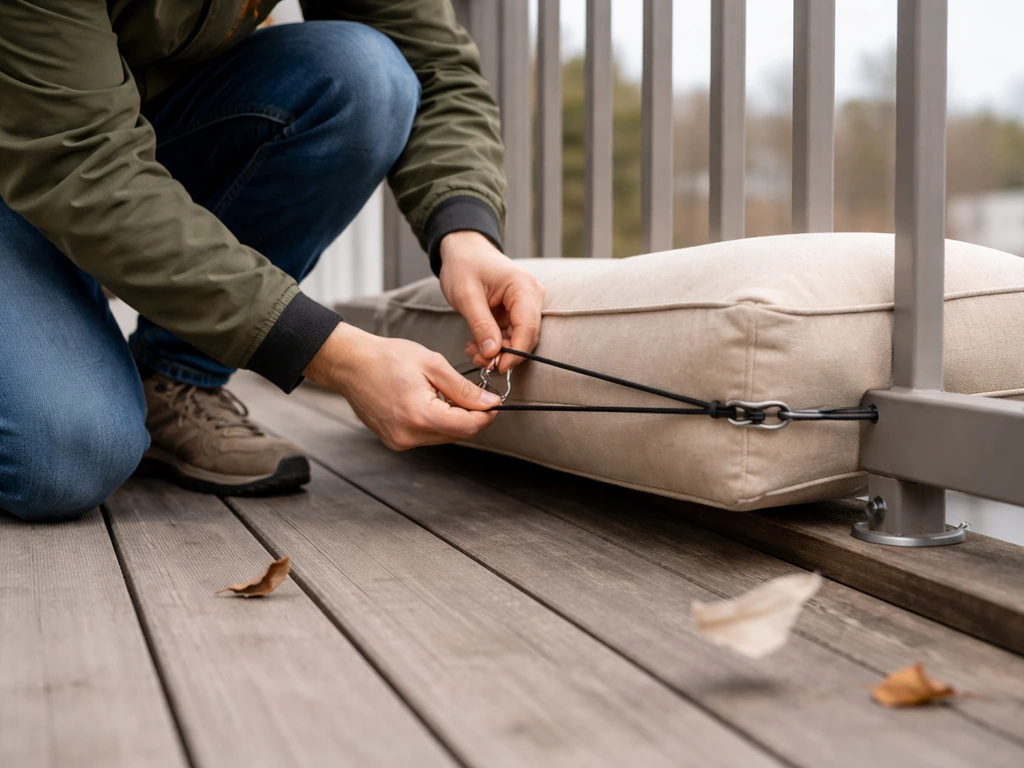
If you live somewhere with serious wind, or if your furniture is on an elevated deck, a loose cushion can become a genuine projectile. Short bungee cords or adjustable furniture straps looped under the chair frame and over the top of the cushion add a top-down hold that no amount of bottom friction can replicate. If you want to secure patio cushions from wind, short bungee cords or adjustable furniture straps are a reliable option for a top-down hold. This is especially useful for chaise lounges, bench cushions, and any furniture on a rooftop or exposed deck. Securing cushions so wind can't catch them as a 'sail' makes a real difference during summer storms.
Dealing with swings and gliders
Moving furniture like porch swings and gliders need a slightly different approach because the momentum of the furniture itself constantly tries to push the cushion forward or backward. Ties anchored to the frame are essential here, non-slip pads alone won't cut it. Use ties at both the front and back of the seat cushion if possible, and consider a short bungee loop under the seat frame as a secondary measure. The goal is to connect the cushion directly to the frame so they move as one unit.
Non-slip methods: pads, grip liners, and coatings
Not everyone wants to attach anything permanently to their furniture or cushions. Non-slip pads and grip liners are a great middle ground because they're cheap, removable, and require zero installation.
Non-slip pads and grip liners
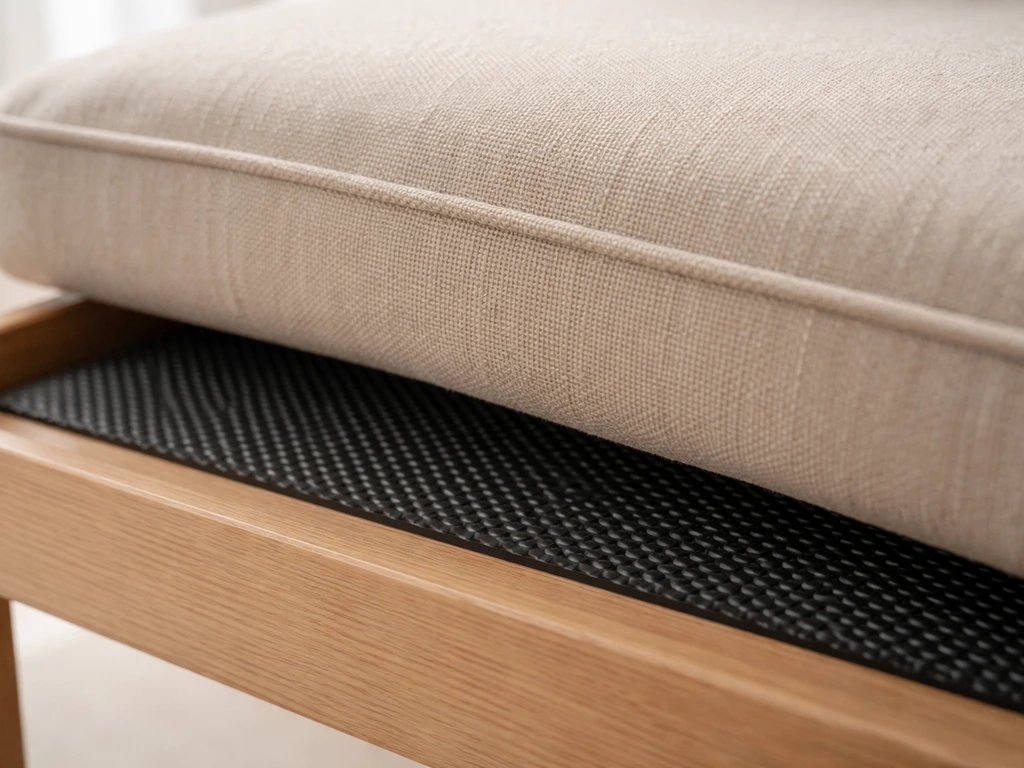
Cut a piece of non-slip rug pad or rubber shelf liner to match the size of your cushion bottom and lay it between the cushion and the chair frame. The textured rubber grips both surfaces and dramatically increases friction. Look for outdoor-rated non-slip rug pad material rather than standard indoor shelf liner, because outdoor versions hold up in rain and sun without breaking down. You can buy a single roll and cut it to fit every cushion on your patio for under $20 total.
One honest limitation: grip liners work best on flat, solid surfaces. If your frame has wide-spaced slats with big gaps, the liner has less contact area and less friction to work with. In that case, combine a liner with ties or Velcro for best results.
Outdoor rug tape
Double-sided outdoor rug tape works similarly to Velcro but without the hook-and-loop mechanism. You apply strips to the cushion bottom and press it onto the frame. It's a clean, low-profile solution for smooth cushion fabrics on smooth frames. The trade-off is that it's harder to remove cleanly at the end of the season. Use it if you plan to leave cushions on the furniture for months at a time.
A word of caution on adhesive grit treads
You might come across adhesive anti-slip tread tape (the kind used on stair treads) and think it could work here. It's generally not a great outdoor solution for cushions because the adhesive degrades faster outdoors, especially with temperature swings, and coverage needs to be fairly thorough to be effective. Stick with outdoor-rated grip liners or Velcro tape instead.
Getting the fit right: size, fabric, and frame compatibility
All the grip tape and Velcro in the world won't fully compensate for a cushion that's the wrong size or the wrong type for your furniture. Getting this part right makes everything else easier.
Cushion size and frame match
A well-fitted cushion should fill the seat area of the chair without hanging significantly over the edges or leaving wide gaps at the sides. Measure your frame's seat opening before buying replacement cushions (width at front, depth from front rail to back rail) and look for cushions within about an inch of those measurements. A cushion that's two or three inches too small will always slide around, no matter what you attach to it.
Slatted frames vs. solid frames
Slatted frames (think teak or aluminum with horizontal bars) offer natural contact points for ties to loop through, which makes them ideal for tie-based anchoring. Solid frames or mesh frames are better candidates for non-slip pads and Velcro because there are no slats to use as anchor points. Match your method to your frame style.
Cushion fabric and backing material
Some cushions have a textured or rubberized backing fabric built in, which already adds grip. If yours don't, or if that backing has worn smooth, that's a sign that either replacement or a non-slip liner is overdue. Slick polyester covers and smooth Sunbrella fabrics slide more than textured weaves, so higher-friction add-ons make more of a difference for those materials.
Cushions with removable covers
If your cushions have zippered removable covers, you have more options. You can sew Velcro directly onto the inside bottom panel of the cover (as described above), add a non-slip liner inside the cover between the cover and the foam insert, or use an exterior non-slip pad under the whole cushion. Removable covers are actually great for this kind of customization because you can open them up and work with the interior.
| Method | Best for | Cost | Permanence | Works in Wind |
|---|---|---|---|---|
| Outdoor-rated Velcro strips | Most chair types, smooth or textured frames | $8–$15 | Semi-permanent, removable | Yes, with good coverage |
| Sew-on Velcro | Cushions with removable, washable covers | $5–$10 | Permanent on cover | Yes |
| Non-slip grip liner / rug pad | Flat or slightly slatted frames, low-wind areas | $10–$20 for whole patio | Fully removable | Partial |
| Fabric ties (built-in or added) | Chairs with slats or rails, swings, gliders | $0–$8 DIY | Adjustable | Best option |
| Bungee/strap anchors | Exposed decks, high wind, chaise lounges | $5–$12 | Fully removable | Excellent |
| Outdoor rug tape | Smooth frames, long-term placement | $8–$12 | Harder to remove | Moderate |
Long-term solutions: keeping cushions in place season after season
Solving the problem once is satisfying. Not having to solve it again next year is even better. A little seasonal maintenance goes a long way toward keeping your grip solutions working and your cushions in good shape.
Regular cleaning keeps grip alive
Plan to clean both the cushion bottoms and the chair contact surfaces every two to four weeks during outdoor season. Pollen, bird droppings, sap, and sunscreen residue build up faster than you'd think, and all of it reduces the friction and adhesion of any grip solution you have in place. A quick wipe with a damp cloth and mild soap takes five minutes and extends the life of your Velcro or liner by months.
Check and re-tighten ties at the start of each season
Before you bring cushions out of storage each spring, take a minute to inspect any ties or straps. Fabric ties can stretch, fray, or loosen over winter. Velcro hooks can collect debris during storage. VELCRO’s “extreme outdoor” hook-and-loop fasteners are designed to hold more powerfully on rough surfaces, which can help when furniture frames are not perfectly smooth Velcro hooks can collect debris during storage. Re-tighten anything that's loosened, replace ties that have worn through, and clean any Velcro with a stiff brush before you rely on it for the season. This is a five-minute check that prevents a whole season of sliding cushions.
Use protective covers when the furniture isn't in use
Outdoor furniture covers are one of the most underused tools in patio maintenance. When you're not actively using the furniture, a fitted cover keeps rain and UV off the cushions, which protects the fabric and prevents the surface from degrading into something slippery. It also means your grip solutions (Velcro, ties) stay clean and functional instead of getting gunked up by weather. A decent furniture cover pays for itself in extended cushion life within a season or two.
Proper off-season storage
At the end of each season, bring cushions indoors or into a storage bin rather than leaving them outside through winter. Freeze-thaw cycles crack and stiffen foam, UV breaks down fabric backing, and moisture that gets trapped in stored cushions breeds mildew that makes surfaces even slicker. Store cushions somewhere dry, stacked flat or on edge, and they'll come out of storage in spring still grippy, still shaped, and still holding their fasteners properly.
Where to start: your action plan
If you want to stop the sliding today, here's the sequence that works for most people: If your cushions are still sliding, focus on how to keep patio cushions from sliding by tightening the right attachments and keeping contact surfaces clean stop the sliding today.
- Clean the cushion bottoms and frame contact surfaces right now. Use a damp cloth and let everything dry completely.
- Reposition the cushions evenly and use any existing ties to secure them.
- If that's not enough, add non-slip grip liner cut to size under each cushion. This is the cheapest, easiest next step and works immediately.
- For more wind resistance or more permanent hold, apply outdoor-rated Velcro strips. Follow the full prep and cure process—don't rush the 24-hour cure time.
- If you have a swing, glider, or exposed high-wind setup, combine ties with a bungee or strap anchor.
- Set a reminder to clean your grip solutions every few weeks and re-check everything at the start of next season.
The right combination depends on your specific furniture, but most setups are solved by grip liner plus Velcro, or ties plus grip liner. You don't need all of these at once, start with the simplest option and add more only if the problem persists. And if you're looking to go deeper on specific parts of this process, attaching cushions to wicker or other specific frame types, choosing the best Velcro products for outdoor use, or learning how to tie down cushions in high-wind conditions are all worth exploring further. If you want to choose the best velcro for patio cushions, look for outdoor-rated hook-and-loop that sticks even when surfaces get damp best Velcro products for outdoor use. For wicker patio furniture in particular, focus on matching your attachment method to the wicker weave and the cushion’s base so it stays put in normal use and in light wind how to attach cushions to wicker patio furniture.
FAQ
Can I use adhesive-backed Velcro or grip pads right after cleaning, or do I need to wait?
Yes, but only if you’re using the right surface prep. Clean with damp cloth first, then let both the cushion bottom and frame sit fully dry. If you apply adhesive-backed grip while either surface is still slightly damp or oily (common after sunscreen), the bond will release and the cushion will keep sliding.
What should I check if my patio cushion still slides after I install non-slip pads or Velcro?
If your cushion is sliding even after adding grip pads or Velcro, check whether the cushion is actually seated in the correct position, especially around back legs or cutouts. A cushion that sits a few millimeters off-center can create a tilt that overcomes the added friction.
I have removable cushion covers. Where should I attach Velcro so it won’t peel off after washing?
For removable zippered covers, adhesive on the cover will usually fail because laundry and friction repeatedly peel the tape. A better approach is sew hook-and-loop onto the inside of the cover panel, or keep the adhesive contact on the cushion base with no laundry contact, then use ties through the frame to provide backup.
How do I keep outdoor Velcro from losing grip over time?
Velcro hooks can clog when they trap lint, pet hair, and outdoor debris. Brush the hook side with a stiff toothbrush or rinse and air-dry it, then re-test before relying on it for storm season.
What if my chair frame has a smooth or glossy finish and the adhesive products won’t stick well?
Yes. If the frame is glossy, dusty, or has a finish that prevents adhesion, adhesive-backed products often won’t hold long. In that case, prioritize tie-based anchoring (loop through slats or around posts) or use a grip liner combined with ties rather than relying on adhesive alone.
What tie material and thread should I use if I’m adding my own cushion ties?
Nylon and polyester ties sewn with heavy-duty upholstery thread work best because they handle outdoor moisture and tension. Avoid thin craft thread or untreated cotton webbing, which can fray or stretch and then loosen the cushion.
Is double-sided outdoor rug tape a good alternative to Velcro for keeping cushions in place?
Double-sided outdoor rug tape can work on certain smooth setups, but removal at the end of the season is usually messier than Velcro or liners. If you need to take cushions off often, choose Velcro or sewn-in/strap-based solutions instead.
How do I stop sliding on gliders or porch swings, since the furniture moves too?
Gliders and rockers require anchoring that accounts for furniture motion, not just friction. Use ties at both front and back when possible, and consider a secondary strap or bungee underneath the frame so the cushion stays aligned during the seat’s back-and-forth movement.
Do non-slip rug pads work on slatted frames, or do I need a different method?
Grip liners work best on flat, solid contact areas. If your frame has wide-spaced slats or big gaps, the liner will only contact in spots, reducing friction. Combine the liner with ties or Velcro to increase the “contact points” that actually resist sliding.
My cushion fabric feels smooth. Will that affect how well the anti-slip solutions work?
Yes, especially when the cushion fabric is very smooth. If the cushion back or underside is slick or worn smooth, a higher-friction add-on (outdoor non-slip liner, properly prepped Velcro, or tie anchoring) will perform better than low-friction liners meant for indoor use.
If my cushion is the right style but seems slightly small, will attachments still fully stop sliding?
Don’t ignore size. If the cushion is too small, it will always be able to shift and create a wedge effect, even with strong grip. Measure seat width and depth before replacement, and aim for cushions within about an inch of the frame opening.
Does cushion alignment matter before I install Velcro or pads?
Place the cushion evenly and seated into any leg notches before applying or pressing hardware. Off-center placement creates a gradient that pulls the cushion toward the lower edge, so even a perfect grip product can look like it “failed.”
How often should I clean the bottom of cushions and the chair contact points?
Most people should clean the contact surfaces about every two to four weeks in outdoor season, because pollen, sap, bird droppings, and sunscreen residue reduce both friction and adhesion. Wipe, then fully dry, before touching adhesive or pressing cushions back into place.
Do patio furniture covers really help with preventing cushions from slipping?
Outdoor covers help a lot because they reduce UV and keep the cushion underside cleaner, which protects the grip solution you already installed. If you cover only when it rains or only loosely, the underside can still get dusty and reduce friction.
Should I leave cushions outside in winter, or does it change how well they grip in the next season?
Yes. Store cushions indoors or in a dry bin rather than leaving them outdoors. Freeze-thaw and trapped moisture can stiffen foam, degrade backing, and leave residue that makes surfaces slicker in spring.