The safest way to secure a tarp over patio furniture is to start with a tarp that's at least 12 inches larger than your furniture's full footprint on every side, drape it so water sheds off the edges rather than pooling on top, and anchor every grommet along the perimeter with either ratchet straps or bungee ball ties spaced no more than 18 to 24 inches apart.
How to Secure a Tarp Over Patio Furniture (DIY Guide)

Maren Grady
29 Apr 2026
Pull the tarp snug so there's no billowing fabric for wind to catch, and add weight (sandbags, concrete blocks, or tie-down anchors) along the bottom edge if you're in a gusty area. During wind warnings, the National Weather Service recommends blank" rel="noopener noreferrer">securing outdoor items to help reduce the risk of damage or injury from gusts windy area. During a hurricane, use the same approach as wind warnings: secure your patio furniture and cover with tight tie-downs to reduce the risk of damage or injury secure outdoor items.
That's the core method. The rest of this guide is about doing it right so your furniture doesn't mold, your tarp doesn't shred, and you're not chasing it across the yard after every storm.
Pick the right tarp size and material first
I've seen a lot of people grab whatever tarp is in the garage, throw it over the furniture, and wonder why it leaks or blows off. The size and material matter more than most people realize, and getting this right upfront saves you a lot of frustration.
How to measure correctly (don't guess)
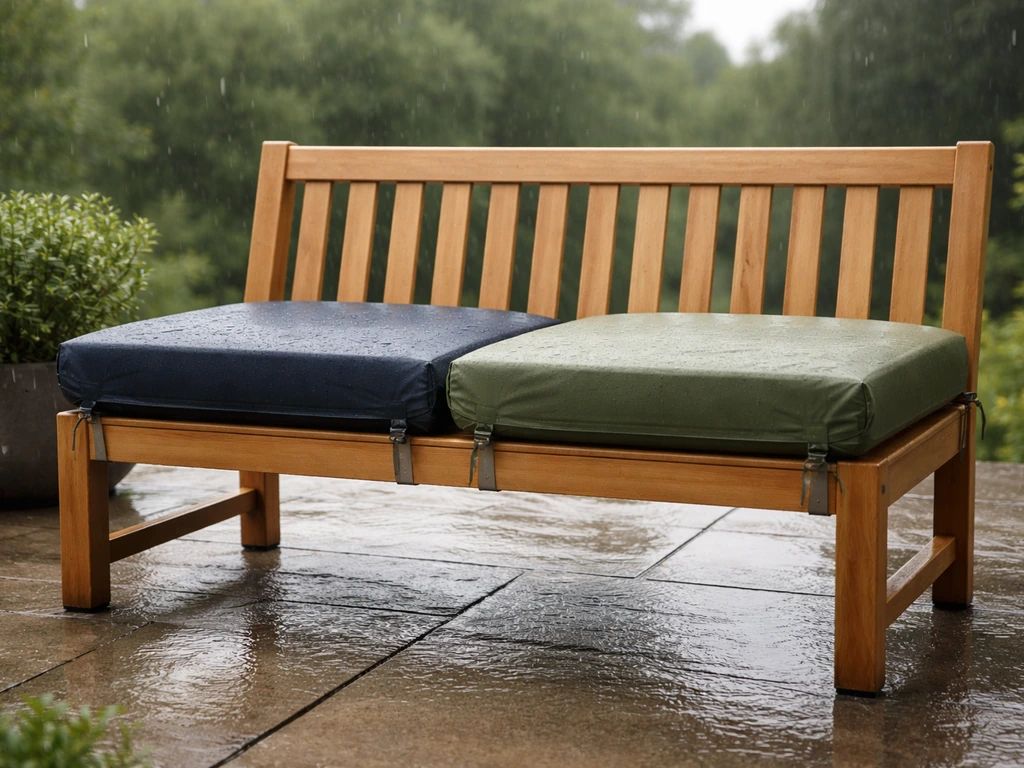
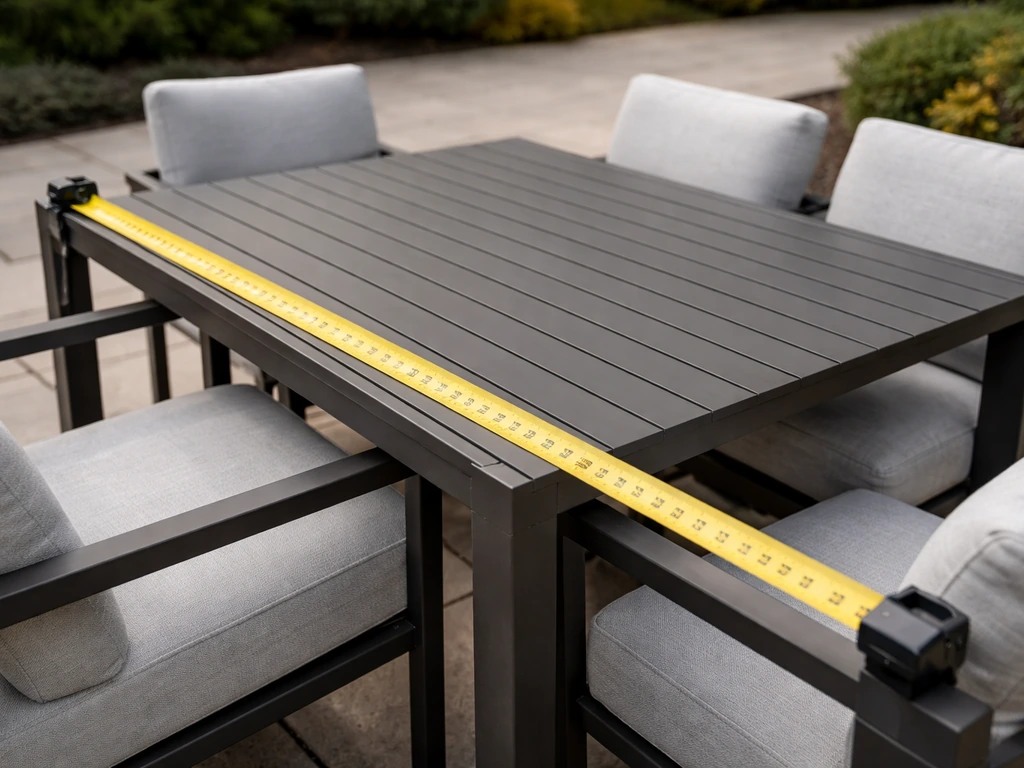
Measure the entire footprint of your furniture as a grouped assembly, not piece by piece. If you have a dining set, remember that the chair backs typically stick out past the table edge, sometimes by 6 to 10 inches. Measure the widest point from the outermost chair back on one side to the outermost chair back on the other side, then add at least 12 inches to every side for drape overhang. That overhang is what sheds the water away from the base of your furniture. Without it, rain runs straight down the legs and pools underneath.
Tarp shape: match it to your furniture layout
A rectangular tarp is the right call for straight-edged dining sets and sectional sofas. For circular tables or round hanging chairs, a round tarp or cover fits far better and avoids bunched corners that trap water. Using the wrong shape just creates awkward folds that become moisture pockets.
Waterproof vs. water-resistant vs. breathable: what actually matters
Here's a distinction worth understanding before you buy. A fully waterproof tarp (like heavy vinyl) lets zero water through the fabric, but it also traps moisture and creates a greenhouse effect underneath, which is exactly what causes mold on your cushions and frames. A water-resistant tarp sheds rain at an angle but can let pooled water seep through over time.
The sweet spot for patio furniture is a breathable, water-resistant material, typically coated polyester, that sheds rain while allowing some airflow to prevent condensation buildup underneath. Vinyl is great if you're just covering hard furniture with no cushions and in a high-rain area. Canvas breathes well but can transfer dye onto your furniture, so I'd skip it for covered patio pieces.
| Material | Waterproof? | Breathable? | Best For | Watch Out For |
|---|---|---|---|---|
| Coated Polyester | Water-resistant | Yes | Cushioned furniture, general use | Not ideal in sustained heavy downpours without proper pitch |
| Vinyl | Fully waterproof | No | Hard furniture, high-rain climates | Traps moisture, can cause mildew under cover |
| Canvas | Water-resistant | Yes | Short-term coverage | Dye transfer onto furniture surfaces |
| Poly Tarp (standard blue) | Waterproof | No | Budget, temporary use | Condensation buildup, not UV-stable long-term |
For most homeowners covering cushioned patio sets, a coated polyester tarp or cover rated for UV resistance and water resistance is the best all-around choice. It costs a bit more than a hardware store poly tarp (typically $20 to $60 depending on size), but it won't cook your cushions or leave you with a mildew problem in two weeks.
Prep the furniture before it goes under the tarp
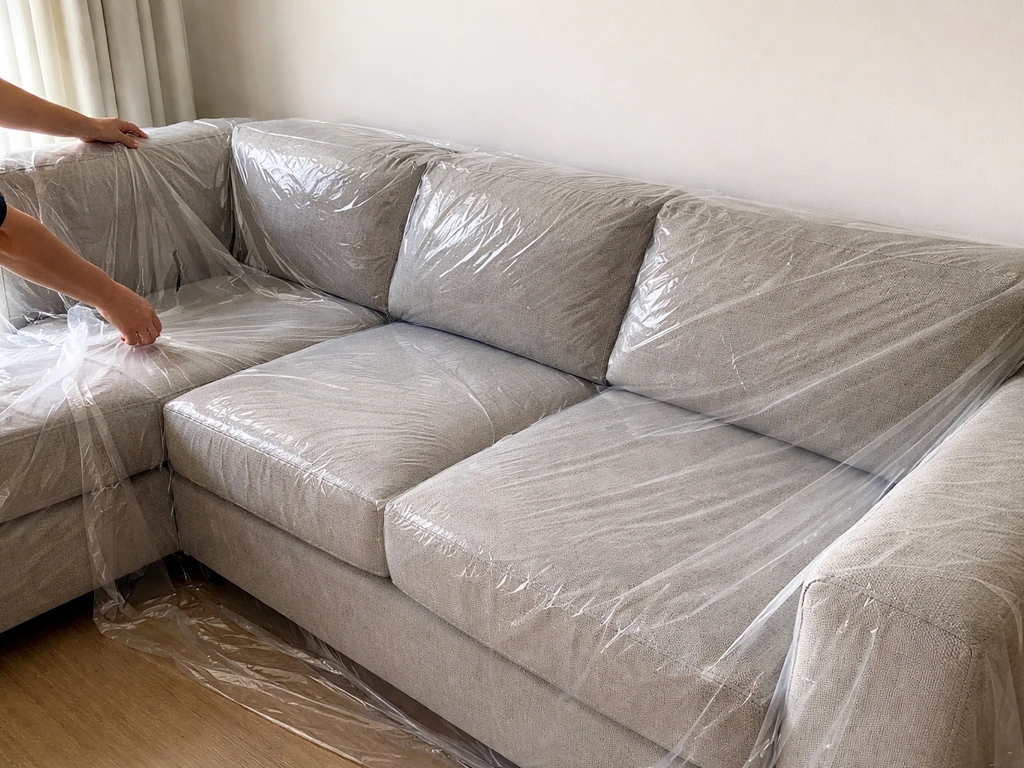
This is the step most people skip, and it's the one that causes the most damage. Covering dirty, damp furniture traps moisture, grime, and organic material underneath the tarp in a dark, warm environment. That's a perfect mildew factory. Here's how I prep before covering.
- Clean all furniture surfaces and cushions. Wipe down frames with a mild soap solution and rinse. For cushions, scrub with a soft brush and rinse thoroughly.
- Dry everything completely. After washing, let cushions air-dry in direct sun for at least 2 hours. Stand them upright to drain and blot with a towel first to speed up the process. Frames and metal parts should be dry to the touch before covering.
- Flatten back cushions onto the seat. If you have cushions with back sections, lay them flat onto the seat cushion before putting the tarp on. This prevents air pockets that trap moisture inside the cover.
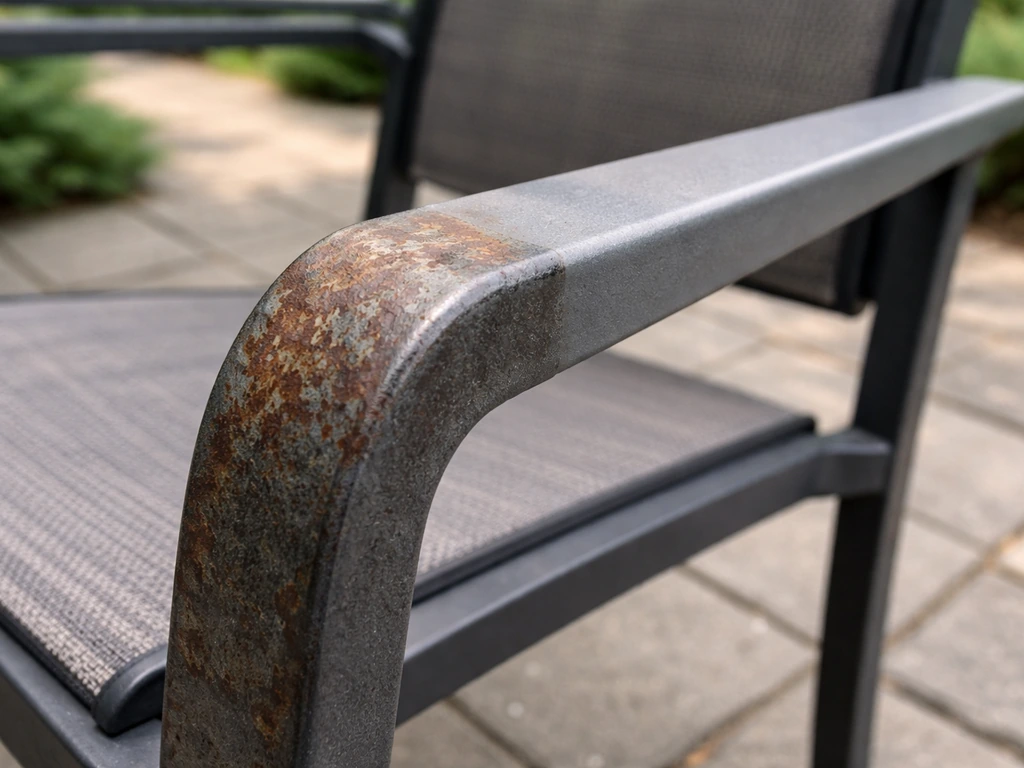
- Protect vulnerable spots. If your furniture has raw wood ends, exposed metal joints, or painted surfaces that contact the tarp directly, consider placing a breathable furniture pad or old towel between the contact point and the tarp to prevent abrasion wear and condensation concentration.
- Remove anything that doesn't need covering. Pull umbrellas down or take them inside. Remove loose pillows and store them indoors or in a waterproof bin. Fewer items under the tarp means a better fit and less moisture risk.
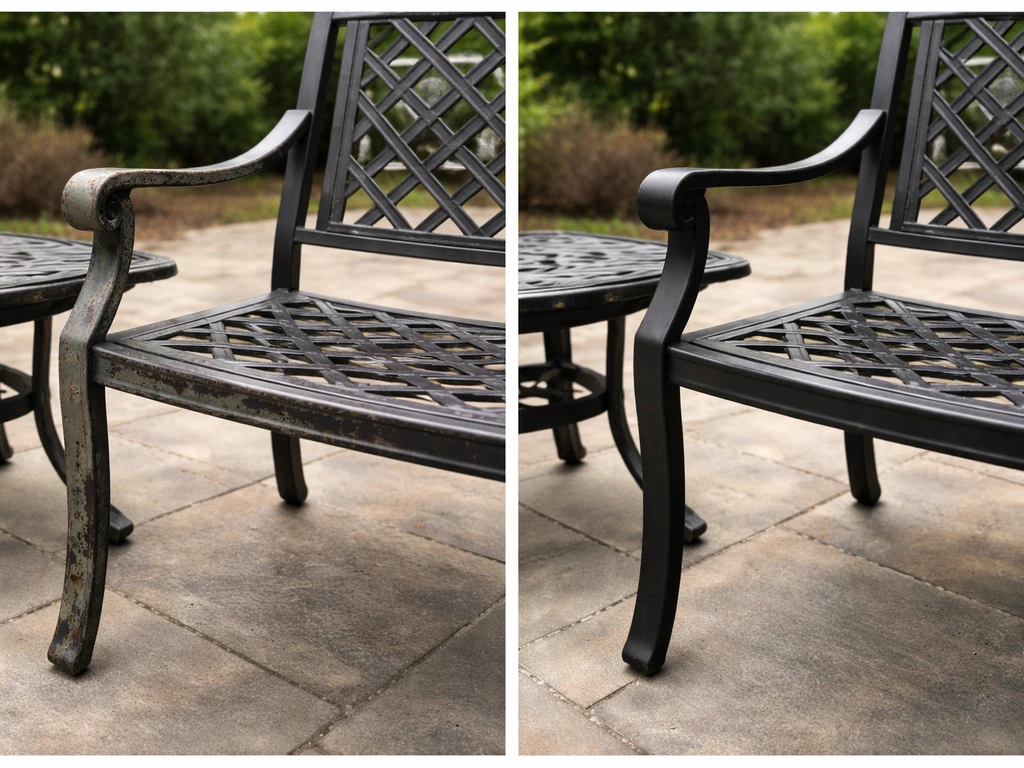
I made the mistake once of covering a just-rained-on set because I was in a hurry. Two weeks later I pulled the tarp off and the cushion covers had black mildew spots. Getting furniture dry before covering is non-negotiable.
How to actually secure the tarp: straps, cords, and tie-downs
There are several good ways to anchor a tarp, and the right choice depends on how windy your area gets and how permanent you want the setup to be. If you want to tie down patio furniture covers, the same approach applies: choose anchors and spacing that match your wind exposure and how secured the cover needs to stay. I'll go from easiest to most heavy-duty.
Bungee cords: quick and easy, but limited
Ball bungee ties (the ones with a small ball on one end that you push through the grommet) are the fastest option. Thread the ball through the tarp's grommet, then hook or loop the cord to a furniture leg, patio railing, or ground anchor point. They allow a small amount of stretch, which can actually reduce grommet tear-out from sudden wind gusts. The downside is they're not reliable in sustained high winds. Use them for light wind areas or as a quick fix, and always route them through the reinforced grommets rather than wrapping them around a loose edge of the tarp.
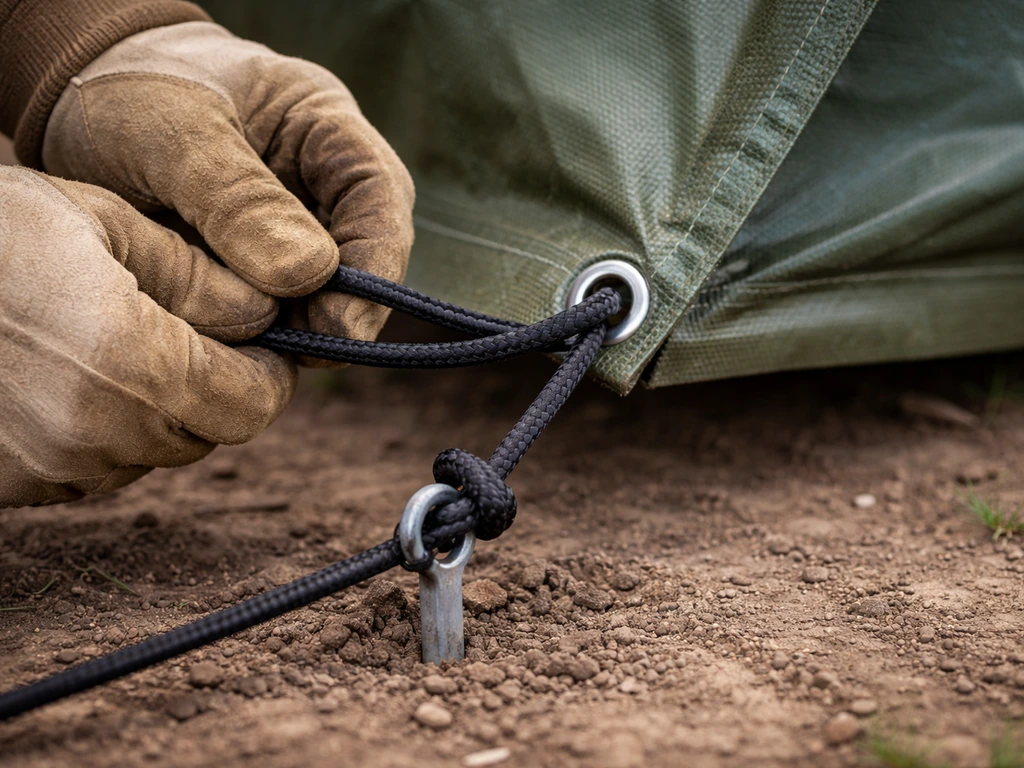
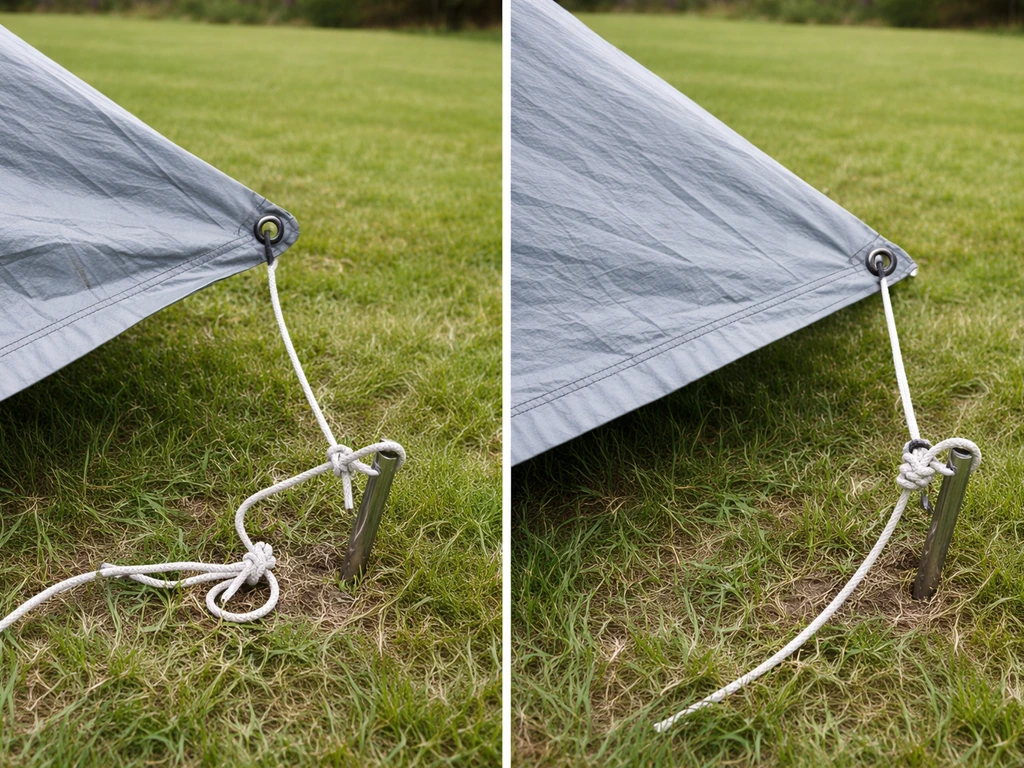
Rope and webbing straps with a proper hitch: better for wind
For more reliable hold, use non-elastic rope or flat nylon webbing straps. Thread them through the tarp's grommets and anchor them to solid points: furniture legs, deck cleats, or ground anchors. The key is using a tensioning hitch when you tie off. A trucker's hitch (easy to look up and learn in about five minutes) lets you apply real tension to the strap and lock it down without it loosening over time. This method puts consistent, distributed tension along the tarp edge, which stops billowing much better than bungee alone.
Ratchet straps: the heavy-duty option
If you're in a region with serious wind, or if you've already had a tarp blow off, ratchet straps are worth the extra few dollars. They apply much more tension than bungee or rope and hold it consistently. Run them over the top of the tarp and down to anchor points on both sides. One or two straps going lengthwise and one going across the width will make the tarp dramatically more resistant to lift. Just be careful not to overtighten at a single grommet point; that's how you tear the tarp. Distribute the force across multiple grommets.
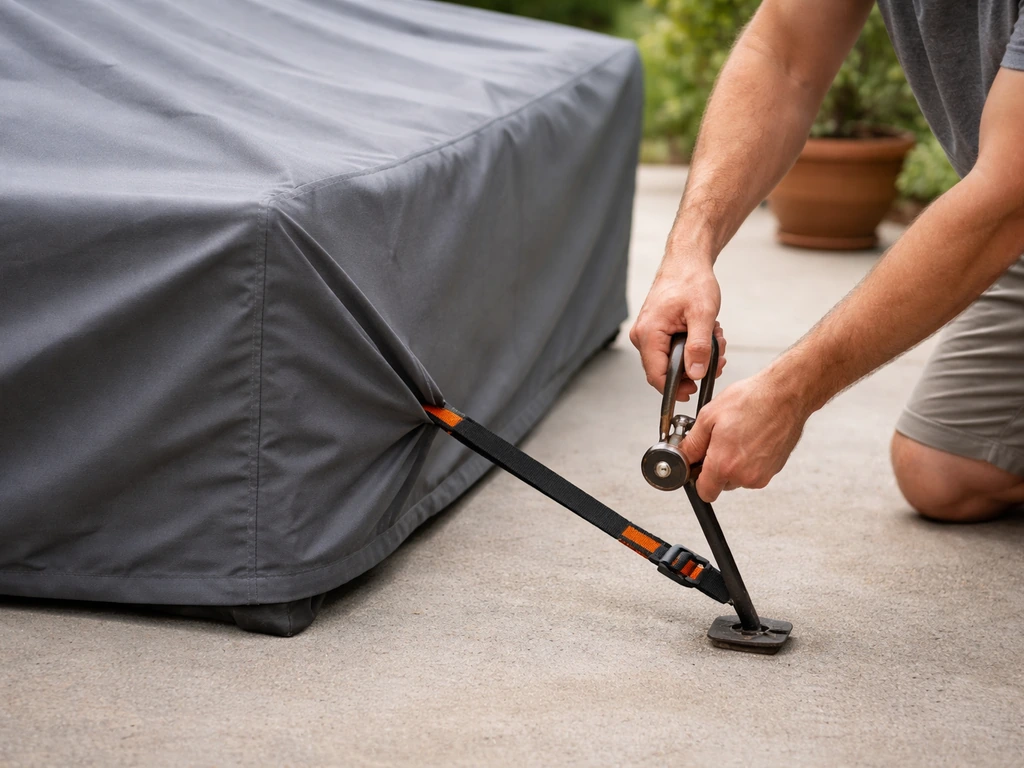
Ground anchors: the permanent solution for concrete or soil patios
If you want a truly fixed anchor point that won't move, you can install a patio tie-down anchor. For concrete patios, bolt-in anchors are available specifically for this purpose; you drill into the slab and set a bolt with an attachment head. For soil or grass around the patio, screw-in stake anchors drive directly into the ground and hold surprising amounts of tension. These are especially useful if your furniture doesn't have legs you can wrap a strap around easily. The investment is around $10 to $30 per anchor point, and they last for years.
Stop the flapping: weights, edge channels, and tensioning tricks
Flapping is the enemy. A tarp that flaps in the wind is one that will eventually tear, blow off, or abrade your furniture. Here's how to eliminate it.
Minimize slack everywhere
The single biggest cause of flapping is too much loose fabric. Once the tarp is over the furniture, pull it down snugly on all four sides before you tie anything. Tuck excess fabric under the furniture base where possible, or cinch it using a cord threaded through the hem grommets to gather the edge like a drawstring. The less excess fabric moving in the wind, the less chance of lift.
Add weight along the bottom edge
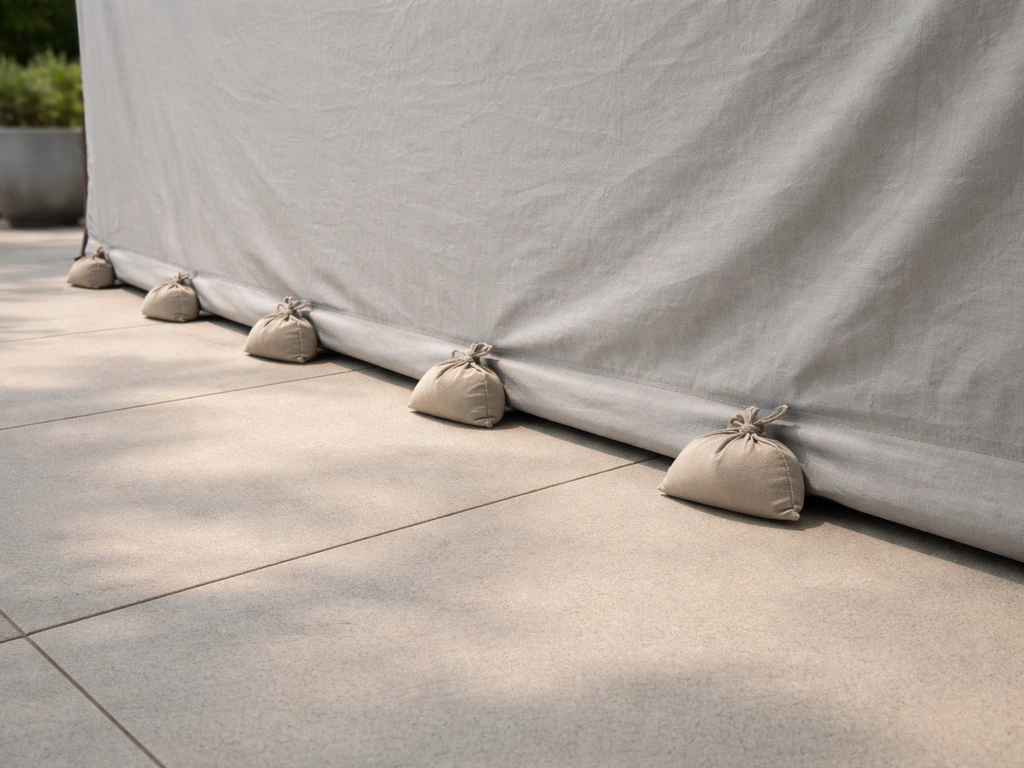
Sandbags laid along the draping edge of the tarp are one of the most effective and cheapest wind solutions available. A 10-pound sandbag costs almost nothing to make (fill a zip-lock freezer bag with sand, seal it, put it in a canvas bag) and sits on the overhanging edge of the tarp to counteract lift. Concrete blocks work too, though they're bulkier. The principle is simple: add enough downward force along the perimeter that wind can't get under the edge and billow the whole tarp up.
Use edge channels and rope-reinforced hems
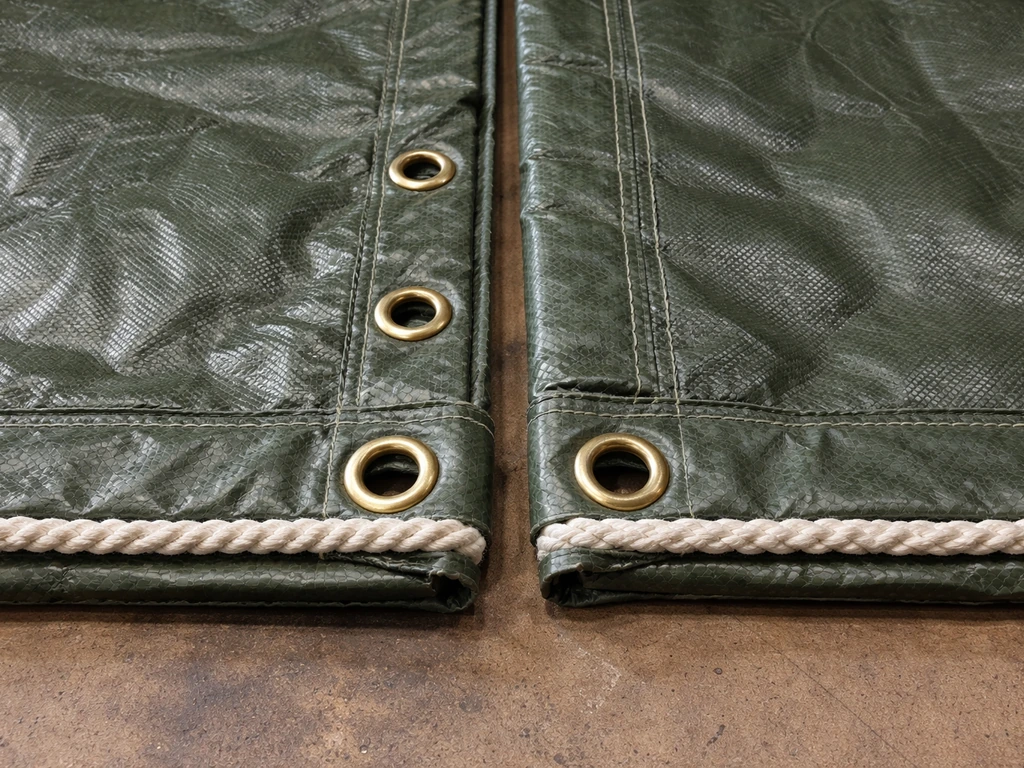
Higher-quality tarps have rope threaded through a folded hem along each edge. This distributes tension along the full edge rather than concentrating it at each grommet hole. If your tarp doesn't have this feature and you're finding grommets pulling out, you can reinforce the edge yourself with a strip of heavy-duty webbing sewn or taped over the hem, or purchase a replacement tarp with proper rope-reinforced edges. The difference in durability is significant.
Grommet spacing matters more than you think
A tarp with grommets every 18 to 24 inches along the edge gives you enough anchor points to truly eliminate the flapping sections between them. If your tarp has grommets only at the corners, that's four anchor points for what might be 20 feet of edge, and those long unsecured spans will catch wind like a sail. If you have this problem, you can add intermediate grommets using a grommet kit (under $15 at any hardware store) to create more tie-down points along the edge.
Covering different furniture shapes the right way
One approach doesn't fit all furniture shapes, and a badly fitted tarp can actually cause more harm than no tarp at all by concentrating moisture in the wrong spots.
Individual chairs
For standalone chairs, drape the tarp fully over the chair so it reaches the ground on all sides. Tuck the excess under the chair base or cinch it around the legs with a bungee cord or rope looped underneath the seat. The goal is no loose fabric flapping above knee height. If you have several chairs, consider grouping them together (stacked or clustered) under one tarp rather than doing individual wraps. It's faster and leaves less surface area for wind to work on.
Dining sets (table plus chairs)
Push the chairs in under the table before covering. This tightens the overall footprint and means you need a smaller tarp. Drape the tarp over the whole assembly, making sure it clears the chair backs on all sides and hangs down at least 12 inches from the table edge. Secure all four corners first, pulling each one snug before moving to the intermediate grommets. Then thread a strap or rope through the perimeter grommets at a consistent height and cinch it to hold the sides against the chair legs. Pull the cover down as far as possible on the frame to prevent sagging on top, which is where water pools.
Sofas and sectionals
Sectionals are the hardest to cover well because of their irregular L or U shapes. Lay back cushions flat onto the seat before covering, which keeps the profile lower and reduces moisture pockets. For an L-shaped sectional, you'll likely need either a custom-cut tarp or two overlapping tarps, with the overlap running toward the inside corner (so rain sheds outward, not into the joint). Secure the overlap seam with waterproof tape or a bungee cord. Then anchor the whole assembly with straps running over the top and down to either furniture legs or ground anchors at each corner.
Get the pitch right for water shedding
Flat tarps pool water. If your furniture is all the same height (like a low sectional), consider propping the center of the tarp slightly higher than the edges using a foam pool noodle, a folded towel, or even a stack of flat cushions underneath. Even a few inches of pitch is enough to direct water toward the edge and off the furniture instead of pooling in the middle and seeping through.
Seasonal upkeep, checking for problems, and safe removal
Putting a tarp on is not a set-and-forget situation. A cover that stays on all winter without a single check will likely create more problems than it solves.
How often to check and retighten
After any storm with sustained winds over about 20 mph, do a quick walk-around and check that all tie-down points are still taut and no corners have lifted. If you are also trying to stop loose fabric from lifting in high winds, focus on evenly spaced anchor points and eliminating slack so the tarp cannot billow. In calm weather, check the setup at least once a month during the off-season. Straps and bungee cords loosen over time as the materials settle, especially after temperature swings. A quick retighten every few weeks takes 10 minutes and extends the life of both the tarp and your furniture significantly.
When to pull the tarp off and let things breathe
Even a breathable tarp needs to come off occasionally. During extended warm, dry stretches in winter or early spring, pull the tarp off for a day to let the furniture air out, check for any moisture or mildew forming, and let everything dry fully before re-covering. If you're in a climate with mild, dry winters, you may only need to cover for rain events rather than leaving the tarp on continuously.
Removing and storing the tarp off-season
When you're done with the tarp for the season, remove it only on a dry day. Shake off any debris, hose it down if it's dirty, and let it dry completely before folding and storing. Storing a damp tarp folded up is just as bad as covering damp furniture; the mildew will be waiting for you next year. Fold it loosely and store it in a breathable bag or on a shelf where air can circulate around it.
Why your tarp keeps blowing off (and how to fix it)
If you've already had a tarp blow off or flap itself to shreds, here's a quick diagnosis guide. Most failures come down to a small number of root causes, and each has a straightforward fix.
| Problem | Why It Happens | Quick Fix |
|---|---|---|
| Tarp lifts off in wind | Too much slack, not enough anchor points, or only corner anchors | Add intermediate tie-downs every 18–24 inches, pull tarp snug before securing, add edge weights |
| Water pools on top | No pitch in the cover, cover is sagging in the middle | Prop the center higher with a noodle or cushion underneath, pull edges down further to create slope |
| Corners keep coming loose | Weak grommet points, overstretched bungee cords | Switch to ratchet straps or rope with a tensioning hitch at corners; reinforce grommets with webbing |
| Tarp abrades and tears on furniture edges | Sharp frame edges or hardware rubbing the tarp from below | Pad sharp contact points with foam pipe insulation or folded cloth; use wider straps to distribute load |
| Mildew forming under the tarp | Furniture covered while damp, or fully waterproof tarp with no airflow | Always dry furniture before covering; switch to a breathable tarp material; air out occasionally |
| Tarp sags in the middle after rain | Water accumulation due to flat pitch | Add center support, pull edges down tighter, improve pitch so water runs off edges |
| Grommets pulling out or tearing | Tension concentrated at too few points, too much force on a single grommet | Add more grommets with a grommet kit, switch to rope-reinforced edge tarp, reduce tension per point by using more anchor points |
The most common single failure I see is people who use only the four corner grommets to tie down a tarp. Four points on a large tarp leaves huge unsecured spans of fabric that billow, whip, and eventually either tear out the grommets or let the whole thing lift off. More anchor points, evenly spaced, is almost always the answer.
If you're dealing with more than just tarp securement, like trying to keep your furniture itself from sliding or tipping in high winds, that's a related challenge worth addressing separately. If you're focused specifically on how to secure patio furniture covers (not just a flat tarp), the tie-down methods and anchor spacing still follow the same fundamentals.
Locking up patio furniture can mean securing it to the ground or adding lockable covers so it resists theft in addition to wind. During a hurricane, locking up patio furniture means securing the items themselves so they cannot slide or tip in extreme wind, not just covering them.
If you are also worried about the furniture itself moving, use straps or tie-downs that secure the legs to ground anchors, not just the tarp keep your furniture itself from sliding or tipping in high winds. And if you've ever had a tarp-style furniture cover blow off despite all these steps, the issue might be that a fitted, purpose-built furniture cover with built-in straps or hem cords would serve you better than a flat tarp in your specific wind situation.
To further reduce theft risk, choose covers with built-in straps or lockable features and secure the furniture or cover to ground anchors or a solid frame fitted, purpose-built furniture cover. Either way, the fundamentals here still apply: dry furniture, snug fit, plenty of anchor points, and regular checks are what keeps the whole system working.
If you need help selecting tie-down methods specifically for a furniture cover, focus on straps, hem cords, and evenly spaced anchor points tie-down methods for a furniture cover.
FAQ
What should I do if my tarp only has grommets at the corners?
If your tarp doesn’t have grommets along the edges, don’t rely only on corner tie-downs. Add intermediate anchor points using a grommet kit near the hem (reinforce the hem first), or sew in a webbing reinforcement strip at each edge so ties pull from a reinforced area instead of tearing through the fabric.
Is a fully waterproof tarp better for patio furniture, or can it cause condensation problems?
For wind, use a breathable, water-resistant coated polyester cover or tarp over cushioned sets. Avoid fully waterproof vinyl for furniture with cushions because it blocks airflow and increases condensation, even when the tarp itself doesn’t leak.
How tight should I make the straps so the tarp is secure but doesn’t tear?
Don’t overtighten one tie at a single grommet. Instead, run straps at consistent heights and distribute load across multiple grommets. If you see fabric puckering or grommets pulling, loosen and re-tension so force is shared along the perimeter.
How do I know when my tarp is the wrong size?
A tarp can be too small even if it covers the furniture. You want drape overhang on every side and enough fabric to remove loose slack. If you see vertical rain streaks straight down to the base or pooled water on top, switch to a larger size (measure the grouped footprint plus overhang) or use a cover with a shaped fit for your furniture type.
Can I prop up a flat tarp to prevent pooling, and won’t that make it flap?
Yes, but only if the center is higher than the edges so water drains outward. Propping works best for flat, low-profile tarps using a foam noodle or folded towel under the middle, and you still need perimeter weight or tension so the elevated section doesn’t balloon in wind.
What exact signs mean my tarp securement needs to be adjusted after bad weather?
After a storm, check the tarp while it’s calm, not during gusts. Look for lifted corners, loosened ties, and grommets that have started to pull out or elongate holes. Re-snug immediately, then repeat after the next windy day.
Which tie-down method is safest in sustained high winds, bungees, rope, or ratchet straps?
For high winds, prioritize non-elastic rope or flat nylon webbing (trucker’s hitch) or ratchet straps, plus weight along the overhanging edge. Ball bungee ties can work for light wind, but they tend to loosen under sustained gusts.
Where should I anchor the straps if I have no solid patio tie-down points?
Choose anchor points that won’t shift. For ground anchors, avoid loose soil, and place anchors where you can achieve solid pull strength. If you anchor to furniture legs or railings, make sure the attachment is to sturdy frame points so the tarp can’t pry loose and start flapping.
How should I store the tarp after the season to prevent mildew and odor?
Don’t store it damp or folded tightly. Shake off debris, let it fully dry in the open, then fold loosely and store in a breathable area (or a breathable storage bag). Damp storage often creates mildew that then reappears when you reinstall the tarp.
My tarp blew off or shredded. What’s the most common root cause and the first fix?
If the tarp blows off, it’s usually because of too few tie-down points or excessive loose fabric. Fix by adding evenly spaced perimeter anchors (or rope-reinforced hem if available), securing all corners first, then tensioning the full edge rather than just corner grommets.
Do I need to leave the tarp on all winter, or can I take it off periodically?
In mild, dry winters, you may not need continuous coverage. A practical rule is to cover for rain events or during damp stretches, and remove the tarp on warm dry days to air out and check for any early mold or moisture trapped underneath.