You can build a solid, comfortable PVC pipe patio bench or chair for $40 to $80 in materials, and it will hold up to sun, rain, and years of outdoor use if you choose the right pipe schedule, use solvent cement properly, and add a few smart reinforcements. If you are also into Minecraft, you can use these same PVC patio furniture build steps as inspiration for how to make patio furniture in Minecraft. The catch is that PVC furniture has a reputation for wobbling and cracking at the joints, and that reputation is mostly earned by people who skipped the primer, used the wrong fittings, or eyeballed their cuts. Do those three things right and you end up with a piece that genuinely surprises people when they learn what it's made of.
How to Make Patio Furniture Out of PVC Pipe: Step-by-Step

Maren Grady
13 Jun 2026
Choosing a PVC Patio Furniture Design
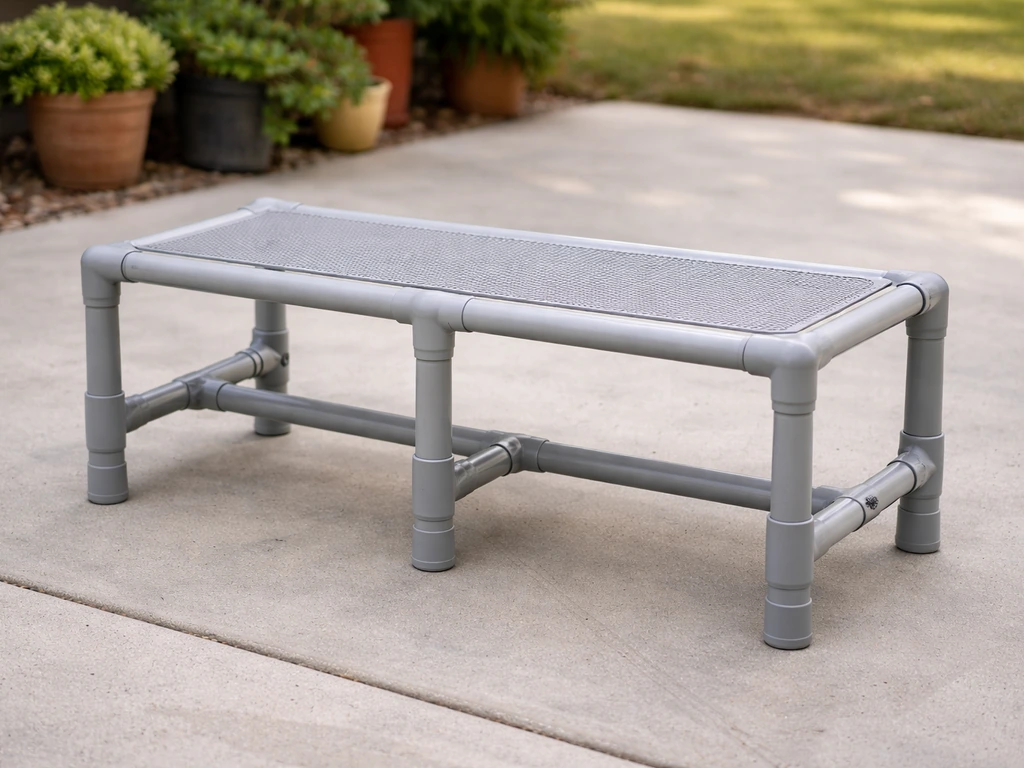
The design you choose has a bigger impact on success than almost anything else. Some PVC builds are simple and forgiving; others look cool in photos but are genuinely hard to make stable. For a first build, I'd point you toward one of three starting points: a slatted bench, a straight-leg armchair, or a loveseat frame. All three use rectangular geometries (90-degree elbows and tee fittings), which means your joints are predictable, your cuts are straightforward, and troubleshooting is easy.
Avoid curved or freeform designs on a first build. They require heat bending the pipe with a heat gun or pipe bender, and if you overbend or underbend a section, you've wasted a length of pipe and potentially weakened its structure. Stick to straight-cut, right-angle geometry until you're confident with the material.
For seating dimensions, comfortable outdoor seating generally lands around 17 to 18 inches of seat height, 20 to 22 inches of seat depth, and 20 to 24 inches of seat width per person. A two-person bench runs 48 inches wide. A back angle between 95 and 105 degrees from the seat plane feels relaxed without being a recliner. Keep these numbers in mind as you draft your design, because building for the wrong dimensions is one of the most common reasons a finished piece gets abandoned.
If you want to compare approaches, wood-based builds offer a different set of tradeoffs. If you want to go the all-wood route, you can use similar measurements and plan a cut list for wood patio furniture instead how to build patio furniture out of wood. PVC is lighter, won't rot, and costs less per linear foot than most dimensional lumber, but wood is easier to sand, stain, and customize. Both are genuinely DIY-friendly.
Materials and Tools Checklist
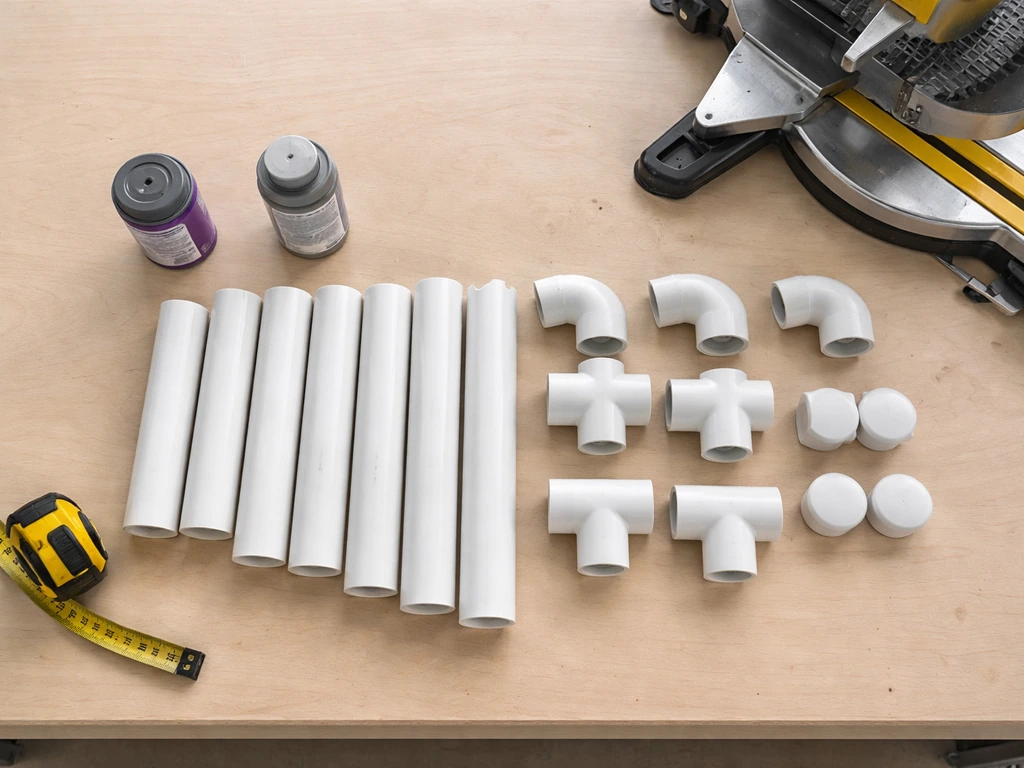
The Right PVC Pipe: Schedule Matters
Use Schedule 40 PVC pipe in 1.5-inch or 2-inch diameter for all structural members. Schedule 40 is the standard gray or white pipe sold at every hardware store, and its wall thickness is what gives the furniture its rigidity. Schedule 20 (thin-wall) is cheaper and tempting, but it will flex under body weight and the joints will eventually fail. Do not use it for legs, seat rails, or back supports. The price difference between Schedule 20 and Schedule 40 in 10-foot sticks is usually less than $3 per stick. It's not worth skimping.
For a standard two-person bench you'll need roughly 60 to 70 linear feet of 1.5-inch Schedule 40 pipe. That's typically 7 to 8 sticks of 10-foot pipe. Buy one extra stick as insurance for miscuts.
Fittings
You'll use three fitting types for most designs: 90-degree elbows (for corners), tee fittings (for T-intersections like where legs meet seat rails), and end caps (to close off exposed pipe ends and prevent water from pooling inside). Buy fittings rated for the same schedule as your pipe and from the same manufacturer line if possible, since socket dimensions vary slightly between brands. A mismatched fitting won't sit flush in the socket, which undermines the joint.
Hardware and Adhesives
- PVC primer (purple or clear): softens the pipe and fitting surfaces so the solvent cement can fuse them at a molecular level. Do not skip this.
- PVC solvent cement: the actual bonding agent. Use a formula rated for the pipe schedule and diameter you're working with.
- Stainless steel or galvanized screws (1.5 to 2 inch): for attaching wood slats or fabric webbing to the frame.
- Zip ties or stainless hose clamps: useful as temporary clamps while joints cure.
- End caps: one per open pipe end.
- Sandpaper (120 grit): for deburring cut ends.
Tools
- Miter saw or PVC pipe cutter: a miter saw gives the cleanest, squarest cuts. A ratcheting pipe cutter works but can slightly deform the end of thicker pipe.
- Tape measure and marker
- Drill with 1/8-inch and 3/16-inch bits
- Speed square: for checking that assemblies are actually square before cement sets
- Fine-grit sandpaper or deburring tool
- Nitrile gloves and safety glasses: solvent cement and primer are aggressive chemicals
- Flat work surface or sawhorses
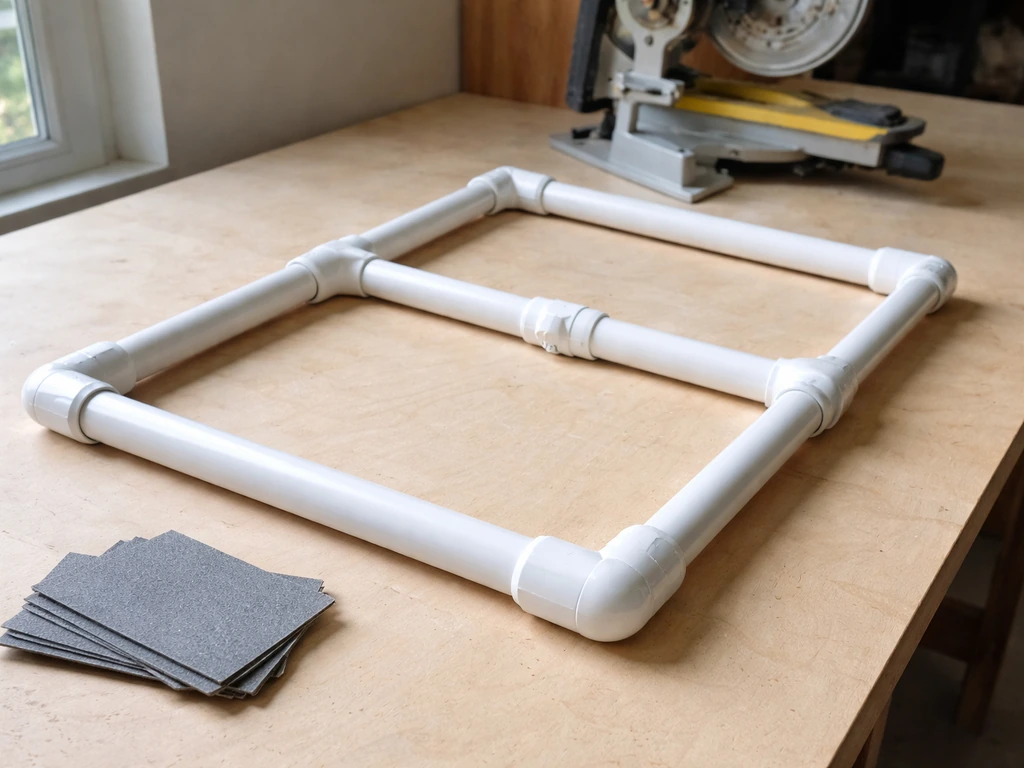
Measuring, Planning, and Building Your Cut List
This step is where most people either set themselves up for success or doom the project before a single cut is made. Draw your design on paper first, even if it's just a rough sketch with labeled dimensions. Then convert every segment of pipe into a line on a cut list. Every single piece gets a label (A, B, C, etc.), a quantity, and a length. This sounds tedious. It saves you hours.
Here's the critical detail people miss: the pipe doesn't run the full dimension of the piece. Each fitting socket adds about 1 inch of socket depth on each side where the pipe inserts. So if you want a seat rail that spans 48 inches from outside corner to outside corner, and there's a 90-degree elbow at each end, the pipe itself needs to be 48 inches minus 2 inches (1 inch per elbow socket) = 46 inches. Fail to account for socket depth and your piece comes out longer than planned, and you won't be able to dry-fit the frame.
Before finalizing your cut list, dry-fit a sample joint using a scrap piece and the actual fittings you bought. Measure how deep the pipe seats into the socket, then use that real number (not an assumed one) for every calculation.
Sample Cut List: Simple Two-Person Bench (48 inches wide)
| Part | Length | Qty | Notes |
|---|---|---|---|
| Front/back seat rails | 46 inches | 2 | Account for 1-inch socket depth per elbow |
| Side seat rails | 19 inches | 2 | Seat depth minus socket depths |
| Back uprights | 18 inches | 2 | Height above seat rail to top back rail |
| Front legs | 17 inches | 4 | Two per front corner (tee fitting) |
| Back legs | 17 inches | 4 | Same as front legs |
| Top back rail | 46 inches | 1 | Matches front seat rail length |
| Cross stretchers (lower) | 46 inches | 2 | Front and back, near floor for rigidity |
| End caps | — | 8+ | Close all open pipe ends |
Once your cut list is done, mark every piece with masking tape and a marker before you start cementing. Cementing the wrong piece into the wrong joint is a genuinely expensive and frustrating mistake because solvent-welded PVC joints are essentially permanent.
Cutting, Assembling, and Reinforcing the Frame
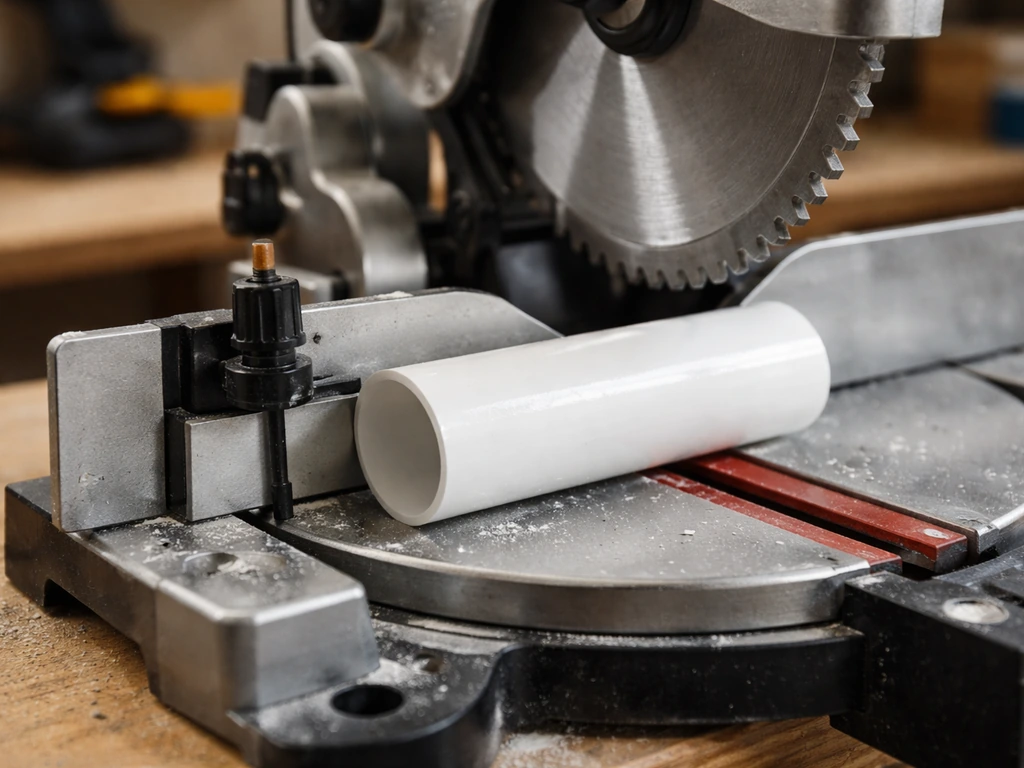
Cutting the Pipe
Set up your miter saw with a fine-tooth blade and cut each piece to length. After every cut, deburr the inside and outside edge of the pipe end with 120-grit sandpaper or a deburring tool. This takes about 10 seconds per cut but matters for two reasons: burrs prevent the pipe from seating fully in the fitting socket, and rough edges can crack fittings under load. Chamfer (lightly bevel) the outside edge of the pipe end slightly with the sandpaper. This helps the pipe slide smoothly into the socket without dragging cement off the wall during assembly.
Dry Fitting the Whole Frame
Before any primer or cement touches anything, assemble the entire frame dry. Every piece, every fitting, fully assembled. Check that the pipe bottoms out in each socket (you should feel or hear a light stop) and that there's no lateral slop in the fit. Check all corners with a speed square. This is the moment to catch a miscut, a wrong-length piece, or a design flaw. Once you're happy with the dry fit, mark each pipe-to-fitting pair with a marker line across the joint so you know the correct rotation when you reassemble with cement.
Solvent Cementing the Joints
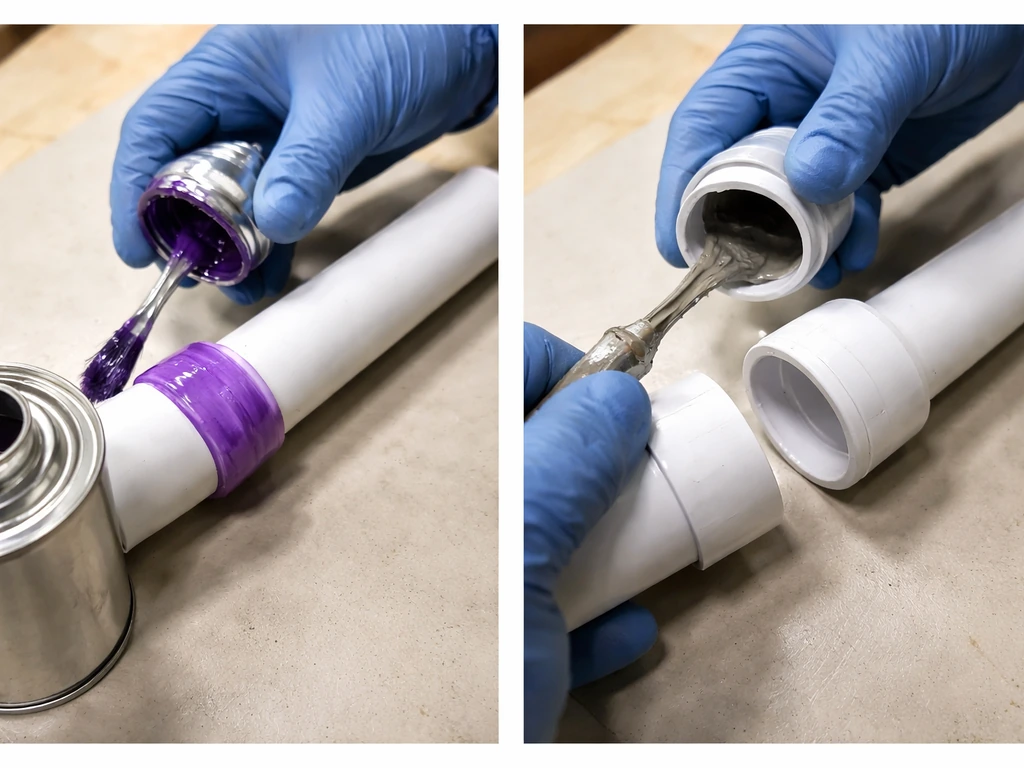
Work one joint at a time. Start from the inside of the frame and work outward so you have room to handle the pieces. The sequence for each joint is: apply primer to the pipe end and to the inside of the fitting socket, let it flash off for a few seconds (it should look matte, not wet), then immediately apply solvent cement to both surfaces while the primer is still active. Oatey’s solvent-welding guidance specifies steps like cut and deburr or chamfer, dry fitting, cleaning, applying primer for PVC or CPVC, applying solvent cement, assembling, and allowing proper cure time before testing primer should flash off for a few seconds and the cement should be applied immediately while the primer is still active. Push the pipe firmly into the socket with a slight twisting motion to distribute the cement, align to your marker line, and hold everything still for 30 seconds. That 30-second hold is not optional: it's what prevents the joint from pushing apart as the cement begins to set. The Plastic Pipe Fittings Association specifically calls this out as a critical step for a satisfactory joint.
Applying the cement while the primer is still wet on the surface gives you the strongest possible bond. If the primer has fully dried before you apply cement, the softening effect is gone and your bond will be weaker. Work quickly, but don't rush so much that you apply to the wrong surface or skip a step.
Allow the assembled frame to cure undisturbed for at least 2 hours before moving it, and wait 24 hours before putting any load on it. Solvent-welded PVC joints reach full strength slowly.
Reinforcing Weak Points
The joints most likely to fail on PVC furniture are the ones taking angular load: the connection between the seat rail and the back uprights, and the lower joints on the legs. Two reinforcement strategies work well. First, add lower cross stretchers near the floor on both the front and back of the frame. These convert racking forces (the side-to-side wobble that destroys furniture) into compression, which PVC handles well. Second, consider adding a diagonal pipe brace or a horizontal cross brace at mid-height on the back of the bench. It's not the prettiest detail, but it makes a real difference in long-term rigidity.
For extra insurance on leg-to-rail joints, after the cement has cured you can drill a 3/16-inch hole through the fitting and pipe and insert a stainless steel pop rivet or a stainless screw. This mechanical fastener backs up the solvent weld and prevents rotation if the joint ever softens in extreme heat.
Weatherproofing, Finishing, and Long-Term Durability
PVC pipe is already resistant to moisture and rot, which is one of its biggest advantages over wood. But it has two real outdoor vulnerabilities: UV degradation and heat-driven joint softening. Unprotected white PVC turns chalky and brittle after a few seasons in direct sun. The pipe itself becomes noticeably more fragile, and the fitting joints can begin to loosen as the pipe surface degrades.
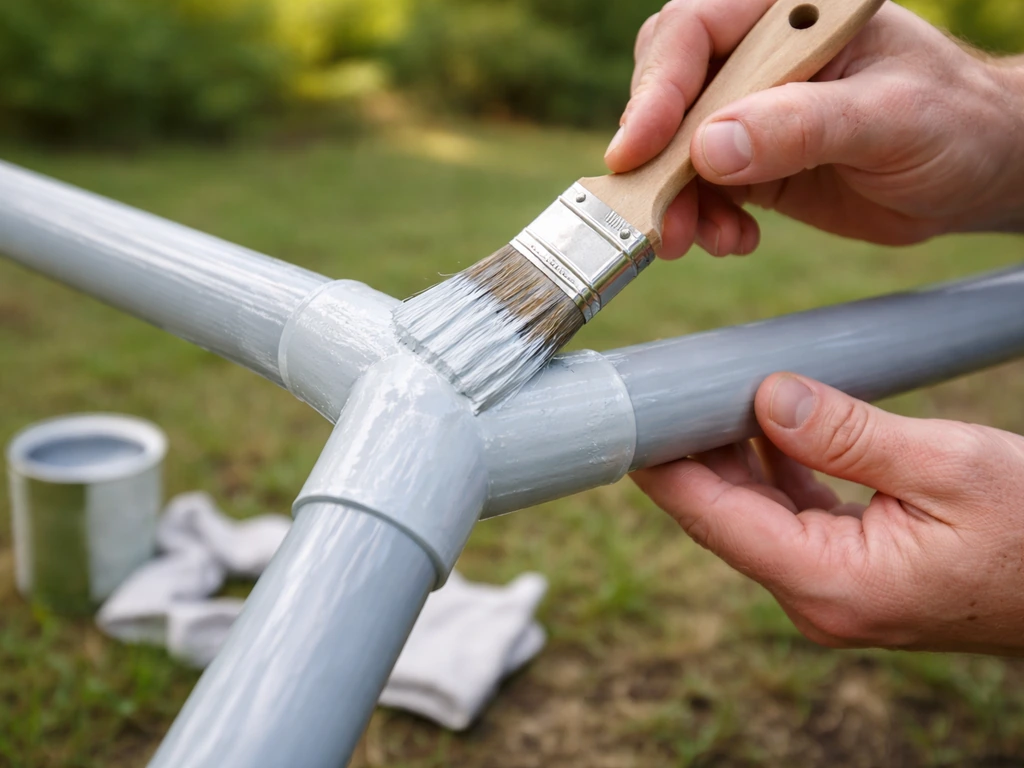
UV Protection
The most effective protection is a coat of paint formulated for plastic. Look for spray paints labeled for plastic and outdoor use, such as Rust-Oleum 2X Paint and Primer or Krylon Fusion. These bond directly to PVC without a separate primer coat. Apply two thin coats rather than one heavy coat, letting each coat dry fully. Light-colored or white finishes hold up better in full sun because they reflect more UV and heat. Dark colors absorb more heat, which can soften joints in climates with very hot summers.
Before painting, wipe down all surfaces with isopropyl alcohol or acetone to remove any residue from the cement and primer process. This step matters; paint adhesion to PVC is about surface cleanliness more than anything else.
Sealing Joints and Open Ends
Cap every open pipe end with a PVC end cap cemented in place. Open pipe ends collect water, insects, and debris, and standing water inside the pipe accelerates degradation from the inside. Run a thin bead of clear silicone caulk around the exterior of each fitting joint after the cement has cured. This isn't structural, but it keeps moisture from wicking into any micro-gaps and protects the joint from freeze-thaw cycles in colder climates.
Storage and Seasonal Care
PVC furniture is light enough to store easily. If you're in a climate with freezing winters, bring it inside or cover it with a fitted furniture cover to prevent thermal cycling stress on the joints. Even a tarp secured with bungee cords is better than leaving it uncovered through a hard freeze.
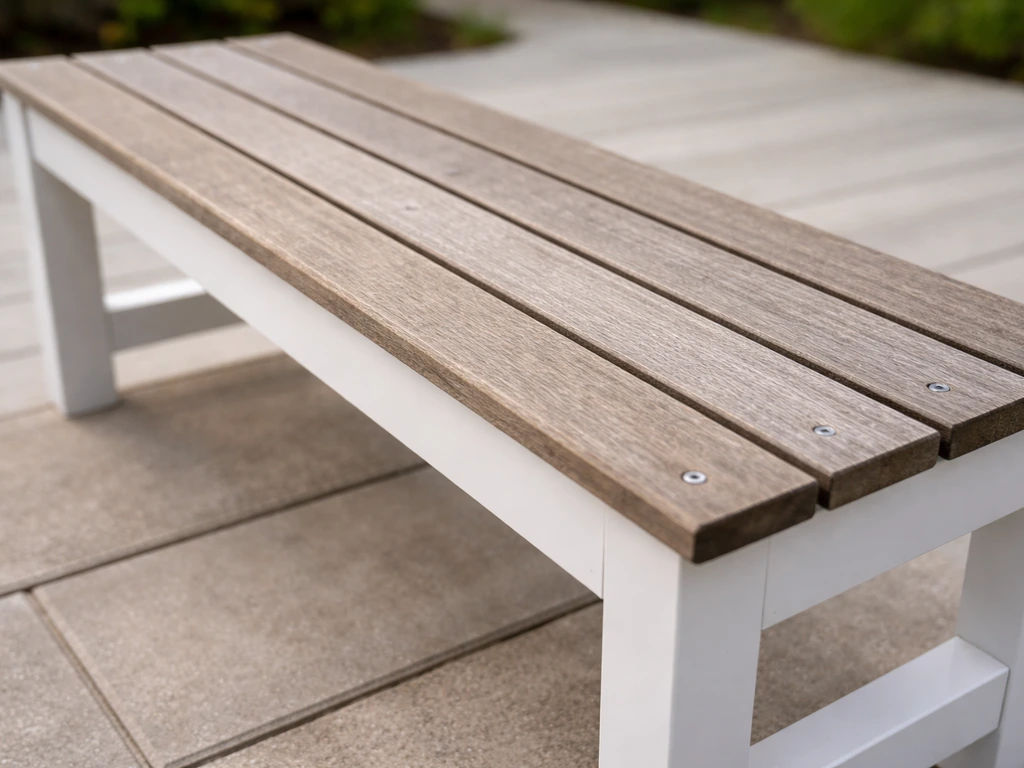
Adding Seating Surfaces: Slats, Fabric Webbing, and Cushions
A bare PVC frame isn't comfortable to sit on, so you need to add a seating surface. Three approaches work well with pipe furniture: wood slats, outdoor fabric webbing (like pool chair strapping), and drop-in cushions. Each has tradeoffs.
| Surface Type | Cost | Comfort | Durability | Difficulty |
|---|---|---|---|---|
| Wood slats (1x4 cedar or pine) | Low ($15–$30) | Good with cushion | Good if sealed | Easy |
| Outdoor fabric webbing | Low ($10–$25) | Very comfortable | Excellent | Moderate |
| Foam cushion with outdoor fabric | Medium ($30–$80) | Best | Good if covered | Easy |
| PVC pipe slats (extra pipe) | Lowest | Firm | Excellent | Easy |
Installing Wood Slats
Cut 1x4 cedar or pressure-treated pine boards to the width of your seat frame. For a different take on patio seating, you can also use 2x4 lumber to build patio furniture with a traditional wood-frame approach 2x4 patio furniture. Cedar is the better choice: it's naturally rot-resistant, lighter, and doesn't require treatment chemicals that can off-gas onto skin. Space slats about 1/2 inch apart for drainage. Pre-drill each slat end with a 1/8-inch bit to prevent splitting, then attach with two stainless steel screws per end into the seat rail. Countersink the screws slightly so the heads don't create pressure points. Seal the slats with an exterior deck sealer or teak oil before installation and reapply once a year.
Outdoor Fabric Webbing
This is the method used on classic lawn chairs and it works beautifully on PVC frames. Buy 2.5-inch or 3-inch outdoor webbing (polypropylene or vinyl-coated) and weave it across and between the seat rails using a simple over-under pattern. Attach each strap end with stainless steel staples driven with a manual staple gun, or fold the end over and secure with a stainless screw and washer through the pipe. Pull the webbing firm but not so tight that it bows the rails inward. Webbing lets air circulate under you, which matters a lot in hot weather, and it's easy to replace if it fades or frays after a few seasons.
Securing Cushions
Standard outdoor seat cushions sized for the bench (usually 44 to 48 inches wide) can sit directly on slats or webbing. To keep them from sliding, attach two small stainless steel D-rings to the front edge of the seat frame with hose clamps, then thread the cushion's tie strings through them. If your cushion doesn't have ties, sew or hot-glue short velcro strips to the underside of the cushion and matching strips to the slat tops. It's not elegant, but it works in the real world when wind gets involved.
Troubleshooting Common Build Problems and Maintenance Tips
The Frame Wobbles
Wobble almost always means one of two things: a joint wasn't fully seated before the cement set, or the frame lacks diagonal bracing. If you catch it during dry fitting, fix it before cementing. If you catch it after the cement has cured, your options are to add mechanical fasteners (screws or pop rivets) through the fitting into the pipe to lock the joint, or to add a cross brace or stretcher to the problem area. If a joint is visibly rotated out of alignment and you just applied cement, you have about 30 to 60 seconds to realign before the cement starts holding. After that, you're either living with it or cutting it apart.
A Joint Cracked or Pulled Apart
This usually happens because primer was skipped, the cement was applied to dry-primed surfaces, or the joint was loaded before full cure. U.S. Plastic also recommends using primer because it softens and penetrates the joining surfaces so the solvent cement can adhere well and form a strong joint primer was skipped. You cannot re-cement a joint that has already been solvent welded. The only fix is to cut out that section of pipe and fitting and replace it with a coupling and new pipe segment. This is annoying but not catastrophic. Cut the failed fitting off with a hacksaw, slide a coupling over the pipe ends, and cement a new fitting and pipe segment in place.
The Paint Is Peeling
Peeling paint on PVC almost always means the surface wasn't clean before painting, or a non-plastic-bonding paint was used. Strip what's peeling with a plastic scraper, wipe down with isopropyl alcohol, let it dry completely, and reapply with a plastic-rated spray paint. Don't try to paint over peeling paint. It will continue to lift and take the new coat with it.
The Slats Are Squeaking or Shifting
Slats squeak when they're not fastened tightly enough to the rail or when the wood has dried and contracted slightly. Re-tighten the screws and add a thin bead of clear outdoor caulk between the slat and the rail surface. If the slat has warped, replace it. Cedar warps less than pine, which is another reason to spend the extra dollar per board.
Annual Maintenance Checklist
- Inspect all joints for cracks, UV chalking, or looseness. Press on each joint by hand to test for any give.
- Check all mechanical fasteners (screws, rivets) for rust or backing out. Replace any stainless screws showing corrosion.
- Wipe down the entire frame with a mild soap solution and rinse clean.
- Touch up any areas where the paint has chipped or faded with plastic-rated spray paint.
- Reapply deck sealer or teak oil to wood slats.
- Inspect webbing for fraying, UV bleaching, or stretched spots. Replace individual straps as needed.
- Check end caps to make sure they're still fully seated and no water has found its way inside the frame.
PVC furniture built with the right pipe, properly cemented joints, and a UV-protective finish will easily last 5 to 10 years with basic seasonal care. The material cost stays well below what you'd pay for comparable commercial outdoor furniture, and you end up with a piece sized exactly for your space. If you get comfortable with the process here, the same techniques scale up to full dining sets, loungers, or even outdoor sofas, and they pair well with approaches from other material builds if you want to experiment with mixing pipe frames and wood tops.
FAQ
Can I mix PVC schedules (for example schedule 40 pipe with schedule 20 fittings)?
For patio furniture, you want “schedule 40” fittings that match the pipe’s schedule and brand line if possible, because socket dimensions can vary slightly. If you accidentally buy schedule 20 fittings, the joint may not seat correctly, which is one of the biggest causes of hidden wobble even if the cement looks fine.
What should I use to make sure my PVC cuts are the right size and square?
If you cut with a standard woodworking blade, check that your cuts are square and clean, and plan to deburr both edges every time. A cut that has a small burr or an angled end can prevent full insertion, and the joint can feel “almost seated” during dry-fit but still fail under racking loads later.
Is it okay to use thinner or more flexible PVC for the seating or braces?
Yes, but only for non-structural parts. Upholstery straps and cushion supports can use the thinner, more flexible areas of webbing and hardware, while legs, seat rails, and back supports should stay schedule 40 to avoid flex and eventual joint loosening.
Do I need to dry-fit the whole frame, or can I dry-fit one joint at a time?
You should dry-fit the entire frame and verify every corner is fully seated, then mark orientation lines before cement. If you dry-fit only one joint at a time, you can miss a cumulative error where later pieces no longer align when everything is assembled together.
What’s the biggest mistake to avoid when cementing (and can I adjust after it starts setting)?
Use a small, controlled amount of primer and keep cement application uniform, but do not try to “re-cement” after it sets. Solvent-welded joints are not like glue-ups where you can adjust later, once the cement begins to grab you have a short realignment window, and after that you must replace the section.
What should I do if the joint doesn’t fully bottom out when I assemble it?
If your joints still feel loose after cement, do not force it and hope it tightens as it cures. Remove and replace that section if it cannot bottom out correctly during the cement hold, because a gap usually means the pipe did not seat fully or the parts were mismatched.
Does weather (cold, humidity, or heat) change how I should prime and cement?
In cold or very humid weather, primer can flash differently and cement can thicken faster, so shorten your delays between primer and cement. Also, pick a ventilated area and consider doing assembly indoors until pieces warm up slightly, since cold PVC can be harder to push into the socket without disturbing alignment.
What’s the best finish strategy to prevent sun damage and water problems?
For durability, cap all pipe ends, then add a UV-protective finish. White or light colors tend to hold up better in full sun, and if you prefer dark colors you may need a higher-coverage topcoat approach because heat absorption can soften joints over time.
When should I paint the furniture after assembly, and what can cause early peeling?
For outdoor use, a simple way is to paint only after full cure and after you wipe off cement residue with isopropyl alcohol or acetone. If you paint too soon, trapped solvent can interfere with adhesion and cause early peeling, especially at joint lines.
How do I diagnose wobble, and what reinforcement actually fixes it?
Add diagonal bracing or cross stretchers in the areas that see racking, and consider a diagonal brace on the back or a mid-height crossbar. Wobble that appears after curing usually means alignment issues were not caught in dry-fit, or the design lacks a path to resist side-to-side twisting.
My PVC chair feels tippy, not just wobbly. What should I adjust first?
If the seat height feels right but the chair feels “tippy,” it’s often an issue with leg spacing or the base rectangle width. Widen the front-to-back stance, add lower cross stretchers near the floor, and ensure diagonal or back bracing to resist the angular forces that topple frames.
How should I store PVC patio furniture in winter to prevent joint stress and moisture buildup?
To store in freezing climates, bring it inside or fully cover with a form-fitting cover, a tarp alone can trap moisture and increase thermal cycling. Elevate the furniture off the ground if possible, so standing water or melting snow cannot stay in contact with the base.