To seal wood patio furniture, clean the wood with an oxygen-based cleaner, let it dry fully (at least 48 hours), sand it smooth starting with 120-grit and finishing with 220-grit, then apply 2-3 thin coats of your chosen sealer or finish, letting each coat dry 6-24 hours before recoating. Choose a penetrating oil sealer for a natural look, a stain-sealer combo for color plus protection, or a spar urethane for the toughest film-building barrier. Done right, one good sealing job will protect your furniture from rain, UV damage, rot, and mildew for 1-3 years.
How to Seal Wood Patio Furniture Step by Step DIY Guide

Maren Grady
29 Apr 2026
When (and why) to seal outdoor wood furniture
Unfinished or poorly protected wood outside is basically on a countdown. Rain drives moisture into the grain, UV breaks down the lignin that holds wood fibers together, and warm damp conditions are a welcome mat for mildew and rot. Sealing creates a barrier (or fills the grain with water-repelling oils) that slows all of that down dramatically. It's one of the highest-return maintenance tasks you can do, costing maybe $20-50 in product for a set of chairs and a table, versus hundreds or thousands to replace weathered furniture.
The right time to seal is before the damage starts, but most people don't get there until they notice the signs. Look for any of these and you know it's time:
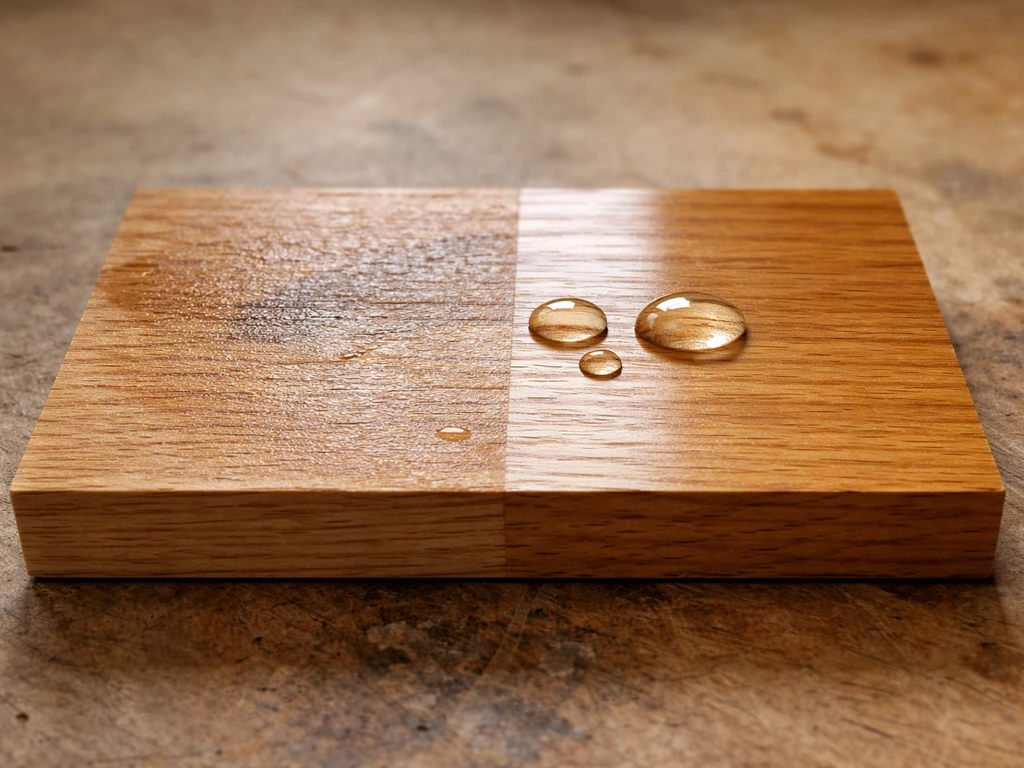
- Water soaks in instead of beading up (do the drop test: drip water on the wood; if it absorbs within a minute or two, the protection is gone)
- Gray, silvery discoloration on the surface (UV-oxidized wood)
- Black streaks or fuzzy patches (mildew or early mold)
- Peeling, flaking, or chalky old finish
- Rough, splintery texture from grain raise
- Wood that feels soft or spongy in spots (early rot)
Timing also matters by season. Ideally, you want to seal when air temperatures are between 50°F and 90°F, humidity is below 85%, and no rain is in the forecast for at least 48 hours after application. Late spring and early fall are typically the sweet spots. Most penetrating sealers need rain-free time to absorb and cure fully before getting wet. Some products like Olympic's weather-ready formulas allow application 8-12 hours before or after rain, but that's the exception, not the rule. When in doubt, check your specific product label.
One important note about new pressure-treated lumber: if you built your furniture from fresh PT wood, wait 3-6 months before sealing it. Pressure-treated wood holds a lot of moisture from the treatment process, and sealing too early traps that moisture in, causing finish failure. Use the water-drop test to confirm the wood is ready: pour a little water on the surface, and if it absorbs readily rather than beading up, the wood is dry enough to accept a finish.
Choosing the right sealer, stain, or finish for your wood type
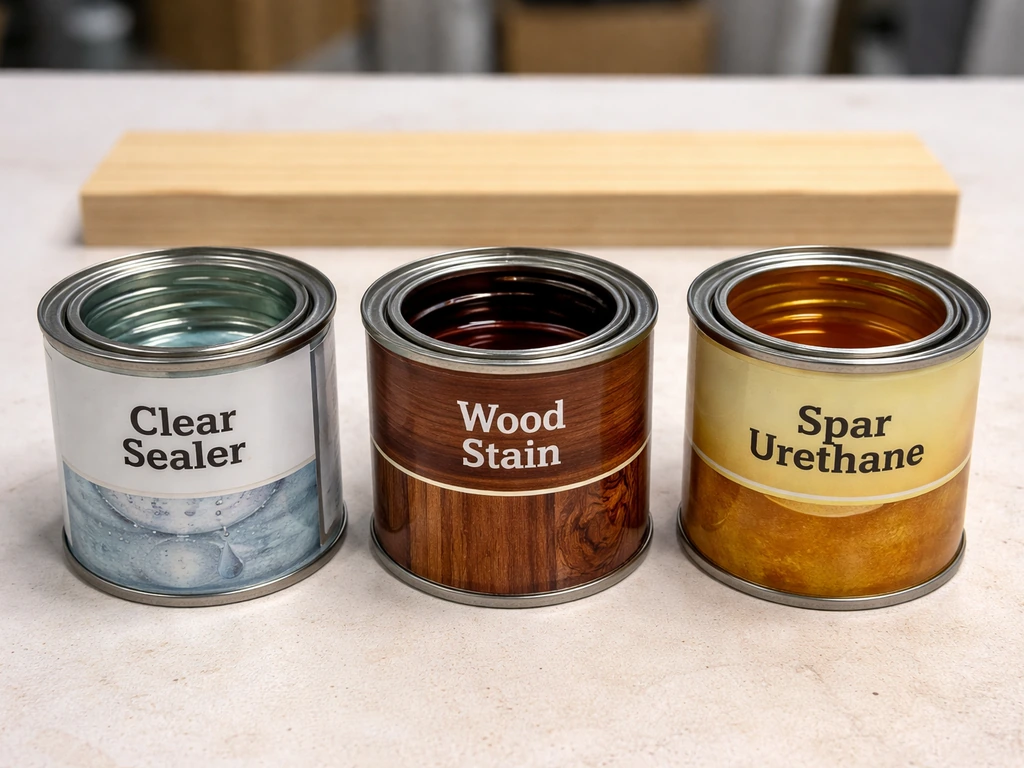
This is where most people either make a great choice or waste an afternoon and $40. The three main product categories work very differently, and the best one depends on your wood species, how much color you want, and how much maintenance you're willing to do long-term.
| Product Type | How It Works | Best For | Durability | Recoat Frequency |
|---|---|---|---|---|
| Penetrating oil sealer (e.g., TWP, Defy) | Soaks into the grain, repels moisture from within | Teak, cedar, ipe, most oily hardwoods | Moderate | Every 1-2 years |
| Stain-sealer combo (e.g., Olympic MAXIMUM) | Adds color while sealing the surface | Cedar, pine, pressure-treated wood | Moderate-high | Every 2-3 years |
| Spar urethane (e.g., Minwax Helmsman) | Builds a protective film on the surface | Pine, oak, furniture that needs tough protection | High (film) | Every 3-5 years, spot repairs as needed |
| Exterior waterproofing finish (e.g., Thompson's WaterSeal) | Penetrates and seals against moisture | Most softwoods, pressure-treated lumber | Low-moderate | Every 1-2 years |
For teak specifically, a dedicated teak sealer is the right call. Teak is an oily tropical hardwood and film-forming products like varnish don't bond well to it long-term. A penetrating teak sealer fills the grain without sitting on top, which means it ages gracefully instead of peeling. That said, nothing is permanent on teak outdoors; reapplication at the first sign of wear is the rule, not the exception.
For cedar and pine (the most common DIY furniture woods), a stain-sealer combo gives you the best mix of color, UV protection, and moisture resistance. For furniture pieces that see heavy contact and you want to avoid refinishing for as long as possible, spar urethane is the toughest choice. It looks more like a varnish, but it flexes with temperature swings better than standard polyurethane, which is critical outdoors.
Quick budget note: a quart of penetrating sealer or stain-sealer runs $15-30 and will cover a standard 4-piece furniture set. Spar urethane runs about the same but you'll need 3 coats, so buy a quart per piece for small furniture or a full quart for a set if you're efficient. Don't go cheap on the finish itself; this is genuinely not the place to save $5.
Prep steps: cleaning, stripping, sanding, and drying
Here's where most DIYers rush and then wonder why the finish peeled in six months. Prep is 80% of the job. A sealer applied to dirty, wet, or unsanded wood will fail. Period. Do this right and the rest is easy.
Step 1: Clean the wood thoroughly
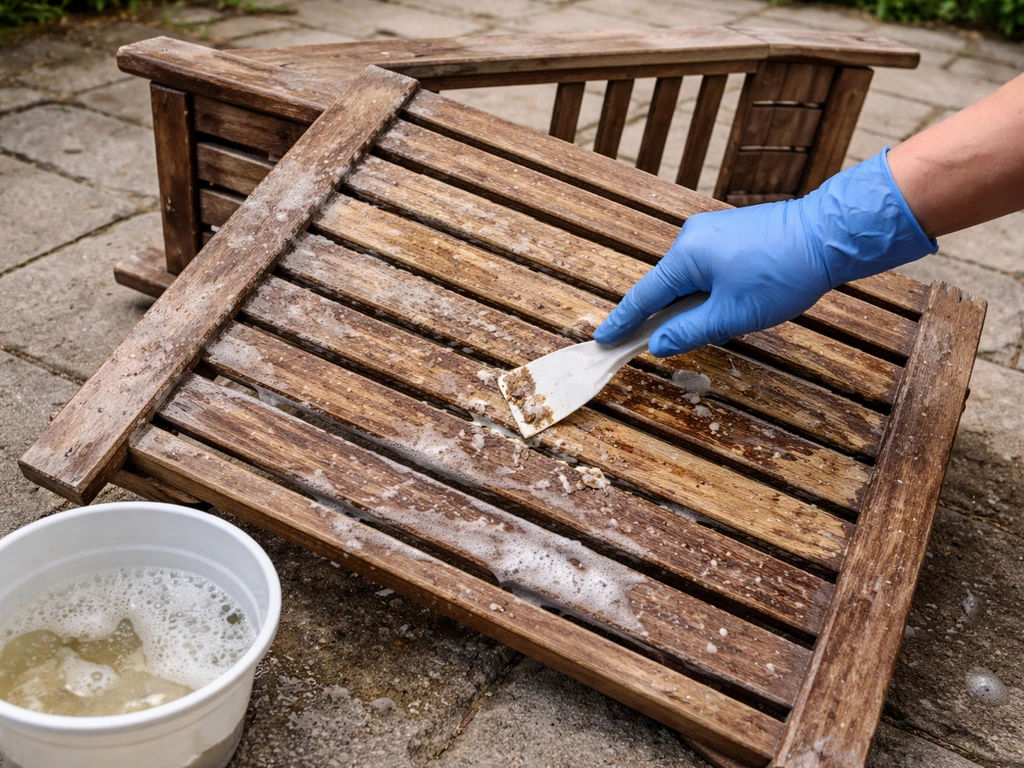
Use an oxygen-based cleaner (sodium percarbonate products like Defy Wood Cleaner or generic deck cleaner) mixed with water. Oxygen bleach is the right choice here because it removes mildew, surface dirt, and the gray oxidized layer all at once, without damaging the wood fibers or leaving an unnatural whitewashed look. Chlorine bleach kills mildew but doesn't remove dirt and deposits effectively, and heavy use can actually damage treated wood. Mix per the label directions, scrub with a stiff-bristle brush, let it sit 10-15 minutes, then rinse thoroughly. For furniture that's just dusty and has no mildew, a good scrub with dish soap and a hose-off works fine.
Step 2: Strip old flaking finish (if needed)
If the old finish is peeling, flaking, or coming off in chunks, you need to remove it before applying anything new. New sealer over peeling old finish will peel with it. Use a chemical stripper formulated for exterior wood (follow label directions carefully, wear gloves and eye protection), or go mechanical with a paint scraper and 80-grit sandpaper on the worst sections. You don't need to strip down to raw wood everywhere, but all loose and flaking material has to go. If the finish is mostly intact and just dull or lightly weathered, you can skip stripping and go straight to sanding.
Step 3: Sand the surface
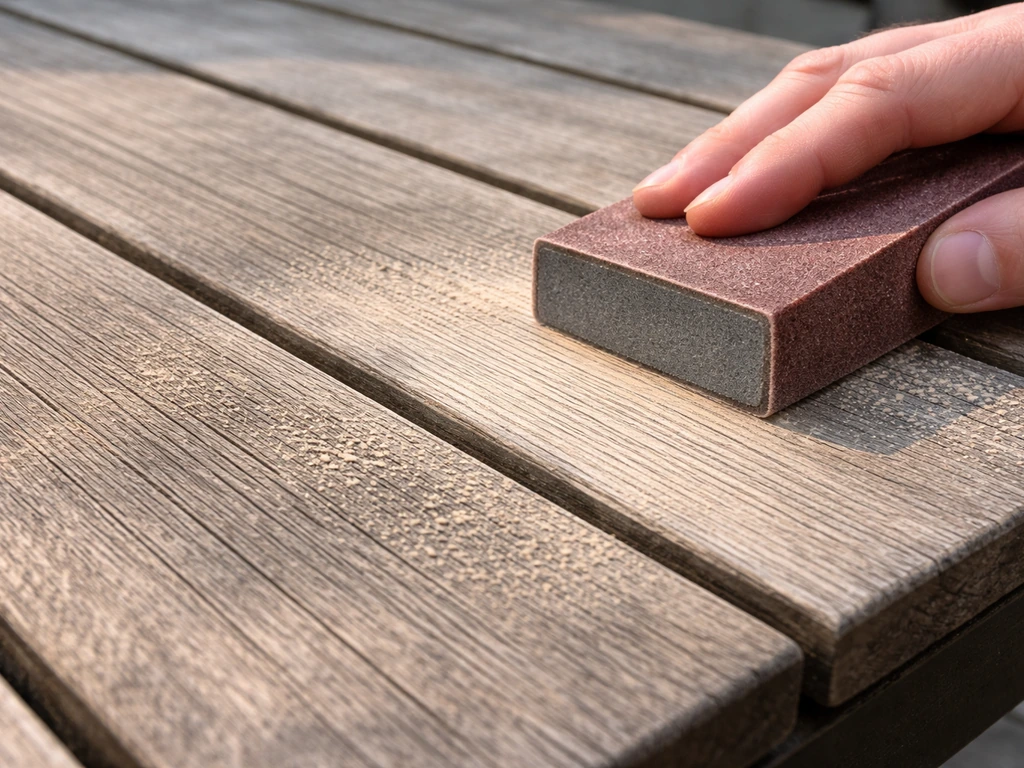
Sand with the grain, never against it. Start with 120-150 grit to knock down rough spots, raised grain, and any remaining old finish residue. Follow up with 180-220 grit for the final pass to open up the pores and create a smooth, even surface that accepts the sealer uniformly. For spindles, carved sections, or curved legs, folded sandpaper or sanding sponges work better than flat sheets. Wipe or blow off all dust before moving on. Sanding dust left on the surface will get sealed in and create a gritty, uneven finish.
Step 4: Let the wood dry completely
After cleaning, the wood must dry fully before you apply any finish. Thompson’s WaterSeal notes that drying time varies with temperature and humidity, and recommends allowing the wood to dry at least partially so there is no more gray color, mildew, or old coating before proceeding. For most conditions, that means at least 48 hours of dry weather. Don't rush this. Wet wood under sealer is the number one cause of finish failure, trapped moisture, and mildew showing back up within weeks of your project. If you're unsure, do the water-drop test again: if water still beads on the surface after cleaning, the wood is too wet. Wait until it soaks in.
How to seal wood patio furniture: step-by-step application

Gather your materials before you start so you're not hunting for a brush halfway through the first coat with wet sealer drying on the piece. If you’re wondering how to waterproof patio furniture, this step-by-step approach will help you seal, cure, and recoat for long-lasting rain and UV protection. You can use the same general waterproofing ideas when learning how to seal metal patio furniture waterproof patio furniture. Here's what you'll need:
- Your chosen sealer, stain, or spar urethane
- Natural-bristle brush (for oil-based products) or synthetic-bristle brush (for water-based)
- Foam brush or foam pad applicator (great for flat surfaces and avoiding brush marks)
- Stir stick
- Drop cloth or cardboard to protect the ground
- Gloves and safety glasses
- 120-grit and 220-grit sandpaper
- Tack cloth or clean rag
- Mineral spirits or water (for cleanup, depending on product type)
- Set the furniture on a drop cloth in a shaded spot if possible. Direct sunlight causes the sealer to dry too fast, which creates lap marks and uneven absorption.
- Stir the product thoroughly (don't shake it; shaking creates bubbles that show up in the finish). Re-stir every 20-30 minutes during application.
- Start with the end grain and joints. These are the most absorbent parts of any wood piece and the most vulnerable to moisture entry. Apply a generous coat to all end grain surfaces first and let it soak in for a few minutes before continuing.
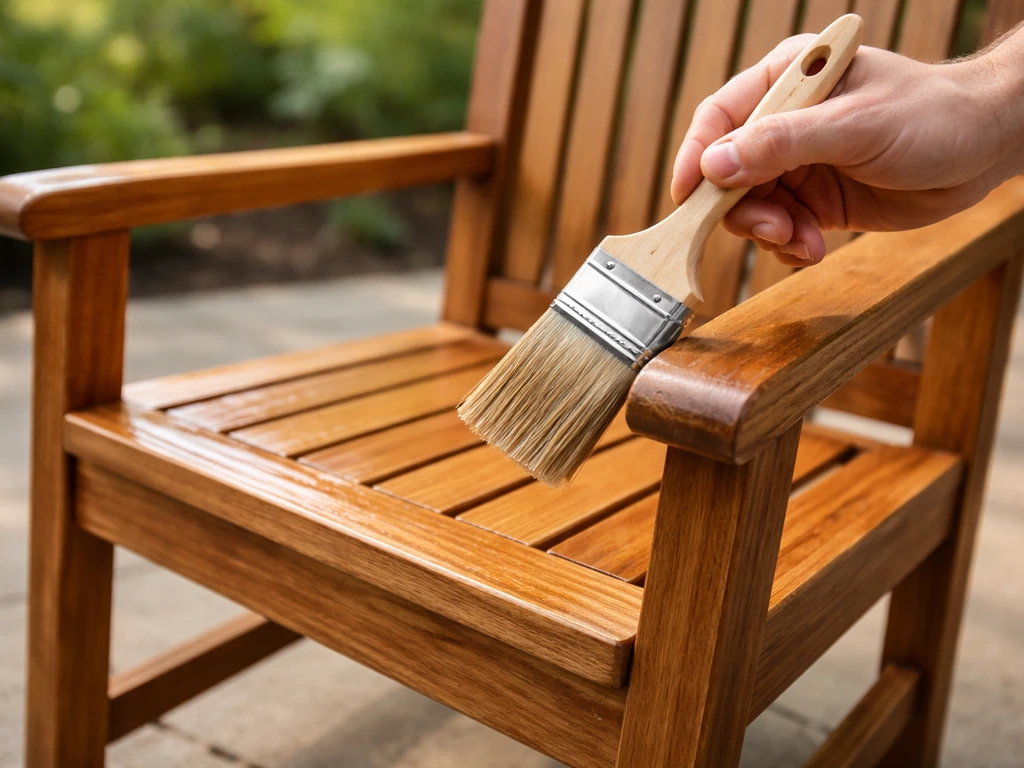
- Apply the first coat in long, even strokes following the direction of the grain. Work one section at a time and maintain a wet edge to avoid lap marks. Don't overload the brush; thin coats absorb and cure better than thick ones.
- For flat surfaces like tabletops, a foam pad applicator gives the most even coverage with the least brush marking. For spindles, legs, and curved parts, a brush gives better control.
- Wipe off any excess that pools in grooves or joints before it dries. Pooled finish dries tacky and doesn't cure properly.
- Let the first coat dry fully (see the timing section below), then lightly sand with 220-grit sandpaper to knock down any raised grain or dust nibs. Wipe clean with a tack cloth.
- Apply the second coat the same way. Most penetrating sealers need 2 coats. Spar urethane typically needs 3 coats for full protection.
- After the final coat, don't sand unless the surface feels rough. Let it cure fully before moving the furniture back outside.
One thing I learned the hard way: don't skip the end grain step. The cut ends of boards absorb moisture at a rate that's 3-5 times higher than face grain. If you seal the top and sides of a bench but ignore the end grain on the legs, the legs will start rotting from the bottom up within a season or two.
Drying and curing times, weather windows, and recoat schedule
Drying and curing are two different things, and the distinction matters. Dry means the surface isn't tacky and won't transfer to your hand. Cured means the finish has fully hardened chemically and is ready for use and exposure. Never judge readiness by the touch test alone.
| Product Type | Dry to Touch | Recoat Window | Light Use | Full Cure |
|---|---|---|---|---|
| Thompson's WaterSeal | ~2 hours | Not typically recoated | 24 hours | 72 hours |
| Olympic MAXIMUM stain-sealer | 2-4 hours | 4-8 hours | 24-48 hours | 72 hours |
| TWP penetrating sealer | 1-2 hours | 1 hour (between coats) | 24-48 hours | 72+ hours |
| Minwax Helmsman Spar Urethane | ~6 hours | 6+ hours | 24 hours | 72 hours |
Between coats of spar urethane, lightly sand with 220-grit, wipe clean, then apply the next coat. This is not optional; it improves adhesion and gives you a much smoother final surface. For penetrating sealers, you typically don't sand between coats; just let the first coat absorb and apply the second while the wood is still slightly tacky (within the recoat window listed on the label).
Keep the furniture protected from rain for at least 48 hours after the final coat. If you are wondering how to waterproof patio furniture, focus on proper cleaning, multiple thin coats, and giving the finish enough time to cure before any rain hits. A penetrating sealer that gets rained on before it cures will wash out of the grain and you'll get blotchy, uneven protection. If rain is coming sooner than that, postpone the project. The wood isn't going anywhere.
For the recoat schedule going forward, plan on inspecting the furniture at the start of every season. Do the water-drop test. If water soaks in, it's time to reapply. Most penetrating sealers on outdoor furniture need refreshing every 1-2 years. Spar urethane on a well-protected piece can go 3-5 years, but you'll likely need to spot-repair high-wear areas like tabletops and armrests more often. Staying ahead of it with a light maintenance coat is a lot easier than stripping and starting over.
Common mistakes, troubleshooting, and long-term maintenance
Tacky finish that won't dry
This almost always means either too much product was applied at once, the humidity was too high during application, or the wood wasn't dry enough. If a coat is still tacky after 24 hours, wipe the surface down lightly with mineral spirits (for oil-based products) to remove the excess, let it dry out, and apply a thinner coat next time. In high humidity, give the piece an extra day before recoating.
Peeling or flaking finish
Peeling means the finish didn't bond to the wood. The cause is almost always one of three things: wet wood, dirty wood, or new sealer applied over incompatible old finish. You'll need to strip the peeling areas back to bare wood, re-prep, and reapply. It's frustrating, but there's no shortcut through it.
Uneven sheen or blotchy color
Blotchy stain usually means uneven absorption, which happens when you sand inconsistently, apply the product in direct sun (it dries too fast), or skip the wood conditioner on absorbent softwoods like pine. For the next coat, sand everything smooth to the same grit, work in shade, and apply thin and even strokes. A wood conditioner applied before staining on pine dramatically evens out absorption.
Mildew coming back quickly
If mildew reappears within a season of sealing, it either wasn't fully killed during the cleaning step, or moisture is getting trapped under a film-forming finish. For recurrence issues, clean again with an oxygen-bleach cleaner, let it dry completely, and consider switching to a penetrating sealer instead of a film product if you're in a humid climate. Penetrating sealers leave no film for mildew to grow under.
Water soaking in despite recent sealing
If the water-drop test fails shortly after sealing, one of two things happened: the sealer didn't cure before it got rained on, or the product was underapplied (too thin, only one coat on thirsty wood). Strip and reapply with proper curing time, or add a second coat if the existing finish is in good shape and just looks thin.
Seasonal maintenance checklist
Once your furniture is sealed and back outside, a simple seasonal routine keeps it in great shape and delays the need for full refinishing:
- Spring: Do the water-drop test, clean off winter grime with a mild soap and water, inspect for any peeling, soft spots, or mildew
- Spring/early summer: Apply a maintenance coat of sealer if the water-drop test fails or if it's been more than 2 years
- Summer: Wipe furniture down after heavy rain or extended wet weather; use furniture covers when not in use for extended periods
- Fall: Clean before storing or covering for winter, reapply if needed before cold sets in
- Year-round: Keep furniture off direct soil contact to prevent moisture wicking and rot at the legs
Wood furniture takes more upkeep than metal or synthetic wicker, but the payoff is furniture that gets better-looking with proper care rather than just fading and cracking. If you're also working with other furniture materials, the maintenance approach shifts considerably: metal furniture has its own rust and corrosion challenges, and wicker needs protection from different angles entirely.
Metal furniture has its own rust and corrosion challenges, so if you want the specifics on how to weatherproof metal patio furniture, follow that guide next. If you're dealing with wicker patio furniture, weatherproofing focuses more on shielding the material from moisture and sun and using the right cover and coatings for that weave weatherproofing wicker patio furniture. But for wood, a solid sealing routine is genuinely the foundation of everything.
One last thing: don't stress about doing this perfectly the first time. Prep is the skill that improves most with practice, and even a decent first sealing job buys you a season or two of protection while you figure out what works best for your specific wood, climate, and situation. The goal is to keep improving the process each year, not to nail it perfectly on the first try.
FAQ
Can I add another coat on top of previously sealed wood patio furniture without stripping?
Yes, but only if the wood is truly dry and the existing finish is compatible. The safest approach is to re-run the water-drop test, then do a small patch test in an inconspicuous area to confirm the new sealer darkens or absorbs evenly instead of beading. If the surface is peeling, you must remove the loose finish first, because sealing over peeling almost guarantees repeat peeling.
How can I tell if my sealed patio furniture is dry versus fully cured?
If the wood looks darker or shiny right after application, that usually indicates wet oil or a film that has not fully absorbed or cured yet, it does not automatically mean it is ready. Dryness is when it does not feel tacky, cure readiness is when the product has hardened enough that light water exposure will not cause streaking or clouding, follow the label for cure time and keep it rain-free for at least 48 hours after the final coat.
Should I sand between coats, or can I recoat right away?
For most penetrating sealers, you generally do not sand between coats, as long as you stay within the product’s recoat window. For spar urethane and other film-formers, you do need a light scuff sanding (commonly with 220-grit) between coats to improve adhesion and smooth the finish. Check the label, because the “sand or no sand” rule changes by product type.
What should I do if it rains before the sealer has fully cured?
Rain typically causes the biggest problems when it happens before cure. If it rains during the first 6 to 24 hours, you may get washout, blotches, or weak protection. Let it dry thoroughly, then do a water-drop test to check if water beads versus soaks, if water still beads and the surface looks uniform you may only need a maintenance coat, if it looks blotchy or water soaks too quickly you likely need to prep and reapply.
Is it okay to spot-repair peeling areas instead of refinishing the whole piece?
If you see peeling or flaking, wipe off any loose material, then strip back to solidly bonded finish on the affected areas. Sand those spots smooth, clean again (oxygen-based cleaner helps remove any remaining residue), let dry fully, and reapply. Spot fixing works if the edges are feathered and the old finish is fully removed where it is failing.
How do I know whether my old finish is compatible with the new sealer I want to use?
Yes, but start by identifying what is already on the wood. Oil-based penetrating products and water-based finishes often layer differently, and incompatible finishes can cause adhesion failures or uneven blotching. The practical method is a small test patch, then confirm with the water-drop test after curing. If the existing finish is a thick film (like old varnish), plan on sanding and possibly stripping the film where you will recoat.
Why does my wood stain look blotchy, and how do I prevent it on softwoods like pine?
For cedar and pine, absorbency is the reason blotches happen and why a conditioner can matter. If you skip conditioning and the wood drinks product unevenly, you can get dark edges or splotchy color. If you are applying stain plus sealer, use the recommended conditioner for the specific stain system, then keep application in shade and use thin, even strokes.
Do I really need to seal the end grain and leg bottoms, or is sealing the top surfaces enough?
End grain is a high-risk area for rot because it wicks moisture several times faster than face grain. Make sure you apply extra attention there, including all leg tops, leg bottoms, joints, and any exposed board ends. If your furniture has mortise holes or cracks, brush sealer into the gaps so water cannot pool there.
What should I do if the sealer remains tacky after 24 hours?
If the finish stays tacky after the expected timeframe, common causes are over-application (too thick), high humidity, or insufficient airflow. Wipe off excess for oil-based products using mineral spirits as directed by the product type, let it dry longer in drier conditions, then apply thinner coats next time. If it is still not curing after an extended dry period, you may need to remove and start over rather than keep layering on top.
How reliable is the water-drop test for deciding whether my wood is ready to seal or whether the seal is working?
A water-drop test is a useful decision tool, but interpret it correctly. After cleaning and before sealing, water should soak in (ready for finish). After sealing and curing, water should bead or resist soaking longer, if it soaks quickly after curing, protection is weak and you may need additional coats or better penetration. Do the test in a few spots, because different woods and areas absorb differently.
How long should I wait after pressure-treating before sealing my patio furniture?
For pressure-treated lumber, waiting matters because sealing traps moisture. Even if the surface looks dry, the internal moisture can still be high, so rely on the water-drop test and allow additional time if it beads. As a general rule, give fresh PT wood several months before sealing, then recheck and proceed only when the water readily absorbs.
If mildew comes back after sealing, is it always a cleaning problem, or could the finish type be the issue?
To prevent mildew recurrence, address both what killed existing mildew and how moisture can get trapped. Oxygen-bleach cleaning is intended to remove the gray oxidized layer and mildew at the surface, then you need full drying before sealing. If mildew returns quickly, switching from a film-forming finish to a penetrating sealer can reduce the chance of trapping moisture under a surface layer, especially in humid climates.