Start with your measurements, pick a focal point, then build outward in zones: dining, lounge, conversation, and clear paths between them. Keep at least 36 inches of walkway between pieces, leave 18–24 inches between a coffee table and seating, and allow 36–48 inches around a dining table so chairs can pull out without hitting anything. That's the framework. Everything else below is just applying it to your specific patio shape, furniture type, and real-life obstacles.
How to Lay Out Patio Furniture: Step-by-Step Layout Guide

Maren Grady
2 Jun 2026
Measure and map your patio before you move a single chair
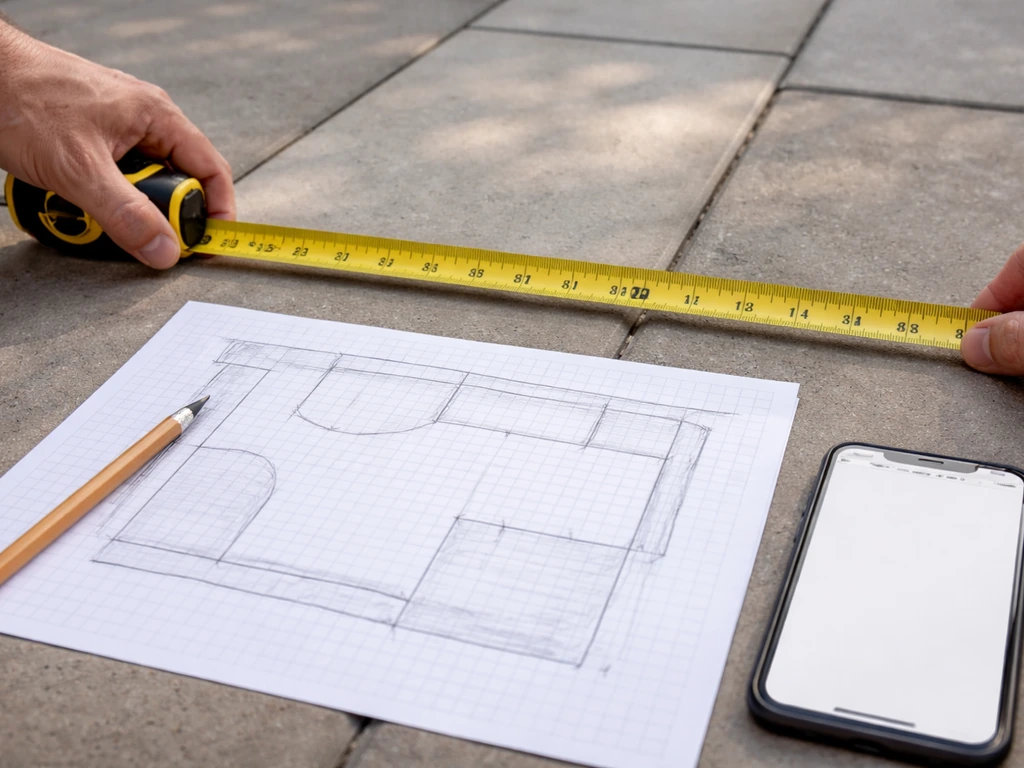
Most layout mistakes happen before anyone touches a chair. People eyeball the space, buy furniture, and end up with a table jammed against a post or chairs that block the slider door. Spend 20 minutes measuring first and you'll avoid hours of frustration. Once your measurements are done, you can apply them to how to buy patio furniture that fits your space and lifestyle.
Measure the total patio dimensions (length and width), then figure out the usable footprint. These are two different numbers. Your total patio might be 16 feet wide, but if there's a built-in planter along one wall, a support column in the corner, and a sliding door with a landing area, your actual usable space might be closer to 11 feet. Sketch it out on graph paper or just use your phone's notes app. Mark every fixed element: posts, columns, stairs, built-ins, low walls, hose bibs, and especially doors.
For doors and sliders specifically, keep a 36-inch clear landing zone directly outside the door opening. That's the area where someone steps out and needs to be able to orient themselves without stepping over a chair leg. Don't place any furniture back or armrest in that landing path.
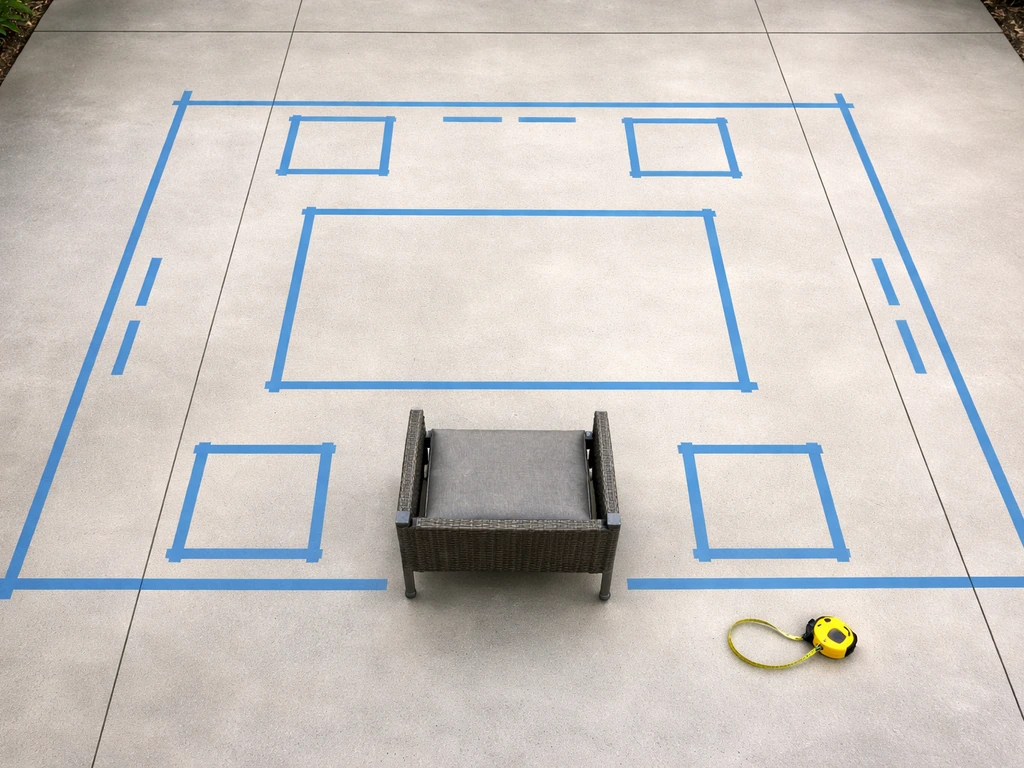
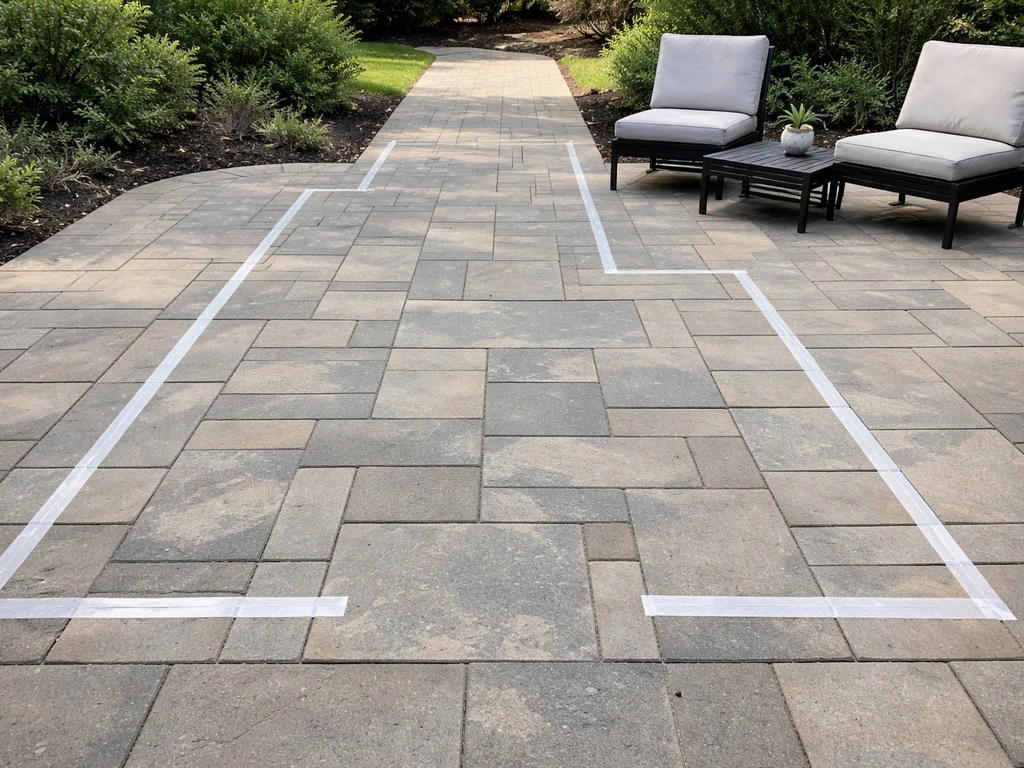
Once you have your sketch, use painter's tape or cardboard cutouts to mark the footprint of your furniture directly on the patio surface. This is the single most useful thing you can do before buying or rearranging. Stand in the taped-out area, pretend to pull out a chair, walk through the path. You'll immediately feel where things are too tight. It takes 10 minutes and saves you from discovering a problem when a 200-pound sectional is already in place.
Divide your patio into zones that actually match how you use it
Think of your patio like a small apartment with distinct rooms. Even a modest 12x16-foot space can have two or three functional zones as long as you're intentional about it. The main zones most patios need are dining, lounge or conversation, and circulation (the paths in between). Not every patio needs all three, but knowing which ones you're working with makes the layout decisions much easier.
Dining zone
The dining zone is table plus chairs plus the space needed to use them. That means 36–48 inches of clearance all the way around the table so chairs can pull out fully and someone can walk behind a seated person without bumping them. If you're working with less space than that, consider a smaller table or a bench on one side (benches slide in without needing pull-out room).
Lounge or conversation zone
This is your sofa, sectional, or club chairs grouped around a coffee table or fire feature. For conversation to feel natural, seated people should be roughly 6–8 feet apart from each other across the grouping. Any farther and you're practically shouting; much closer and it feels like a doctor's waiting room. The coffee table should sit 14–18 inches from the sofa or chair edges, close enough to set down a drink without leaning awkwardly, but not so close it blocks your feet.
Circulation zone
Circulation isn't really a zone you furnish, it's the space you protect from furniture. Mark your main walking paths before placing anything. A comfortable walking path is at least 36 inches wide. A main traffic path (like the route from the door to the yard) should be closer to 48 inches. If you have support posts on a covered patio, watch for pinch points where a post plus a chair back narrows the path to less than that. Those pinch points are annoying at best and a genuine tripping hazard at worst.
Spacing rules that make the difference between comfortable and cramped
Here are the numbers worth memorizing. These aren't arbitrary style rules, they're based on how much room people actually need to sit down, stand up, and move around without bumping into things.
| Situation | Recommended Clearance |
|---|---|
| General walking path between furniture | 36 inches minimum |
| Main traffic path (door to yard) | 48 inches recommended |
| Around a dining table (for chair pull-out) | 36–48 inches |
| Chair pull-out depth at a dining table | 20–24 inches |
| Coffee table to sofa/chair edge | 14–18 inches |
| Between opposite seating in a conversation area | 6–8 feet (72–96 inches) |
| Clear landing zone outside a door or slider | 36 inches minimum |
One thing people consistently underestimate is chair pull-out space at a dining table. You need about 20–24 inches just to pull a chair back enough to sit down comfortably. Add that to the back of every seat position when you're planning, not just the ends. On a rectangular table with seating on both long sides, that means you need a fairly generous clearance buffer behind every chair. Use your painter's tape to mark it before committing.
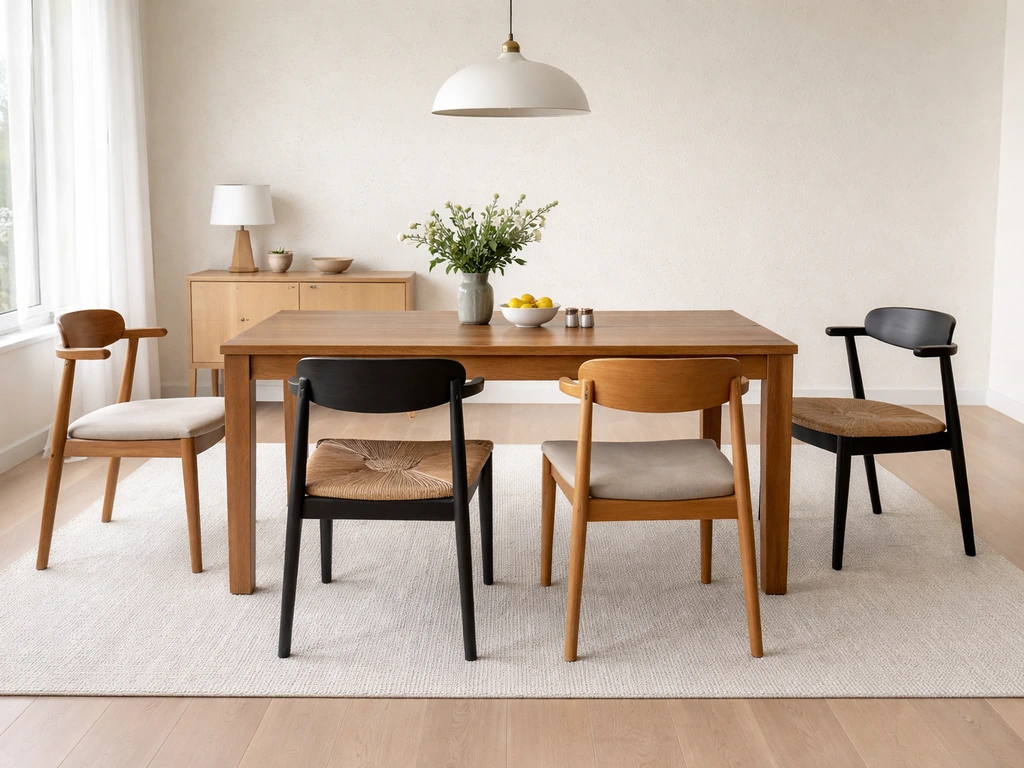
Also pay attention to the table-to-chair height relationship. The gap between the seat top and the underside of the tabletop should be about 10–12 inches. If you're mixing and matching chairs with a table (which is very common when restoring or buying secondhand), check this measurement before you finalize the pairing. Too little gap and knees bang the apron; too much and you're reaching up like you're sitting at a bar.
How to lay out different furniture types
Dining sets
Position the dining table as the clear anchor of its zone. The table goes first, centered on the zone, then chairs arrange around it. Rectangular tables work best when they run parallel to the longest wall or edge of the patio, which keeps the clearance zones from eating into the rest of the space. Round tables are more forgiving in tight spots because you don't have corners jutting out into circulation paths. After placing the table, use tape to mark the 36–48 inch clearance bubble around it, and make sure that bubble doesn't overlap your main walking path or the door landing zone.
Sectionals and conversation sets
Sectionals are big, which is why they work best anchored into a corner or against a wall or railing rather than floating in the middle of the patio. An L-shaped sectional in a corner naturally defines the conversation zone and leaves the rest of the patio open. Place the coffee table 14–18 inches from the sofa's front edge, centered in front of the primary seating section. If you're using individual club chairs instead of a sofa, arrange them facing each other or at slight angles around a central table, keeping that 6–8 foot conversational distance between opposite seats.
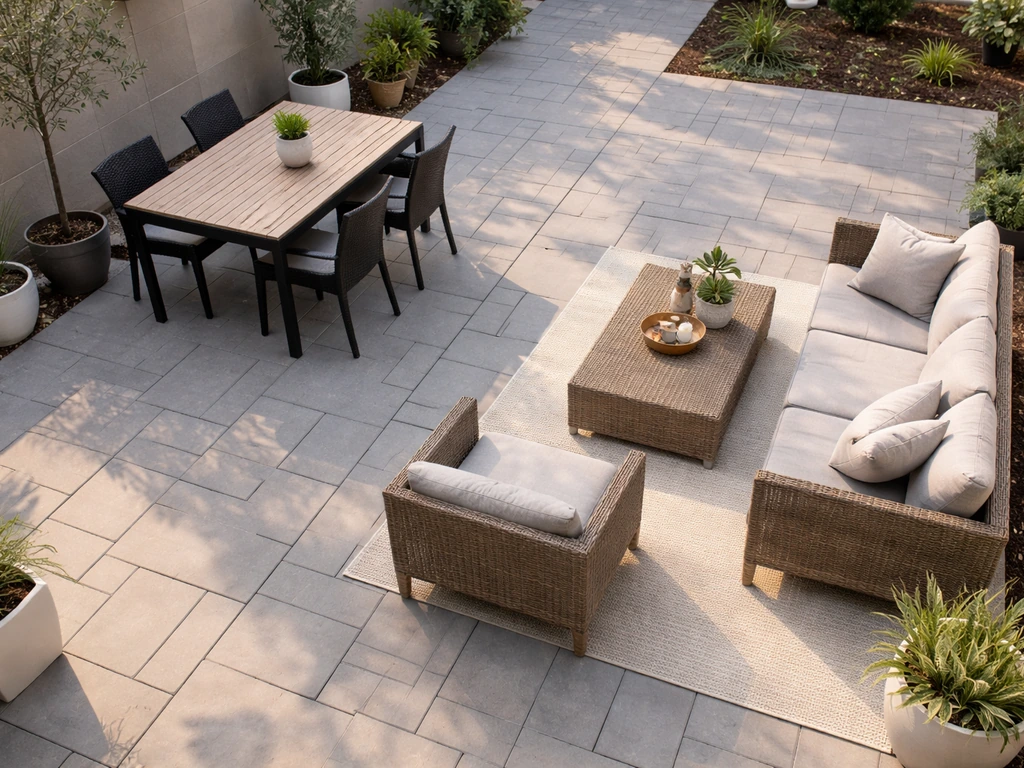
Mixed seating (dining plus lounge on the same patio)
When you're combining a dining set and a conversation area on one patio, zone separation is key. Put the dining area closest to the house (near the door where food comes out), and the lounge area farther out or to one side. Keep a clear path at least 36 inches wide between the two zones. Even a subtle level change, like a small platform under the dining table, creates a psychological boundary that makes the two zones feel intentional rather than jumbled together.
Loungers and daybeds
Loungers need room on both sides for someone to get on and off, and they need clearance at the foot end too. A pair of loungers side by side with a small side table between them is a classic setup that works well. The risk with loungers on smaller patios is depth: a full lounger can be 75–80 inches long, and two of them side by side can consume nearly the entire width of a modest patio. Measure first, always.
Working with your patio's shape and the obstacles in it
The biggest layout challenge most people face isn't the furniture, it's the fixed stuff they can't move: a post right in the middle of the covered area, stairs that cut into the corner, a sliding door flanked by columns, or an L-shaped footprint with a weird short leg. Here's how to handle the most common ones.
Doors and sliders
Treat the door swing (or slider track) and its 36-inch landing zone as a hard boundary in your plan. Nothing goes there. Once you've marked that off, lay out the rest of the furniture around it. A common mistake is placing a sofa or loveseat back just inside the door landing, which means the first thing anyone does when they step outside is squeeze past the arm of a couch. It feels like a minor annoyance until you've done it 200 times.
Support posts and columns
Posts are actually useful anchors for furniture arrangement if you work with them. A post in the corner of a covered patio can define the back corner of a conversation area, with the sectional running along the walls on either side. The danger is when a post falls in the middle of a traffic path and a nearby chair back creates a pinch point that narrows the route to less than 36 inches. Denver's Outdoor Places Program requirements for clear paths call for minimum separation in life-safety circulation, including specific spacing so furniture does not narrow the route below the clearance standard blank" rel="noopener noreferrer">less than 36 inches. If that happens, move the chair, not the post (you can't move the post). Sometimes rotating a sofa or angling it slightly is enough to open up the path.
Long, narrow patios
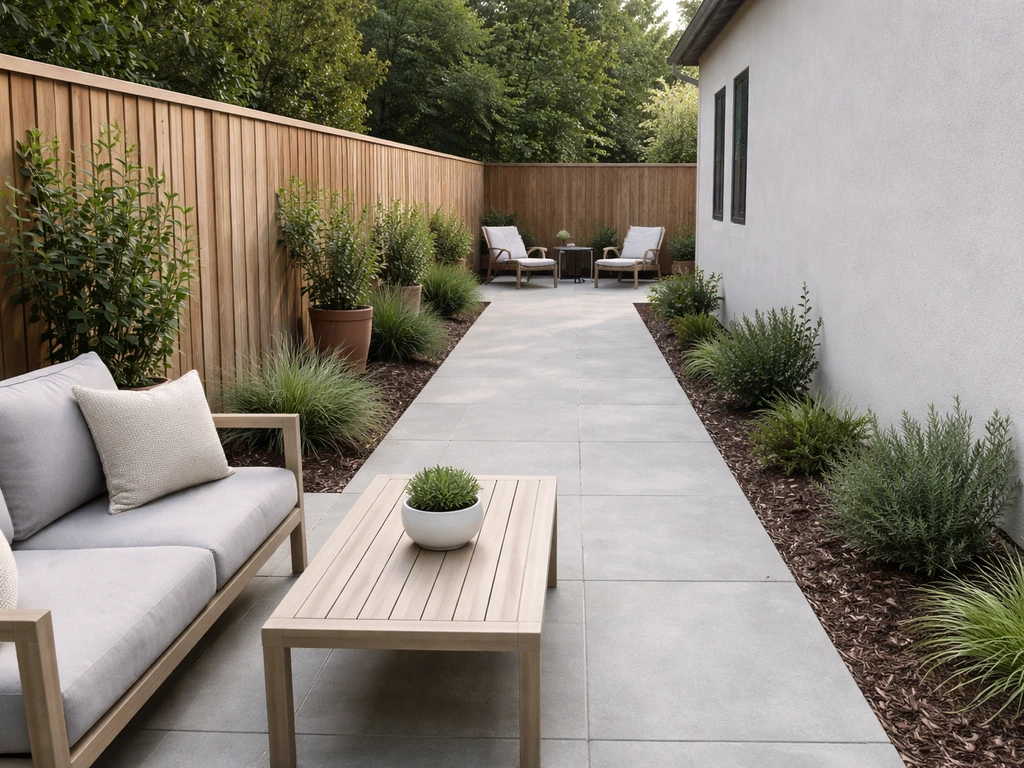
The instinct on a long narrow patio is to run the furniture lengthwise, but this often creates a tunnel effect with no usable width. Instead, break the patio into two distinct zones side by side (or end to end with a clear break in between) and keep furniture from being too deep front-to-back. Avoid deep lounge pieces that eat up the already-limited width. A bistro table and chairs at one end, a pair of shallow club chairs at the other end, with a 36-inch path down the middle is a solid template for a patio 8 feet wide or narrower.
L-shaped and irregular patios
Use the natural geometry to your advantage. Put one zone in each leg of the L. Dining in the longer section near the house, lounge or fire feature in the shorter corner section. The corner where the two legs meet becomes your natural transition and circulation point. Just make sure the corner itself stays clear (at least 36 inches) so it doesn't become a dead end.
Style anchors that also affect how your layout functions
Good patio design isn't just about where things sit spatially. A few specific elements double as both style choices and functional tools that either reinforce your zones or undermine them.
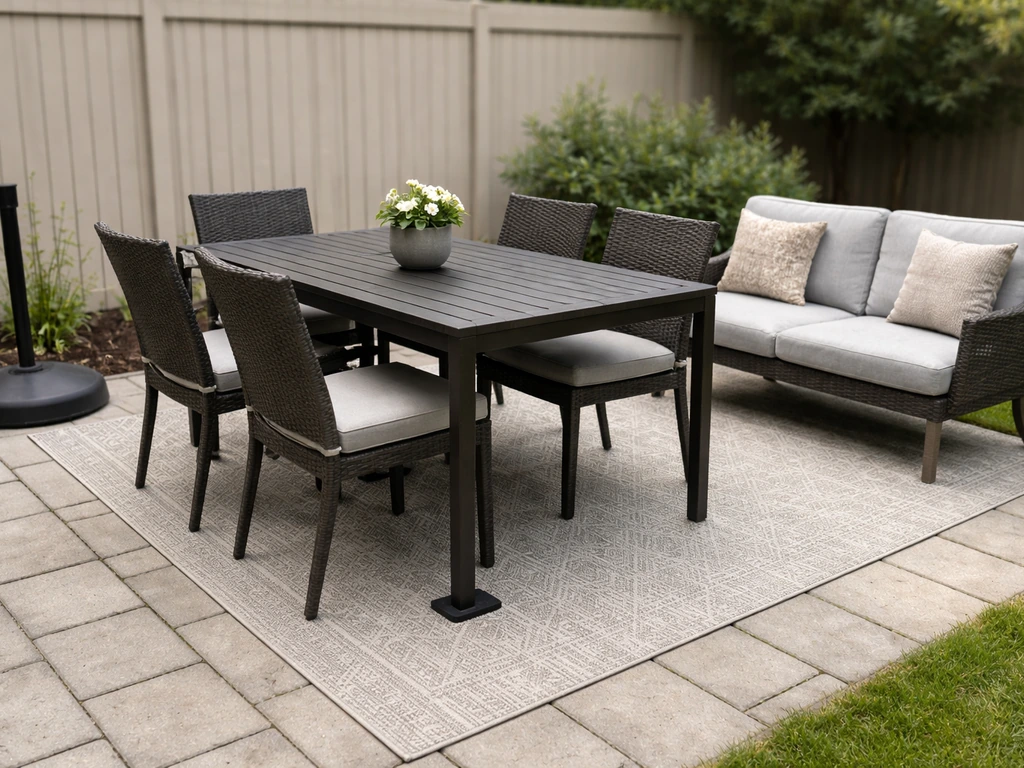
Outdoor rugs
An outdoor rug is probably the most powerful zone-defining tool you have. For a lounge area, size the rug so that at least the front legs of the sofa and chairs sit on it. This visually ties the grouping together and also physically anchors pieces so they don't drift. For a dining area, the rule is different: the rug needs to be large enough that the chair legs stay on the rug even when chairs are pulled out. This prevents the chair legs from catching on the rug edge every time someone sits down or stands up, which is both annoying and a tripping hazard. Size up rather than down on dining rugs.
Shade structures
Where you put your shade (umbrella, pergola, sail shade) determines where the comfortable seating is during the afternoon. Before finalizing your layout, pay attention to where sun falls on your patio at the times you actually use it. A dining table in full afternoon sun in July will go unused no matter how nice the layout is. Shade structures also define the top boundary of a zone, which helps a furniture grouping feel like a complete room rather than objects floating in open space.
Lighting
String lights hung about 8–10 feet above ground over a dining area create an intimate overhead plane that makes the zone feel distinct and purposeful after dark. Run them above the table footprint, not the whole patio. If you try to light everything with string lights at the same height, you lose the zone-defining effect and it ends up looking like a parking lot. Use lower light sources (lanterns, solar path lights) to mark the edges of circulation paths.
Color grouping
Using consistent cushion colors or materials within a zone (and different ones in the adjacent zone) is an easy way to visually reinforce the separation between dining and lounge areas, especially on patios where there's no physical level change or structural boundary. You don't need to go full interior-designer on this. Even matching cushion color within a conversation grouping while using a different color at the dining set does the job.
Making the layout practical to own and maintain
Here's something layout guides rarely talk about: where you place your furniture determines how fast it wears out. This matters a lot if you care about extending the life of your pieces, which (given how much outdoor furniture costs) you probably should.
Sun, wind, and moisture exposure
Pieces placed in full, unshaded sun bleach and degrade significantly faster than those under a pergola or shade sail. Even though patio layouts talk about clearances, you also need to think about whether the grass will stay flattened and drain well under the furniture can you put patio furniture on grass. Cushion fabrics and frames both suffer. If you have shaded zones and unshaded zones, put your best or most expensive pieces under cover. Save the cheaper or more weather-resistant pieces for the sunny spots. Also think about prevailing wind direction on your patio. Pieces positioned so wind funnels directly onto them (and their cushions) will take on more moisture and pollen. A fence, planting, or railing that breaks wind on one side can meaningfully reduce how often you're wiping things down.
Cover access and storage planning
When you finalize your layout, think about whether you can actually cover each piece easily. A sofa jammed into a corner with chairs tight on both sides is a nightmare to cover and uncover every time rain is coming. Leave enough room to slide a cover on and off without moving other furniture. Covers should be waterproof but breathable so they keep rain out while still allowing airflow underneath, which prevents the trapped condensation and mold that ruins cushions from the inside out.
If you store cushions off-season (which is the single best thing you can do for their longevity), plan where that storage is relative to the furniture. A storage bench built into the layout, or a deck box positioned at the edge of the conversation zone, means you'll actually use it because grabbing cushions isn't a production. If the storage is across the yard or requires moving furniture to access, cushions end up left out all winter by default.
Fire pit clearance (a hard constraint, not a style choice)
If you're centering a layout around a fire pit or fire table, seating placement isn't just about comfort distance. Check the manufacturer's clearance requirements for combustibles before you finalize anything. Most wood-burning fire pits require significant clearance from furniture, overhead structures, and fencing. Gas fire tables have their own specs. The 6–8 foot conversational distance guideline for fire pit seating happens to align well with most safety clearance minimums, but always verify against your specific unit's documentation.
A simple checklist to lay out your patio from scratch
If you want to start from zero and work through this systematically, here's the order that makes sense: If you are also deciding what to buy and where to place it, this guide on how to organize patio furniture can help you build a layout that fits your space.
- Measure total patio dimensions and sketch to scale on paper or phone.
- Mark all fixed obstacles: doors, posts, stairs, built-ins, planters.
- Mark the 36-inch door landing zone and main walking paths as off-limits to furniture.
- Decide which zones you need: dining, lounge, conversation, or a mix.
- Identify your focal point for each zone (table, sectional, fire feature, grill).
- Use painter's tape or cardboard to mark furniture footprints on the actual patio surface.
- Walk every path, pull out chairs, and sit in the taped-out areas to test clearances.
- Confirm: 36 inches on all walking paths, 36–48 inches around the dining table, 14–18 inches at the coffee table.
- Place shade structures to match your actual use times, not just aesthetics.
- Choose rug sizes that keep all chair legs on the rug when pulled out (dining) or front legs on the rug (lounge).
- Think about cover access and cushion storage before you commit to the final layout.
- Move the real furniture in.
Once you have the layout dialed in, it's worth thinking about how to organize and store everything for the off-season, how to set up each piece for first use, and whether the furniture you've chosen is actually right for your space and budget. When you set up patio furniture, start by confirming your layout supports easy movement, clear landings, and comfortable spacing. Those are natural next steps after nailing the layout itself, and they'll make everything you've planned here last a lot longer.
FAQ
How do I lay out patio furniture if my patio is smaller than the recommended clearance space?
Use a “reduced but safe” plan: keep the door or slider landing zone and at least one 36-inch circulation route, then switch to a smaller dining table or a bench (often only on one side) and use shallow conversation pieces. For coffee tables, prioritize the 14–18 inch spacing but consider an ottoman or nesting tables if you cannot maintain consistent gaps everywhere.
What if my walkway has to pass between two seating pieces, can I squeeze the distance?
Avoid reducing the main path below 36 inches. If you end up with a narrower pinch point from a chair back plus a post or railing, rotate or offset the seating to widen the “bottleneck” while keeping the rest of the zone spacing intact. The goal is to make the tight spot happen nowhere near where people stand or turn.
How should I account for patio furniture that is on wheels or has armrests that extend?
Plan for the “real footprint,” not the static measurement. If a piece has casters or can be pushed out, include extra clearance beyond the seat spacing, especially near circulation paths and dining chair pull-out areas. Test with cardboard cutouts and simulate pushing the piece into place, then pulling it back out.
Can I place a sectional in the middle of the patio if I really want an open layout?
It’s possible but harder to keep circulation safe. If you float a sectional, you must create clear lanes on both sides and confirm the chair and ottoman or coffee table do not intrude into a 36-inch path. In most cases, anchoring an L-shaped sectional to a corner or wall gives the same conversational feel with fewer clearance compromises.
How do I choose between a round and rectangular dining table for layout?
Choose a round table if your patio has irregular edges or circulation that you cannot keep parallel to a wall, because round forms reduce corner protrusions. Choose rectangular if you have a long, straight usable edge, since aligning it parallel helps preserve room around chair pull-out and keeps the clearance bubble from overlapping door or main paths.
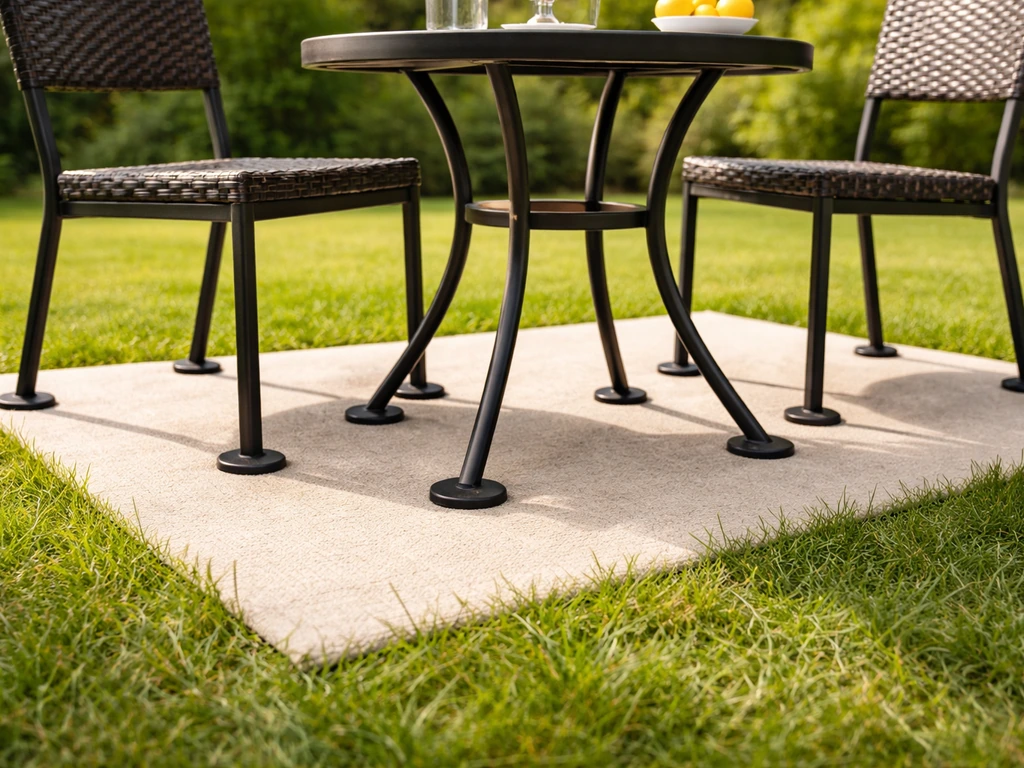
What should I do if my dining chairs still hit the rug edge when people sit down?
Increase the rug size for dining use so chair legs stay fully on the rug even when chairs are pulled out. Also check chair height and table overhang (apron clearance), because the combination of a too-small rug and poor seat-to-table height pairing makes chairs angle awkwardly and catch.
How much clearance do I need around a coffee table near lounge seating?
Use the 14–18 inch spacing as your target, but also measure from the coffee table corners, not just the closest side. If the coffee table is used with a fire pit or bulky side seating, consider nesting tables or a slimmer profile to prevent foot and knee collisions during frequent standing and sitting.
Where should I put the outdoor rug relative to seating and dining furniture?
For lounge, ensure the rug covers the front legs so the grouping looks grounded and does not slide visually. For dining, size it so pulled-out chairs remain fully supported on the rug surface. If the rug edge is visible where chair legs land, plan to size up rather than trimming it.
How do I lay out patio furniture when there’s a step, deck height change, or uneven surface?
Treat the height change like a boundary: keep furniture from crossing into the transition area and use the step as part of your zone definition rather than forcing tight clearances around it. Re-measure clearance using the actual walking experience, because uneven edges can slow people down and make pinch points feel worse than the tape measure suggests.
What’s the best way to verify door clearance when a chair might block the opening?
Mark the 36-inch landing zone outside the door, then do a realistic “door plus person” simulation. Stand at the doorway, open it fully, step out, and pivot as if you are carrying something (or holding a drink). If you would brush a chair arm or leg during that pivot, move furniture or rotate seating instead of relying on eyesight.
Should I plan furniture placement based on sun and wind before or after I set the clearances?
Do sun and wind checks after you have the clearance layout, then adjust within the framework. Keep circulation lanes and door landing zones fixed first, then relocate the most delicate pieces (cushions, lighter fabrics, and your most weather-sensitive items) into shaded zones or under cover, while placing tougher pieces in sun.
How much space should I leave for putting covers on and off?
Leave access paths at least wide enough to reach the cover edges without moving multiple pieces. In tight corners, sofa positioning can trap you, so avoid layouts where you can only access the cover from one side. Plan a small “cover access lane” that stays clear during the layout stage, not after you’ve bought everything.
If I’m centered on a fire pit, how do I handle different fire pit types safely?
Start with the seating distance you want for conversation, then verify the manufacturer clearance requirements for combustibles and overhead structures. If you choose furniture, confirm that cushions and nearby materials can tolerate the unit’s radiated heat and that gas fire tables or wood-burning pits have different spacing needs.
What’s the smartest order to lay out furniture before buying replacement or secondhand pieces?
Lock in the fixed constraints first (usable footprint, posts, stairs, doors, and circulation paths), then place the dining table anchor and confirm chair pull-out. Next place the conversation grouping and coffee table spacing, then test rug coverage and shade placement. Only after the zones pass the “tape test” and door simulation should you buy final sizes or mixed chair-table sets.