You can decorate patio furniture right now by picking one clear goal (color refresh, covering wear, matching a new theme, or full restoration), prepping the surface properly for outdoor conditions, and choosing materials rated for UV exposure and moisture. The specific path depends on what your furniture is made of: wood needs sealing and outdoor paint or stain, metal needs rust treatment and a primer made for bare metal, plastic needs a bonding primer before paint sticks, and wicker or rattan needs gentle cleaning plus fabric or spray protection. Skip the prep and whatever you put on top will peel, fade, or mildew within one season.
How to Decorate Patio Furniture: Easy DIY Refresh Steps

Maren Grady
5 Jul 2026
Start here: pick a goal and a style direction
Before you buy a single can of spray paint or a throw pillow, get specific about what you actually want the end result to look like and why. Vague intentions like "make it look better" lead to half-finished projects. The most common decorating goals fall into five buckets, and each one points to a different set of tools and techniques.
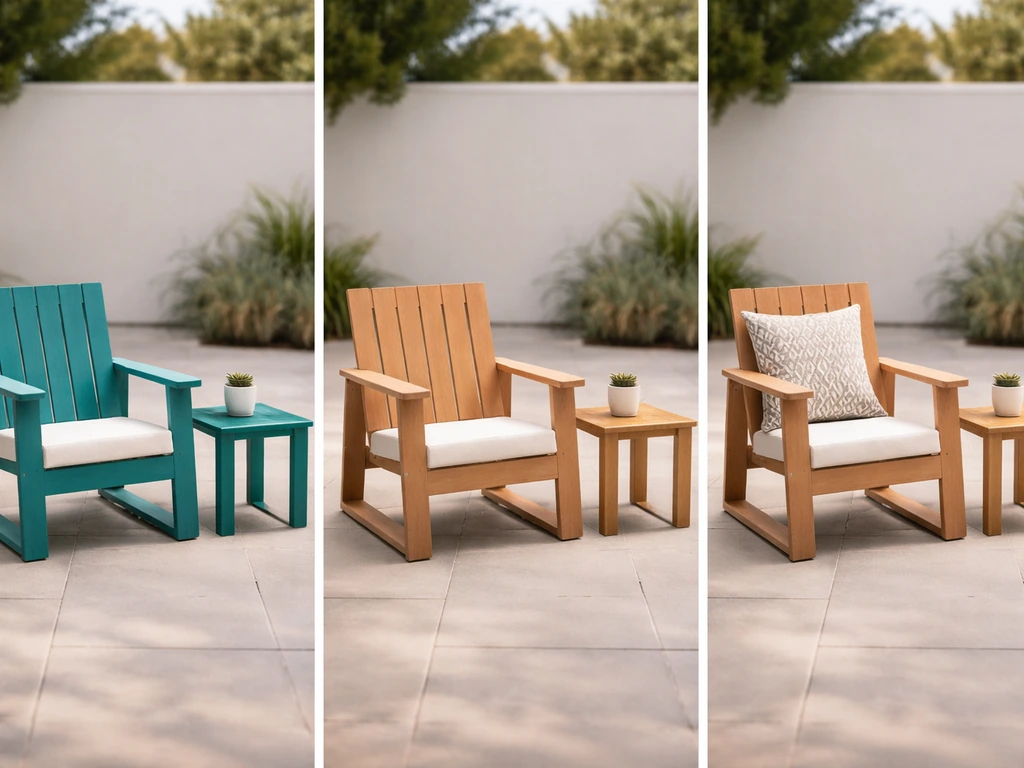
- Fresh color: You want a whole new look, not just a touch-up. This means paint, stain, or new cushion covers as the star of the project.
- Covering wear: Faded fabric, scuffed frames, or chalky plastic that looks tired but is still structurally sound. Slipcovers, spray paint, and fabric dye work well here.
- Matching a theme: You're coordinating with a new umbrella, outdoor rug, or planter color. Focus on accent pieces, hardware swaps, and complementary cushion colors.
- Restoring damaged pieces: Peeling paint, rust, cracked wood, or broken straps. This is a repair-first, decorate-second project and it takes the most time.
- Upgrading comfort and function: Adding cushions, armrests, or new upholstery to furniture that never had it. Mostly a fabric and foam project.
Once you know your goal, pick a style direction before shopping. Common outdoor styles right now include coastal/natural (weathered wood tones, sandy neutrals, navy blue accents), modern farmhouse (black metal frames, white or cream cushions, shiplap-pattern stenciling), bohemian (mixed patterns, macrame, bright saturated cushion covers), and minimalist contemporary (solid matte colors, clean lines, no pattern). Having a reference photo on your phone when you shop prevents impulse buys that clash. If you're also thinking about how furniture is arranged or styled as a whole space, that's a related area worth exploring separately. Once you have that big-picture style in mind, the next step is learning how to place patio furniture for comfort and good flow how furniture is arranged or styled as a whole space.
Assess what you actually have before spending a dollar
This is the step most people skip and then regret. Spend 20 minutes doing a real inventory of your furniture before you plan anything. You need to know the material, the current finish condition, and whether there are any structural issues that would make a surface project fail or look worse.
Identify your furniture material
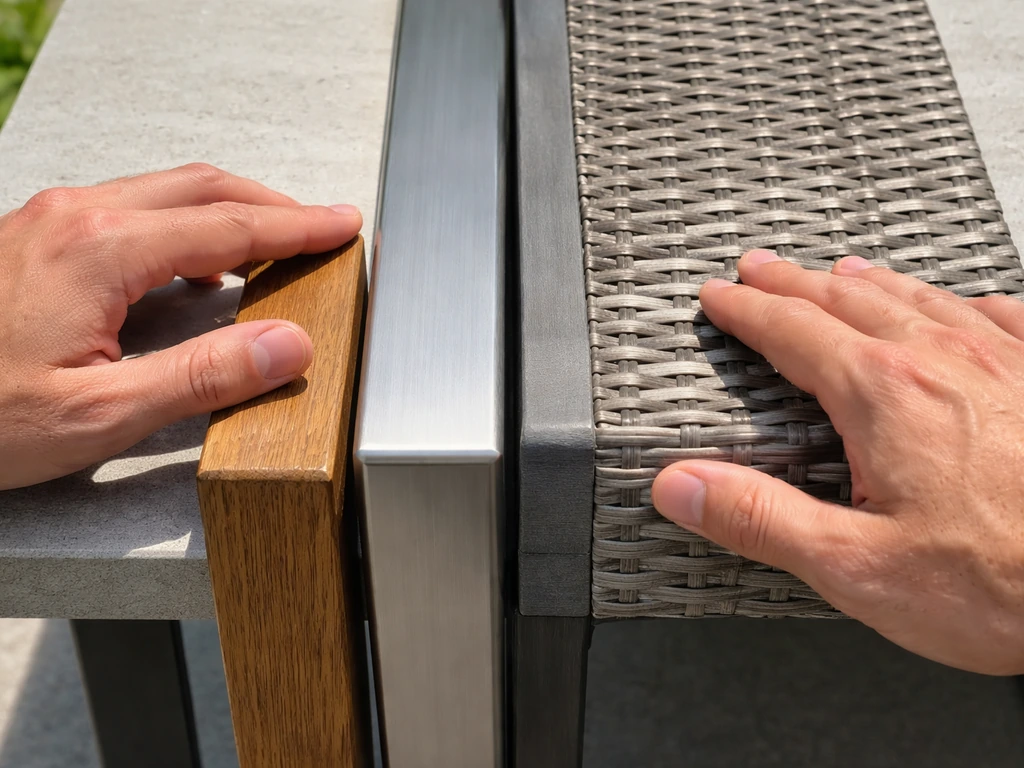
Knock on a frame leg. Wood sounds solid and dull. Metal sounds hollow and rings slightly. Plastic sounds hollow and lighter. Wicker and rattan are woven, but the frame underneath is usually either metal or wood, and that frame is what determines your prep approach. Knowing your material matters because paint adhesion, primer choice, rust treatment, and sealer selection all change based on what's underneath.
Check the surface and structural condition
Run your hand along every surface and look for these specific issues, because each one changes what you do next.
- Peeling or flaking paint: You'll need to strip or sand back to a stable surface before any new coat. Painting over loose old paint just means it peels again faster.
- Rust on metal: Surface rust (light orange staining) can be treated with a rust converter or sanded off. Deep pitting or flaking rust means more aggressive treatment, and sometimes structural loss.
- Soft or spongy wood: Press a key or screwdriver tip lightly into the wood. If it sinks in, there's rot. Decorate over rot and the whole piece will fail within a season. Small spots can be stabilized with epoxy wood filler; large rot means replacement.
- Chalky or faded plastic: Run your finger across the surface. If white residue comes off, the plastic is oxidized. This needs a specific plastic restorer or bonding primer before paint.
- Mildew or algae: Green or black staining that wipes off is surface mildew. It needs to be killed and removed before painting or it bleeds through.
- Loose joints or wobbly frames: Fix structural issues first. A beautiful paint job on a wobbly chair still leaves you with a wobbly chair.
- Worn or faded upholstery: Check if the fabric is just faded or actually breaking down (fraying, tearing, crumbling foam). Faded fabric can be covered or dyed; structurally damaged fabric needs replacement.
Prep steps that actually make or break the project
I'll be honest: prep is where most DIY patio furniture projects fail. People get excited about the color and rush through the cleaning and sanding, then wonder why the paint is peeling three months later. Give prep the same time and attention as the decorating itself.
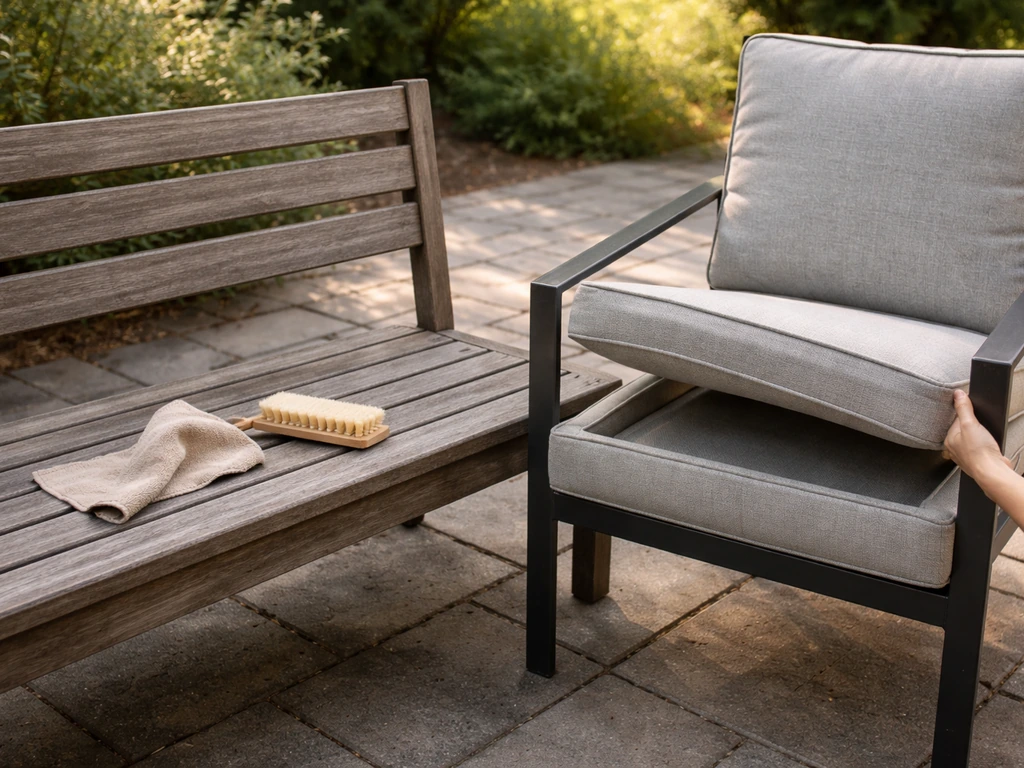
Deep cleaning first, always

Scrub every surface with a stiff brush and a mix of one part white vinegar to two parts water, or use a dedicated outdoor furniture cleaner. For mildew, use one cup of bleach per gallon of water, scrub, let it sit for 10 minutes, then rinse thoroughly. If you paint over mildew without killing it, it comes back through the new finish. Rinse everything well and let it dry completely, at least 24 hours in warm weather, before doing anything else. Moisture trapped under paint or stain causes bubbling and peeling.
Sanding and scuffing
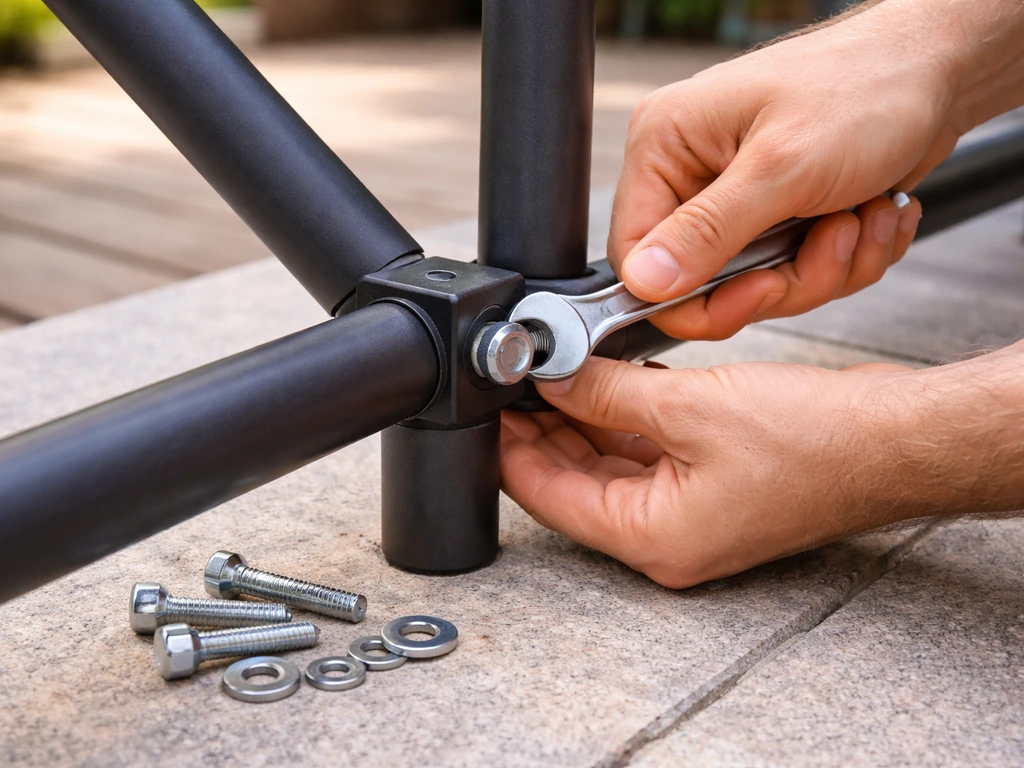
For wood furniture, scuff-sanding with 50-grit sandpaper before priming gives the primer something to grip. This is a roughening step, not a stripping step, so don't overthink it. Sand with the grain, wipe off the dust with a tack cloth or damp rag, and let it dry. For end-grain areas (the cut ends of wood boards or slats), apply a dedicated end-grain sealer before primer because end grain absorbs moisture like a sponge and causes paint to fail faster there than anywhere else. For metal in good condition, 220-grit sandpaper or a scuff pad is enough to dull the surface so primer sticks. For rusty metal, use 80-grit or a wire brush attachment on a drill to remove loose rust, then treat remaining rust with a rust converter product before priming.
Rust removal on metal frames
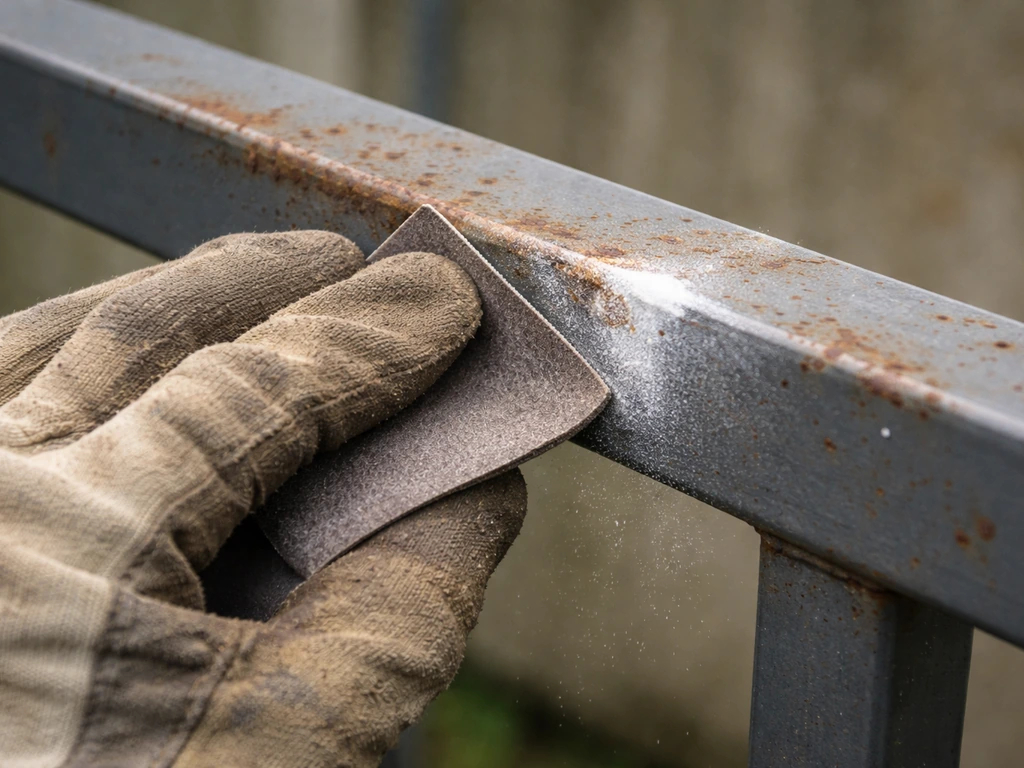
Light surface rust can be sanded down to bare metal, then primed immediately (bare metal starts re-rusting within hours in humid conditions, so don't leave it overnight unpainted). For heavier rust, brush off loose material, apply a rust converter like Rust-Oleum Rust Reformer directly to the rusted area, and let it cure fully per the label before painting over it. The converter chemically changes the rust to a stable compound that primer and paint can bond to. You don't sand after using a converter; you prime directly over it.
Priming: don't skip it outside
Outside, primer isn't optional. For bare wood, use an exterior oil-based primer or a shellac-based stain-blocking primer like blank" rel="noopener noreferrer">Zinsser BIN, which dries to the touch in minutes and can be recoated in about 45 minutes, making it great when you're trying to finish a project in a day. For metal, use a direct-to-metal (DTM) primer or a spray primer specifically rated for metal. For plastic, use a bonding primer or a spray primer designed for plastic and vinyl. Without the right primer for your material, topcoat adhesion is weak and the whole project fails early.
Decorating methods: what works, when, and what to use
Here are the main paths for decorating patio furniture, each with a realistic picture of what it takes and when it's the right choice. If you want step-by-step guidance on choosing the right materials and finishes, see our full guide on how to patio furniture.
Cushions and cushion covers
Swapping out cushions or adding them for the first time is the fastest and most forgiving way to change the look of patio furniture. For cushion fabric, look specifically for fabric rated for outdoor or marine use, with UV-resistant and water-resistant properties. Sunbrella is the gold standard but costs more; brands like Waverly Outdoor or Richloom Outdoor are more budget-friendly and still hold up. If your existing cushions are structurally fine but faded, replacing just the covers is much cheaper than replacing whole cushions. Zipper-closure slipcovers for standard cushion sizes are widely available online. If your furniture doesn't have standard-size cushions, buying outdoor fabric and sewing your own covers is a realistic beginner project.
Slipcovers and outdoor throws
Fitted slipcovers (for Adirondack chairs, dining chairs, and loveseats especially) let you change the look entirely without any prep work on the frame. They're also easy to pull off and wash. Outdoor throws are more decorative than functional in wet climates but work well in dry regions or covered patios. Look for throws made with acrylic or polyester outdoor fabric, not cotton, since cotton holds moisture and mildews fast outdoors.
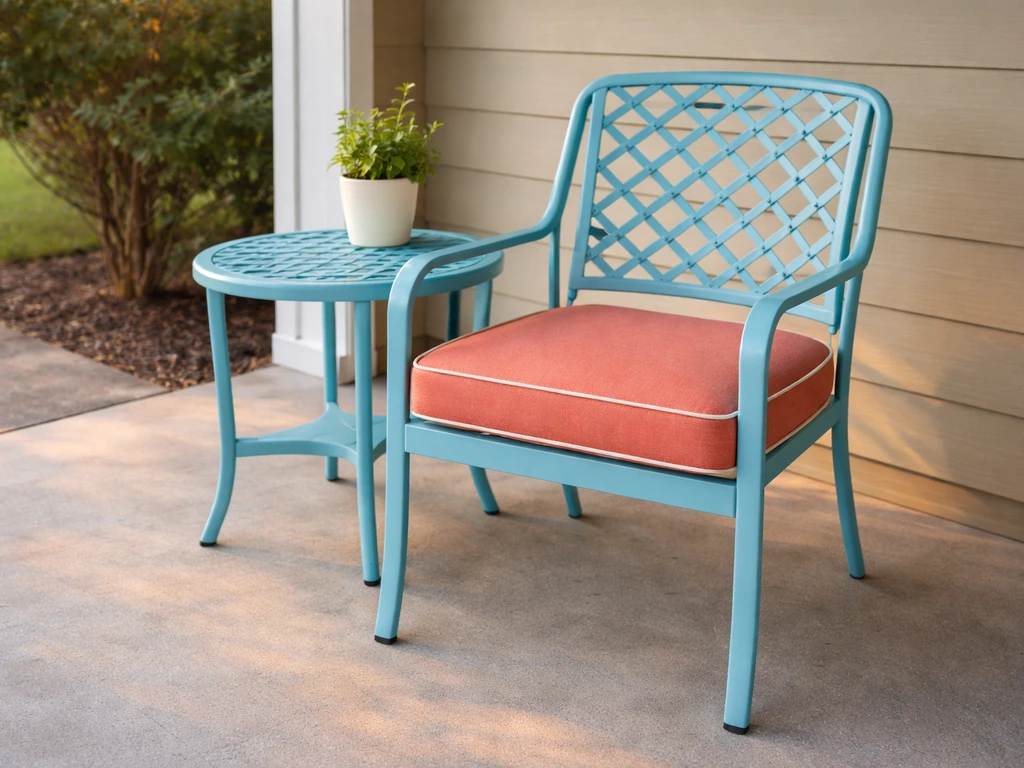
Painting the frame
Paint is the highest-impact single change you can make to the look of a patio furniture frame. For wood frames, use an exterior latex or alkyd paint rated for outdoor use; a satin or semi-gloss finish holds up better outside than flat finishes because it resists moisture better and cleans more easily. For metal frames, a product like Rust-Oleum Restore Outdoor Furniture is designed for two-coat application, with touch-dry time of 2 to 4 hours and recoat time of 4 to 6 hours at 70 to 80 degrees Fahrenheit and 50% relative humidity. Check the weather before you start: the manufacturer specifically calls for no rain for at least 48 hours after application, so don't start this project if rain is coming. If you're painting furniture that already had a factory powder-coat finish (common on aluminum and steel patio sets), lightly scuff-sand the existing finish before priming so the new paint has texture to grip.
Staining and refinishing wood
If you want wood furniture to look like wood (rather than painted), use an exterior penetrating stain or a deck-and-siding stain in the color you want. Stain soaks into the wood rather than sitting on top, so it doesn't peel the way paint can. It does fade over time and needs reapplication every one to two years, but it's a much lower-maintenance look than paint on wood. For teak or ipe furniture, a teak oil or specialized hardwood oil sealer is the traditional choice and maintains the natural color. For softer woods like pine or cedar, an oil-based exterior stain with a built-in sealer is your best option.
Stencils and decals
Stenciling is one of the most underrated decorating tools for patio furniture because it costs almost nothing and transforms a plain piece. Use a repositionable adhesive stencil, a foam pouncer brush, and outdoor paint. Apply paint in a light dabbing motion, not a brushing stroke (brushing pushes paint under the stencil edge and blurs the design). Two thin coats look sharper than one thick coat. Seal over the design with a clear exterior matte or satin topcoat when done. Outdoor vinyl decals work on smooth metal and plastic surfaces and take about five minutes to apply.
Reupholstering and recovering seats
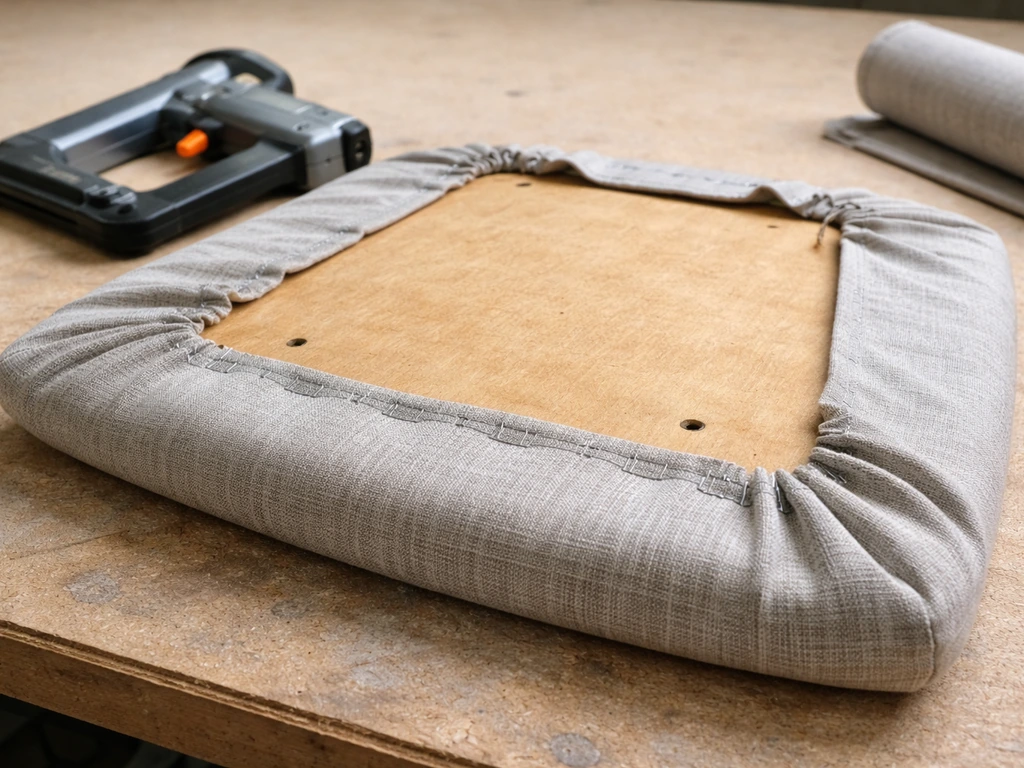
For dining chairs or benches with removable seat cushions, reupholstering is a great beginner project. Most removable seats are just a piece of plywood or foam padding stapled to a frame and wrapped in fabric. Unscrew the seat from underneath, pull out the old staples, replace the foam if needed (two-inch high-density foam is the standard), cut new outdoor fabric about four inches larger than the seat on all sides, wrap and pull tight, and staple every two inches with a staple gun. This project takes about 30 minutes per seat once you've done it once. For fixed upholstery on loungers or sofas, the process is more involved and is worth a dedicated project guide, but the principle is the same: remove old fabric, transfer the pattern to new fabric, and staple or sew it back.
Hardware and accessory updates
Replacing worn or mismatched hardware (bolts, screws, leg caps, furniture feet, tie-on straps) makes a huge difference and is often overlooked. Black oxide or stainless steel hardware looks far better than rusty zinc screws. Replacement leg tips and gliders come in standard sizes and cost almost nothing at hardware stores. If your furniture has woven strap seats that are broken or sagging, replacement vinyl strap kits are available online for most standard chair sizes and can be replaced without special tools.
Furniture-type specific advice
Different furniture types have specific quirks that change how you approach prep and decoration. Here's what to know for each. If you are wondering how to connect patio furniture differently, start by matching your fixes to the furniture type so the prep and decoration steps actually hold up.
Metal frames (steel, aluminum, cast iron)
Aluminum doesn't rust but it does oxidize and get a chalky, pitted surface over time. Clean it with a mild acid cleaner or a dedicated aluminum cleaner, then apply a bonding primer before painting. Steel and cast iron rust actively. Treat rust before any surface decoration or you'll be doing the whole project again next year. Wrought iron is heavy, holds up structurally for decades, and is very worth restoring with rust treatment, primer, and a semi-gloss exterior paint or spray paint rated for metal.
Wood frames (teak, cedar, pine, eucalyptus)
Hardwoods like teak and eucalyptus are naturally rot-resistant but still need UV protection to prevent graying and cracking. Softwoods like pine need sealing on all surfaces, including end grain, before painting or staining, or moisture gets in and causes rot and finish failure. If there are existing cracks or splits, fill them with exterior wood filler before sanding, otherwise water gets trapped inside and works against your new finish from underneath.
Plastic and resin furniture
Plastic is the trickiest to paint because standard paint won't bond to most plastic surfaces without a bonding primer. The good news is plastic doesn't rust or rot, so prep is mostly cleaning and priming. For oxidized, chalky plastic, try a plastic restorer product first (like Rejuvenate Outdoor Plastic Restorer) before committing to paint. Sometimes that alone brings the color back without any painting. If you do paint plastic, use a paint formulated for plastic and vinyl, apply thin coats, and expect to reapply every two to three years as the plastic flexes with temperature changes.
Wicker and rattan
Natural rattan is beautiful but not truly weatherproof and is best used on covered patios. Synthetic resin wicker (which most outdoor wicker furniture is today) holds up much better. For decorating, the woven structure means brushing on paint is nearly impossible; use spray paint or a spray gun for even coverage. Clean wicker thoroughly in the weave with a soft brush, dry completely, and use a spray primer and spray topcoat for the most even result. The cushions on wicker furniture do most of the style work, so investing in good outdoor cushion covers gives you the biggest visual payoff for the least effort.
Dining sets vs loungers vs benches vs tables
Dining chairs and benches see the most wear on seat surfaces, so concentrate refinishing effort there. Tabletops take the most UV and water exposure, so sealer or a quality topcoat is critical on any wood table surface. Chaise loungers often have adjustable mechanisms that get rusty and sticky; lubricate these with a silicone spray after repainting. Umbrellas with faded canopies can be painted with fabric spray paint designed for outdoor awnings, which is much cheaper than replacing the canopy, though results depend on how degraded the fabric is.
Weather-proofing so the new look actually lasts
Every decorating project on outdoor furniture should finish with a weather protection step. This is not optional outside.
- Clear exterior topcoat sealer: Apply over any painted or stained wood surface to lock in the color and add a moisture barrier. Spar urethane is a strong choice for wood, especially tabletops. For metal, a clear lacquer or enamel topcoat adds corrosion resistance.
- UV-resistant fabric protector spray: Apply to any new outdoor cushion fabric, canvas, or wicker. Products like 303 Fabric Guard restore water repellency to outdoor fabrics and add UV blocking. Reapply every season.
- Marine-grade paint where it counts: If you have furniture that sits near a pool or in a very wet climate, marine-grade topcoats (designed for boat surfaces) offer superior moisture and UV resistance over standard exterior paint.
- New product waiting periods: Some restoration products, including Rust-Oleum Restore Outdoor Furniture, require waiting at least 6 months before applying on certain surfaces. Read your product labels before assuming you can use a new coating on a surface that already has something on it.
- Storage and seasonal care: Even with great prep and quality products, the single biggest thing you can do to make a new look last is get furniture off the ground or under cover during the offseason. Use breathable furniture covers (not plastic tarps, which trap moisture) or move pieces to a dry shed or garage.
Ongoing maintenance is simple: wash outdoor furniture with mild soap and water at least twice a season, and spot-treat any chips or scratches in the paint immediately with a matching touch-up coat before moisture gets underneath. A 10-minute touch-up in May saves you a full refinishing project the following spring.
Budget breakdown, shopping list, and project paths
Here's an honest look at what three different project scopes cost and require, so you can match your approach to your actual time and budget.
| Project Path | Best For | Time | Approx. Cost | Key Supplies |
|---|---|---|---|---|
| Cushion and cover refresh | Furniture with solid frames but faded fabric | 1 to 2 hours | $30 to $80 | Outdoor cushion covers, UV-resistant fabric spray, outdoor throw |
| Spray paint frame refresh | Metal or plastic furniture with surface wear | Half day (with drying) | $25 to $60 | Rust converter (metal), bonding primer, spray paint rated for surface, clear topcoat |
| Full wood refinish and repaint | Wood furniture with peeling finish, graying, or minor rot | Full day to weekend | $60 to $150 | 80 and 220-grit sandpaper, exterior primer, end-grain sealer, exterior paint or stain, spar urethane topcoat, brushes or rollers |
| Reupholster seat cushions | Dining chairs or benches with worn seat fabric | 30 to 60 min per seat | $20 to $50 per chair | 2-inch high-density foam, outdoor upholstery fabric, staple gun, staples, screwdriver |
Step-by-step: quick metal frame refresh (beginner project)
- Clean the frame thoroughly with a degreaser or dish soap and water. Rinse and dry completely.
- Sand any rust spots with 80-grit sandpaper or a wire brush. Apply rust converter to remaining rust and let it cure per the label (usually 24 hours).
- Lightly scuff the entire frame with 220-grit sandpaper or a scuff pad.
- Apply a metal primer in thin, even coats. Let it dry fully.
- Apply two coats of spray paint rated for metal, letting each coat dry to recoat time before adding the next.
- Finish with a clear exterior topcoat spray for added protection.
- Do not use furniture until fully cured (usually 48 to 72 hours). Keep dry for at least 48 hours after final coat.
Step-by-step: wood furniture repaint (intermediate project)
- Clean wood with a bleach solution (1 cup bleach per gallon water) to kill any mildew. Rinse and dry 24 hours.
- Sand the entire surface with 50-grit sandpaper to remove loose paint and rough up the surface. Follow with 120-grit to smooth.
- Fill cracks or holes with exterior wood filler. Let dry and sand flush.
- Seal all end-grain sections with an end-grain sealer and let dry.
- Apply exterior primer (shellac-based for stain blocking if wood has tannin-rich species or mildew staining). Let dry to recoat time.
- Apply two coats of exterior latex or alkyd paint, letting each coat dry fully.
- Apply a spar urethane topcoat on tabletop surfaces or any horizontal surface that holds water.
- Reassemble hardware, replacing any rusty screws or bolts with stainless steel equivalents.
Whichever path you take, the same rule applies: do the prep right, use products rated for outdoor exposure, and protect the finished result with a sealer or fabric protector. If you want to know how to mix patio furniture looks without the headaches, start by matching your style and materials to the prep steps you already chose prep right. That's genuinely the whole formula. The decorating is the fun part, but the prep is what makes it last past the first summer.
FAQ
Can I decorate patio furniture without stripping or sanding it first?
Sometimes, but only if the surface is already sound and you still do a proper clean and a scuff. If you see peeling, flaking, or rough scaling, you need to remove loose finish back to stable material. For glossy factory coatings (especially on metal), scuff-sand lightly so primer can bite. If you skip both deep cleaning for mildew and scuffing for adhesion, topcoats typically fail within one season.
What’s the best way to clean patio furniture if it’s covered in algae or heavy grime?
Start with a stiff-brush wash using outdoor cleaner or the vinegar-water mix, then address mildew separately (bleach-water solution with a dwell time before rinsing). Don’t paint right after rinsing, let it dry fully, at least 24 hours in warm weather. If the furniture stays slightly tacky or has a slick residue, re-clean, because residue prevents primer from bonding.
How long should I wait between steps when repainting patio furniture?
Dry time matters as much as recoat time. After washing and rinsing, wait until the piece is completely dry, then follow the product label for primer and topcoat recoat windows. Avoid “rushing to finish the same day” when the surface is still cool or slightly damp, because trapped moisture can bubble even if you used the correct primer.
Is it better to use spray paint or brush-on paint for patio furniture?
Spray is usually smoother for metal and wicker, and it reaches into seams faster. Brush-on works well for wood and touch-ups, but use thin, even coats and keep an eye on runs and puddles. For any method, two thin coats generally look better and last longer than one thick coat, because thick coats trap solvents and can stay soft.
How do I choose paint sheens for patio furniture so it cleans easily?
For outdoor frames, satin or semi-gloss typically resists moisture better and wipes down more easily than flat finishes. Flat finishes can be beautiful, but they tend to stain and show scuffs sooner outdoors. If you’re painting wood details or stenciled areas, keep the stencil edge crisp by using a light dab application, then match the topcoat sheen across the whole piece.
Do I need a topcoat sealant over paint or stain on patio furniture?
Often yes for extra protection, but it depends on what you applied. Painted surfaces are usually designed to be the finished layer after topcoat paint. For stains, a clear exterior topcoat can be necessary depending on the product, especially for tabletops that see heavy water exposure. If you’re unsure, test a small hidden spot first, because some clear coats can alter the color tone over stain.
What should I do if my metal furniture is still rusty after sanding?
Remove loose rust thoroughly, then use a rust converter on the remaining rust, do not sand after applying the converter, and prime directly over it when it has cured per the label. If you sand after conversion, you can reduce the chemical conversion where you need it most. Also prime quickly after bare-metal exposure, because bare metal can re-rust fast in humid weather.
Can I paint over powder-coated furniture?
Yes, but only with proper scuffing and the right primer. Powder coat is tough and slick, so you need light scuff-sanding to create texture, clean thoroughly to remove dust, then apply a bonding primer or direct-to-metal primer rated for that surface. If you notice the new paint peeling when you scratch it, stop and strip to stable coating before repainting.
How do I treat end grain on wood furniture properly?
End grain absorbs water like a sponge, it’s a common failure point. Seal end-grain areas with a dedicated end-grain sealer before primer, then continue with your regular primer and topcoat. Skipping end-grain sealing often shows up as peeling or roughness around cut edges first.
What’s the safest way to use bleach on outdoor furniture without damaging it?
Mix bleach with water at the recommended ratio, scrub, let it sit about 10 minutes, then rinse thoroughly until you no longer smell bleach. Wear gloves, avoid windy days to prevent splashing, and let the furniture dry completely before priming. If you have plants nearby, cover them or rinse surrounding areas after, because bleach can harm vegetation.
Can I use indoor fabric or regular cotton cushions outdoors?
You can, but they’ll mildew and fade faster, especially in shaded or humid locations. Outdoor-rated cushions are typically UV-resistant and water-resistant (often acrylic or polyester blends designed for outdoor use). If you already have cotton, use slipcovers for protection and store or cover them when not in use to extend life.
How often should I reapply touch-up paint outdoors?
Touch up as soon as you see chips or scratches, ideally within days to weeks, not months. A quick 10-minute fix can prevent moisture from getting under the coating and causing bubbling or rust. Keep a small matching can or even a pen-style touch-up for small spots, and stir well so color consistency stays close.
What’s the easiest way to refresh patio furniture without repainting the frame?
Swap cushions and add removable slipcovers, since it changes the look with no adhesion work. Choose outdoor or marine-grade fabrics with UV and water resistance, and consider zipper-closure slipcovers for standard cushion sizes. For wicker or resin pieces, focus on cushion covers and throws made with acrylic or polyester outdoor fabric, since the frame is harder to paint cleanly.
Are furniture covers worth it, and how should I use them?
Covers help, especially for tabletops and cushions, but they must be breathable or you risk trapping moisture underneath. Use a cover when rain is expected for long periods, and periodically remove it to let the furniture dry. Avoid tight plastic-only covers on humid weeks unless the cover is designed to vent, because condensation can promote mildew.