The safest, deck-friendly way to anchor patio furniture is to use purpose-built furniture anchors or deck brackets fastened into your deck's joists (not just the surface boards), paired with stainless steel hardware and sealed penetrations to keep moisture out. For a removable setup, clip-style deck furniture anchors that grip between deck boards with no drilling are the cleanest option. For something more permanent, lag bolts or post anchors driven through the deck board and into the joist below give you real holding power against wind uplift and tip-over. Which method you choose depends on your deck material, your furniture's footprint, and how often you want to move things around.
How to Anchor Patio Furniture to a Deck (DIY Guide)

Maren Grady
23 Jun 2026
Why you actually need to anchor furniture on a deck
Decks create a unique problem that patios on grade don't: smooth composite or painted wood surfaces are almost frictionless when wet, and furniture up on an elevated deck catches more wind than furniture at ground level. A 30 mph gust can turn a lightweight aluminum chair into a projectile in seconds, and even a heavy wrought-iron table can walk across smooth Trex boards during a storm. That's a real safety issue, not just an inconvenience.
Tip-over risk is the other factor most people underestimate. The U. S. Consumer Product Safety Commission has run an 'Anchor It!
' campaign for over a decade specifically because furniture tip-overs cause serious injuries, particularly to children. The CPSC says the Anchor It! campaign has helped lead to fewer furniture tip-overs, supporting anchoring as a way to reduce serious injuries [the U. S.
Consumer Product Safety Commission has run an 'Anchor It! ' campaign for over a decade](https://www. cpsc. gov/Newsroom/News-Releases/2025/CPSC-AnchorIt-Campaign-Marks-10-Years-Fewer-Furniture-Tip-Overs-Lead-to-Safer-American-Households).
A chair on a raised deck that tips backward doesn't just fall over, it can fall over the railing. Beyond personal safety, an unsecured dining table or bench sliding around over time will gouge, scratch, and wear down your deck boards, which gets expensive fast. And if a guest is injured because furniture moved on your deck, you're looking at a liability headache. Anchoring is genuinely worth the afternoon it takes.
Picking the right anchoring method before you buy anything
The biggest mistake people make is buying hardware before they've thought through their specific situation. Spend five minutes answering these questions first: What is your deck surface made of (pressure-treated lumber, composite like Trex or TimberTech, or aluminum decking)? Do you have deck railings you can tie into? Are your furniture feet flat, slotted, or fitted with casters? And do you want to move the furniture seasonally or lock it down semi-permanently? The answers change everything.
Removable vs. semi-permanent anchoring
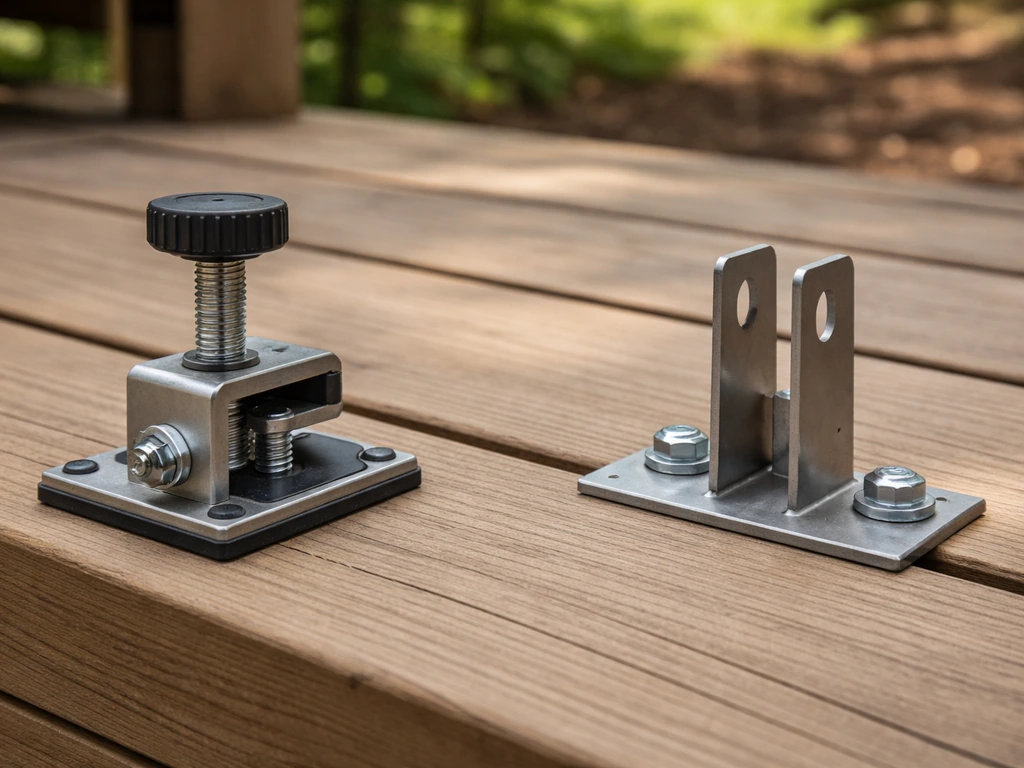
Removable anchoring is ideal if you want to bring furniture inside for winter or rearrange your deck layout. Products like the MyDek Furniture Anchor use a clip system that slides between or clips onto deck boards with no tools and no drill holes at all. These are a great starting point and won't void any composite deck warranties.
The trade-off is holding strength: clip-style anchors resist sliding well, but they don't match the uplift resistance of a bolted anchor in a serious storm. Semi-permanent anchoring means drilling into the deck surface and ideally into the framing below.
It takes more work to set up and a little more care to do without damaging the deck, but it holds through severe weather and is the right call for large dining sets, heavy benches, or furniture on a very exposed deck.
Deck material matters a lot
On pressure-treated or natural wood decks, you have the most flexibility: standard stainless steel deck screws, lag bolts, and post-style anchors all work well and are forgiving to install. On composite decking (Trex, TimberTech, Lumberock, and similar), you need to be more careful. Decksdirect notes that on [composite decking](https://www. decksdirect.
com/knowledge-builders/how-to-mount-a-deck-post) you need to be careful and follow the right approach for fastening so the boards don't crack or get damaged. Composite boards are denser than wood and can mushroom or crack if you don't pre-drill, and most manufacturers specify pre-drilling with a 1/8" to 5/32" bit before any fastener goes in. More importantly, composite deck boards are not structural on their own: they're a surface layer over the joist framing below.
If you're fastening anything that will take a real load, your fastener needs to reach the joist, not just sit in the composite board. On aluminum deck systems, follow the manufacturer's instructions specifically and use only stainless steel fasteners to avoid galvanic corrosion (more on that in the tools section).
Matching the anchor to the furniture
| Furniture Type | Best Anchor Method | Removable? |
|---|---|---|
| Dining table with flat pad feet | Floor bracket or post anchor bolted to joist | No (semi-permanent) |
| Dining table with pedestal base | Post anchor or base plate bolted through deck to joist | No (semi-permanent) |
| Lightweight chairs with flat feet | Clip-style deck furniture anchor or furniture strap to railing | Yes |
| Chairs with slotted/slatted feet | Clip through foot slot into deck board gap | Yes |
| Chairs with casters | Caster cups anchored to deck surface | Yes/No |
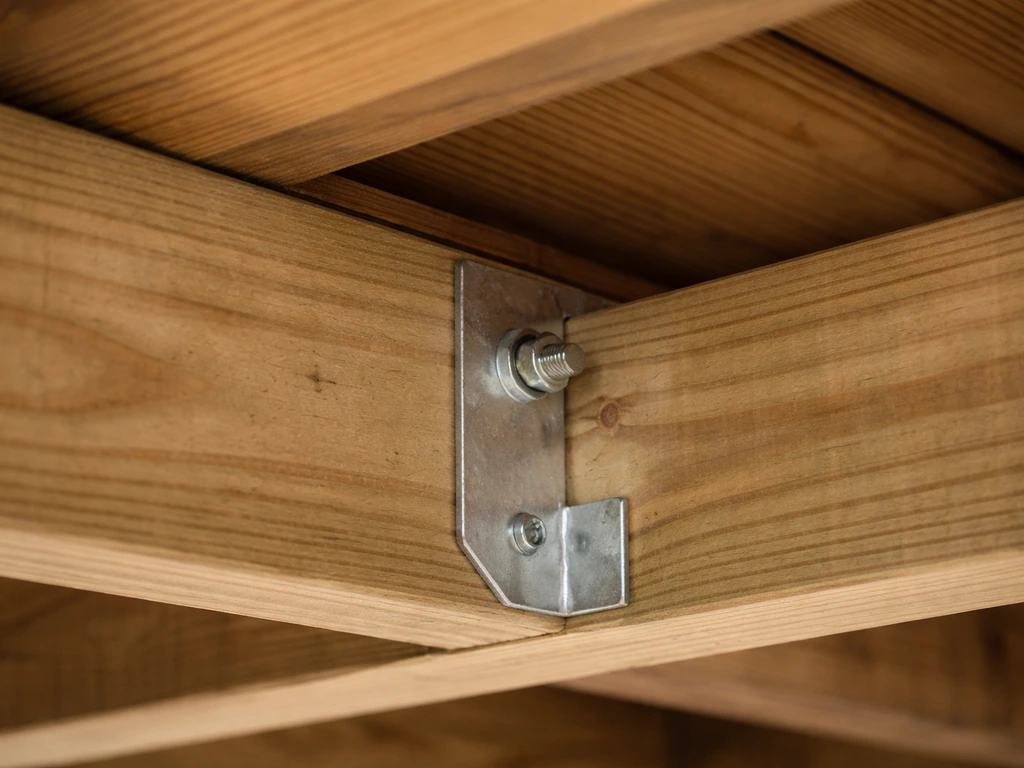
| Benches (freestanding) | L-bracket or post anchor to joist, one per end | No (semi-permanent) |
| Sectional seating pieces | Clip sets between pieces + corner anchors to deck | Yes |
Tools, materials, and safety prep
Here's what you'll realistically need before you start. I've learned the hard way that running out to the hardware store mid-project because you forgot one thing doubles the time it takes.
Tools you'll need
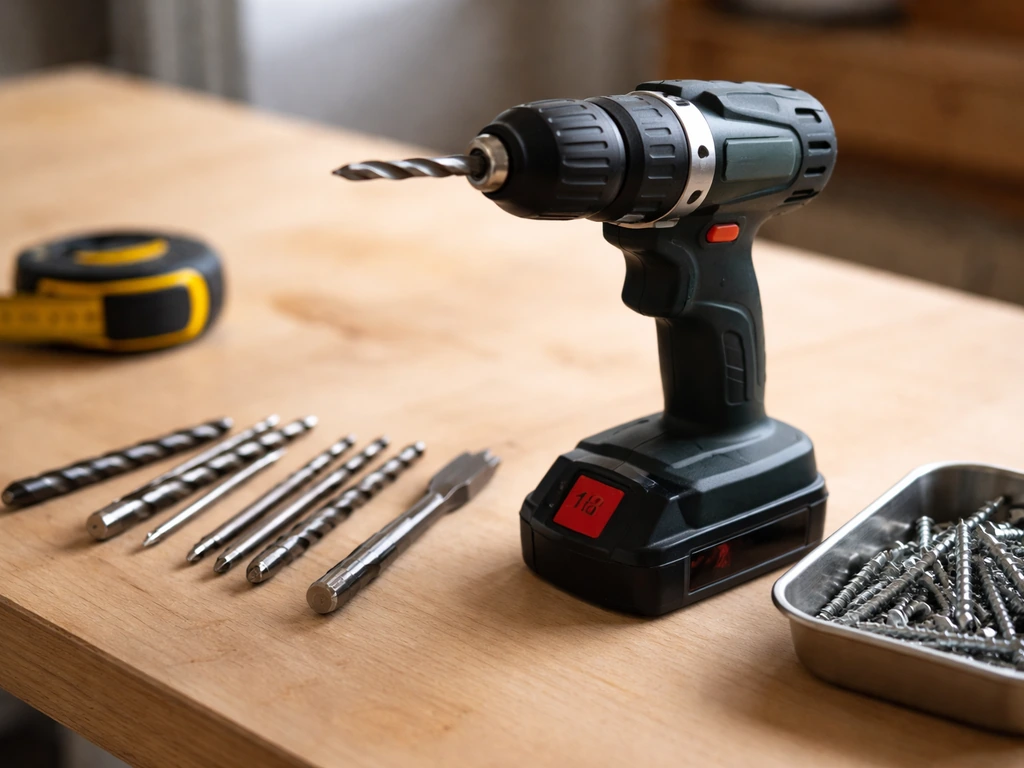
- Cordless drill/driver (a basic 18V model works fine)
- Drill bit set including a 1/8" and 5/32" bit for pre-drilling, plus a larger bit (3/8" or 1/2") for lag bolt pilot holes
- Stud finder or a simple joist-locating method (measure from the edge of the deck, joists are typically 16" on center)
- Tape measure and pencil or chalk line for layout
- Socket wrench or adjustable wrench for tightening lag bolts
- Caulking gun if you're using silicone or polyurethane sealant
- Safety glasses and work gloves
Materials to buy
- Stainless steel fasteners (screws or lag bolts): use #8 or #10 stainless steel screws for composite; hot-dipped galvanized or stainless for pressure-treated wood. Never use plain steel on a deck — it rusts within one season.
- Flat washers and lock washers: distributes load across the deck board surface and prevents fasteners from pulling through over time
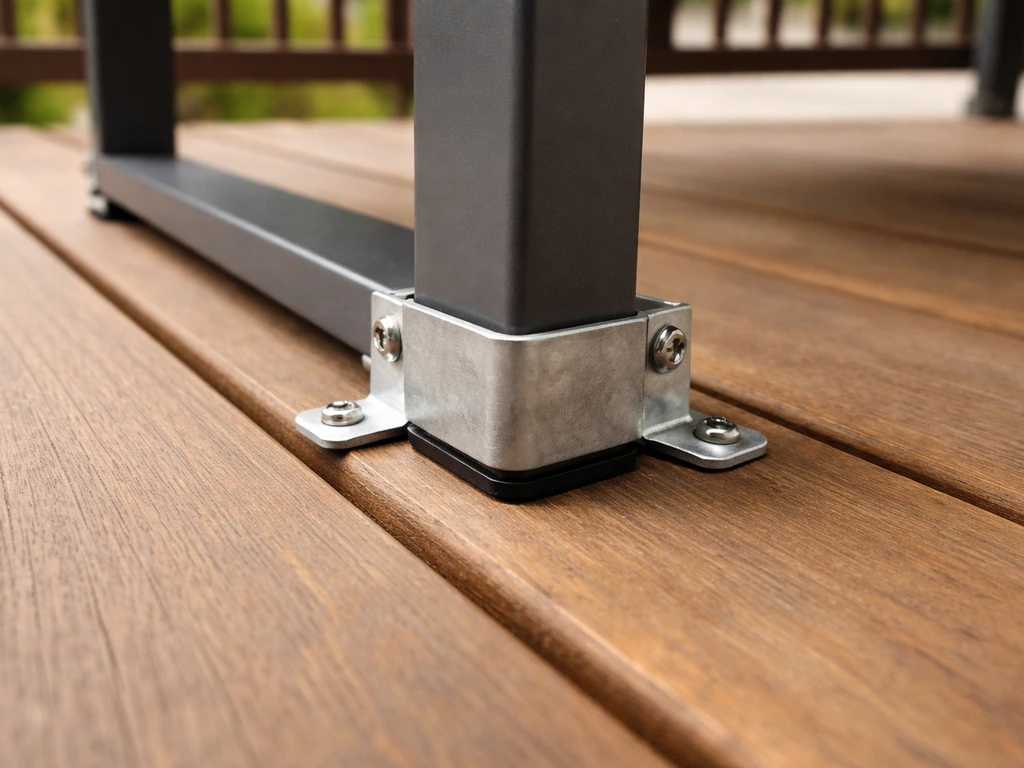
- Deck furniture anchors or floor brackets: purpose-built products like L-brackets, post base anchors, or clip-style systems depending on your chosen method
- Silicone or polyurethane exterior sealant (clear): for sealing any drilled penetrations against water intrusion
- Anti-corrosion hardware: if your furniture is aluminum and your deck is treated lumber or composite, use nylon washers or plastic standoffs to prevent direct metal-to-metal contact and avoid galvanic corrosion
- Furniture straps or cable ties rated for outdoor UV exposure: for a secondary tether to railings on lightweight pieces
Safety checks before you drill a single hole
First, never drill near electrical conduit. If your deck has lights, outlets, or any wiring, know where those runs are before you touch a drill. Second, identify your joist locations before fastening anything structural. You can tap the deck surface with a knuckle and listen for a solid vs.
hollow sound, or simply measure from the edge of the deck in 16" increments (that's standard joist spacing for most residential decks, though some composite decks use 12" spacing per manufacturer requirements). Third, avoid over-penetrating. When drilling through a composite board into a joist, you want the fastener to bite into the joist, not punch through it into whatever is below.
Drill a shallow pilot hole first and measure your drill bit depth against the fastener length to make sure you're stopping where you mean to. Finally, inspect the deck boards around your anchor points. Boards with visible rot, splitting, or soft spots are not safe anchor locations: find a different spot or repair the board first.
Step-by-step: anchoring a dining table or large furniture set
Large dining sets are the highest-stakes anchor job because they're heavy, they have wide footprints, and the table base usually concentrates all the weight in one spot. This is the method I use for a semi-permanent installation that will hold through a serious storm.
- Set the furniture in its final position. Walk around it and check clearances: you want at least 3 feet of clear walkway on all sides so chairs can pull out fully and nobody is squeezing past a railing. Mark the foot positions with chalk or painter's tape on the deck before moving anything.
- Locate the joists under each foot position. Use your tape measure from the deck edge (typically 16" on center) and mark joist centerlines with tape. You want at least one foot of the table, ideally two opposite feet, to land over a joist so your lag bolt has something structural to bite into.
- Move the furniture off the marked positions so you have clear access to drill.
- For each anchor point: pre-drill a pilot hole through the deck board only first, using a 1/8" bit for composite or 5/32" for harder composites like TimberTech. Keep the drill perpendicular to the surface. Stop when the bit breaks through the bottom of the deck board.
- Widen the pilot hole to match your lag bolt diameter (typically 3/8") using a larger bit, again through the deck board only.
- Install your bracket or post anchor plate over the hole, aligning it with the pencil mark for the furniture foot. Drive a 3/8" x 3" or 3/8" x 4" stainless steel lag bolt through the bracket, through the deck board, and into the joist below. Use a flat washer under the bolt head to distribute load. Tighten with a socket wrench until snug: firm but not so tight you're crushing the composite board.
- Apply a bead of clear silicone or polyurethane exterior sealant around the base of the bracket where it meets the deck board. This keeps water from sitting in the hole and wicking into the joist.
- Set the furniture back into position over the anchor points. Most floor brackets have a lip or pin that locates the furniture foot: line them up and confirm the piece sits flat and level.
- Repeat for the remaining anchor points. A standard 4-person dining table should have at minimum 2 anchor points (diagonally opposite legs or base ends); a large 6-8 person set benefits from all 4 corners anchored.
- For the table's chairs, see the seating section below.
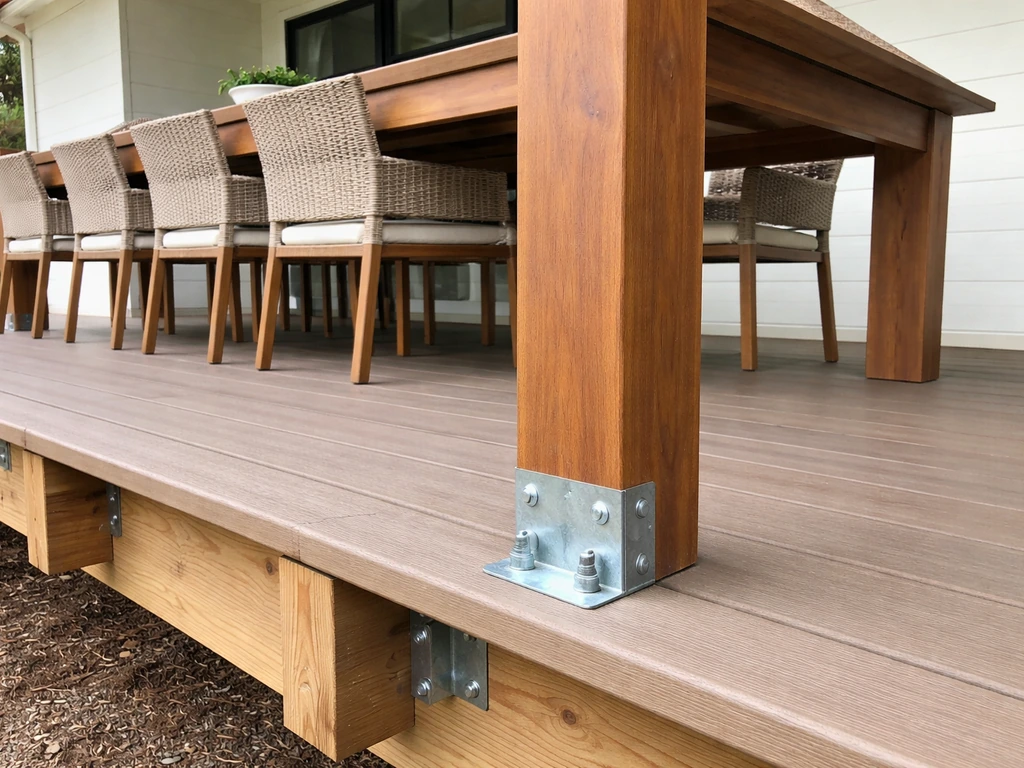
One thing I'll flag here: if your table has a pedestal base rather than four legs, the load is even more concentrated in one spot. Use a post base anchor (the kind typically used for deck post installation) centered on a joist, and make sure the anchor plate spans at least two deck boards so the load spreads. Bolt through both boards into the joist. This is the same principle used for Titan-style post anchor kits, adapted for furniture use.
Step-by-step: anchoring chairs, benches, and lighter seating
Chairs are a different problem than tables. They move constantly (pulled in and out), they're lighter so they catch wind easily, and you almost never want them permanently fixed in one spot. The goal here is semi-secure: resisting wind uplift and unintended sliding without preventing normal use. For a practical guide on the right approach and hardware, see how to secure patio furniture to deck semi-secure: resisting wind uplift and unintended sliding.
- For clip-style anchoring (no-drill method): Use a deck furniture anchor product designed to clip between deck board gaps or slide under the board edge. Slide the anchor into position at the deck board gap nearest to where the chair foot will sit. Press the clip down until it locks. Set the chair foot into the clip receiver. This method works well on wood and composite decking with standard 1/8" to 3/16" gaps between boards. It holds against sliding in most conditions and is fully removable.
- For chairs with slotted feet (the rectangular slot in the chair foot): Thread a clip or strap anchor through the slot in the foot and connect it to the deck board gap or a floor anchor below. This is faster than it sounds and is very effective for lightweight aluminum or resin chairs.
- For a tether method using deck railings: Cut a length of UV-stable cable or strap to length and attach one end to the chair leg with a stainless steel quick-link, and the other end to a railing post using a rail anchor clip rated for outdoor use. Keep the tether short: you want just enough slack that the chair moves normally during use but can't travel more than a few inches in any direction. This is my favorite approach for chairs in very exposed, windy locations.
- For benches requiring a permanent anchor: Position the bench and mark the foot locations as you did for the dining table. Locate the joists. Pre-drill through the composite or wood board, then drive a 5/16" x 2.5" stainless lag bolt through an L-bracket and into the joist. One bracket per end of the bench is usually sufficient for a standard 5-6 foot bench. Seal all penetrations.
- For chairs with casters: Use caster cups (rubber or non-slip material) under each wheel. These are not drilled down but rather sit on the deck and grip through friction and weight. They protect the deck boards from caster marks and add meaningful resistance against sliding. For high-wind areas, combine caster cups with a tether to the railing.
If you're anchoring a whole seating set with multiple pieces that connect together, clipping the sectional pieces to each other first (so the set acts as one heavier unit) and then anchoring one or two corners to the deck is often more practical than anchoring every individual piece. If you need to clip patio furniture together, focus on connecting the pieces so the whole set acts as one heavier unit before you anchor the corners to the deck clipping the sectional pieces to each other first. There are clip products designed specifically for connecting adjacent patio furniture pieces to each other, which is worth exploring if you have a large modular sectional.
Protecting your deck while anchoring: spacing, water, and load distribution
This is the part most guides skip, and it's where people end up regretting the whole project two years later. If your patio is on concrete, the approach is a bit different, but you can still secure patio furniture safely with the right anchors and placement how to secure patio furniture to concrete. Decks can handle furniture weight just fine, but only if the load is distributed properly and moisture is kept out of any penetrations you create.
Seal every penetration
Any hole you drill into a deck board is a potential moisture entry point. Water that gets into a composite board's core can cause swelling and cracking over freeze-thaw cycles. Water that reaches a wood joist accelerates rot. After every bracket is installed, run a small bead of clear exterior silicone or polyurethane sealant around the perimeter of the bracket base plate where it meets the deck surface. Don't skip this step even if it feels redundant: it takes 30 seconds per anchor point and can add years to the deck's life.
Use standoff hardware to prevent trapped moisture
If your anchor bracket has a flat base plate that sits directly on the deck, water can get trapped under it and never dry out. Use nylon or stainless standoff washers to lift the bracket slightly (just 1/8" to 1/4" is enough) so air and water can pass under it freely.
This also matters for galvanic corrosion prevention: if your furniture is aluminum and your deck hardware is steel or galvanized, direct metal-to-metal contact in the presence of moisture creates a galvanic pair that will accelerate corrosion of the less noble metal. The British Stainless Steel Association notes that bimetallic contact can create galvanic corrosion risks depending on the metal pair and whether an electrolyte like moisture is present galvanic pair that will accelerate corrosion.
Plastic or nylon washers between dissimilar metals break that contact.
Furniture placement and deck wear
Keep heavy furniture legs off the ends of deck boards near the fascia: board ends are the weakest point and the most prone to cracking under concentrated load. Center your anchor points over joists whenever possible. Avoid placing anchors in sections of decking that show any softness, cupping, or discoloration. And plan your layout so that furniture doesn't block the drainage gaps between boards: you need water to run off the deck surface freely, not pool under a table base.
Spacing and access
A common layout mistake is placing the dining table anchor points so close to the railing that chairs can't pull out fully. Before finalizing any anchor position, sit in the chairs (physically sit down with them pulled out) and make sure the layout works. Semi-permanent anchors are a real pain to move after the fact, so test the ergonomics before you commit.
Testing, maintaining, and re-checking your anchors over time
Installing anchors is only half the job. The other half is making sure they stay effective as seasons change, hardware loosens, and the deck itself moves through expansion and contraction cycles.
Testing stability right after installation
After everything is installed, do a real stability test: grab the table from both short ends and push and pull firmly in each direction. The furniture should feel firmly planted with minimal play. Then tilt one side up slightly and release: a properly anchored piece should resist and return to flat without bouncing or rocking. For chairs, grab the top of the backrest and push backward hard (imagine wind loading). The chair should resist tipping significantly more than an unanchored chair of the same weight.
Seasonal maintenance checks
I check my deck anchors twice a year: once at the start of outdoor season in spring, and once in the fall before winter storage. Here's what to look for each time.
- Check lag bolts and screws for loosening: composite and wood both expand and contract seasonally, which can work fasteners loose over time. Hand-tighten anything that has any play, but don't overtighten, especially in composite: you're just trying to get back to snug.
- Inspect sealant around each penetration: clear silicone can dry out and shrink after a few years. If you see gaps or cracking in the sealant bead, clean the area with rubbing alcohol and re-apply.
- Look for rust or corrosion on hardware: even stainless steel can show surface rust (tea staining) in coastal or humid environments. Surface rust on stainless is mostly cosmetic, but if you see any hardware that is actively pitting or flaking, replace it before it fails.
- Check the deck boards around each anchor point for signs of stress: cracks radiating from a screw hole, soft spots, or discoloration that suggests moisture intrusion mean you need to move the anchor to a healthy section of decking.
- If you remove furniture for winter storage, use the opportunity to clean the anchor hardware, re-coat any exposed wood around penetrations with exterior wood preservative, and replace any clip-style anchors that have become brittle or cracked from UV exposure.
When to re-anchor from scratch
If a lag bolt is spinning freely when you try to tighten it, the threads have stripped in the joist, and you need to move to a new location nearby: typically 2-3 inches to one side so you're hitting fresh wood. Plug the old hole with a wooden toothpick and a drop of exterior wood glue, let it cure, then seal over it. If you've had the same anchor setup for 5 or more years and the brackets are showing significant corrosion or the sealant is completely gone, it's worth pulling everything out and starting fresh with new hardware. A full re-anchoring on a 6-person dining set takes about 2 hours and is much cheaper than replacing deck boards that have rotted under a leaking bracket.
FAQ
Should I anchor patio furniture to the deck boards or into the joists?
A safe rule is to anchor into the framing (joists), not just the deck surface. Even if a bracket feels tight, surface-only fastening can loosen over time on wet composite or smooth painted boards, especially under wind uplift.
How do I avoid drilling into the wrong depth or punching through the joist?
If you need to drill, stop as soon as you’ve reached the joist, then verify by measuring drill-bit depth before the real install. Drilling too deep can pierce through the underside or into utilities, and you lose holding power if you don’t actually bite into framing.
What should I check after a windstorm if I used a no-drill (clip) anchor system?
For removable systems, check that the furniture feet stay fully seated after rain. Clip-style anchors can loosen slightly if the base is not designed to sit flat, is uneven, or has worn pads, so re-test fit after the first storm.
Why do composite deck anchors sometimes fail or crack even when the fastener seems secure?
On composite decks, pre-drill and use the manufacturer’s fasteners, then avoid driving fasteners into the board with excessive force. Composite can mushroom or crack if you skip pilot holes or if you clamp the bracket down too hard.
Can I anchor furniture that has wheels or casters, and what changes?
If your furniture has casters or gliders, you typically need a different strategy than fixed-leg anchoring. For stability, use anchors that match the footprint and add non-marring pads, then reduce caster travel by anchoring at key corners or choosing semi-secure restraints that prevent sliding.
Is it okay to tie furniture anchors into the deck railing instead of the joists?
Yes, but only if the railing is rated for that kind of lateral force and you’re using compatible hardware. Many railings are not structural for furniture loads, so anchoring to railings can shift the failure point and still leave the deck surface vulnerable.
How often should I re-tighten or re-check anchors after installing them?
After installing, do a grab test and then repeat once after the first two heavy wind events. Hardware can settle slightly as sealants cure and as the deck experiences thermal movement.
What should I do if a lag bolt spins and won’t tighten in the joist?
If a fastener spins, treat it as stripped threads rather than trying to “force it tighter.” Move a few inches to fresh framing, fill the old hole, and seal the patch to avoid becoming a recurring moisture entry point.
Do I need special washers if my patio furniture is aluminum and my deck hardware is steel or galvanized?
Yes, especially for aluminum furniture on steel or galvanized deck hardware. Use nylon or stainless standoff washers and keep dissimilar metals from touching directly in wet conditions to reduce galvanic corrosion.
What’s the most common layout mistake when anchoring a dining set?
Place anchor points so chairs can pull out fully without binding, and avoid putting the corners too close to the fascia. If you lock down too close to the railing, chair movement can lever the table or loosen anchors over time.
Should I lift bracket bases off the deck surface, and why?
If the bracket base sits directly on the deck, consider standoffs so air and water can pass underneath. Trapped water under a flat plate can keep the area wet and reduce hardware lifespan.
Is it better to anchor every piece of a modular sectional, or the set as one unit?
For whole modular seating sets, anchoring the connected unit is usually more efficient than anchoring every single piece. Clip adjacent sections first so the set behaves as one heavier mass, then anchor only the corners that see the highest wind loads.
What if the deck board looks slightly damaged near where I want to anchor?
If a deck board is soft, split, or shows rot or cupping, don’t anchor there. Replace or repair the board first, then re-locate anchors over sound framing to restore proper load transfer.
How do I decide between removable anchors and semi-permanent lag-bolted anchoring?
If you plan to move furniture often, choose removable anchors that avoid permanent penetrations, but accept lower uplift resistance. For heavy tables on very exposed decks, semi-permanent anchors into joists are usually the safer choice.