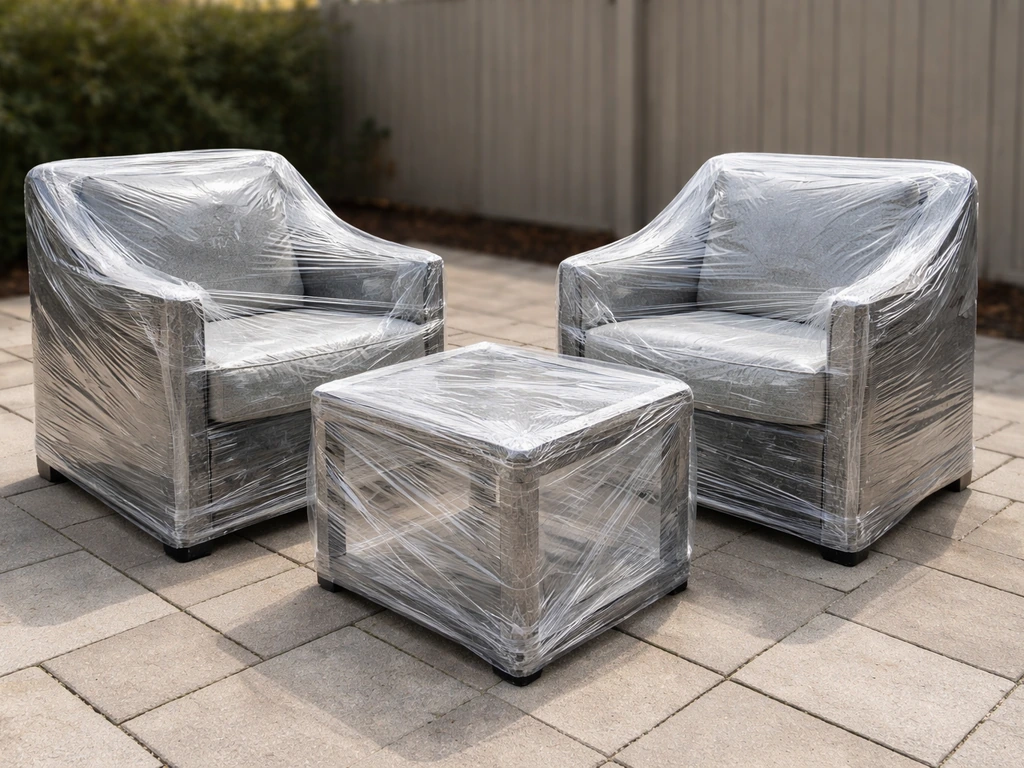
You can absolutely shrink-wrap patio furniture yourself, and it works well for long-term outdoor storage. The basic process is: clean and dry every piece, protect any sharp edges or protruding hardware with foam or cardboard, wrap the furniture tightly in 6-to-8-mil polyethylene shrink film, seal all seams with UV-resistant preservation tape, then use a heat gun to shrink the film snug. Add at least one or two ventilation accessories (self-adhesive shrink wrap vents or desiccant bags) before you seal it up completely. That last step is the one most DIYers skip, and it's why they end up with mildew and rust come spring.
How to Shrink Wrap Patio Furniture: DIY Steps and Tips

Maren Grady
5 May 2026
When shrink-wrapping is the right choice (and when it isn't)
Shrink-wrapping makes the most sense when you need airtight, weatherproof protection for metal and resin furniture that will sit outdoors through a full winter, or when you're storing pieces under a deck, against a fence, or in any spot where a standard cover would blow off or flap around. When you prepare and store patio furniture this way, you can dramatically reduce mildew and rust after winter weather weatherproof protection for metal and resin furniture. It's also great for protecting stacked chairs or a wrapped set of furniture as a single unit.
That said, shrink wrap is not the right choice for everything. If you’re trying to keep patio furniture protected through the winter, look for an airtight, weatherproof approach like properly vented shrink-wrapping only for compatible materials shrink wrap is not the right choice for everything. Untreated wood furniture should not be sealed in shrink wrap because the trapped moisture causes warping and rot. The same goes for leather cushions or any natural-fiber cushions that can't fully air out. If your storage spot gets hot, be careful too: standard polyethylene wrap can deform in extreme heat, and the trapped air underneath can accelerate that. For wood-heavy pieces, a breathable patio cover combined with indoor cushion storage is a smarter move. To tarp patio furniture for winter, choose a breathable cover when possible and secure it snugly to prevent wind from catching the fabric. If you're on the fence between wrapping and covering, it's worth knowing that while standard waterproof covers can trap condensation and cause mold just like a poorly vented shrink wrap job can, breathable covers let moisture evaporate and are generally safer for mixed-material furniture.
- Good candidates: aluminum, steel, wrought iron, resin wicker, and all-weather wicker furniture
- Good candidates: resin or plastic chairs and tables
- Good candidates: furniture being stored outdoors, under a deck, or in partially open spaces
- Not recommended: untreated solid wood furniture (teak, cedar, oak, pine)
- Not recommended: furniture with leather, suede, or natural-fiber fabric cushions still attached
- Not recommended: pieces stored in a hot enclosed space like a non-ventilated shed in summer
Materials and tools you'll need before you start
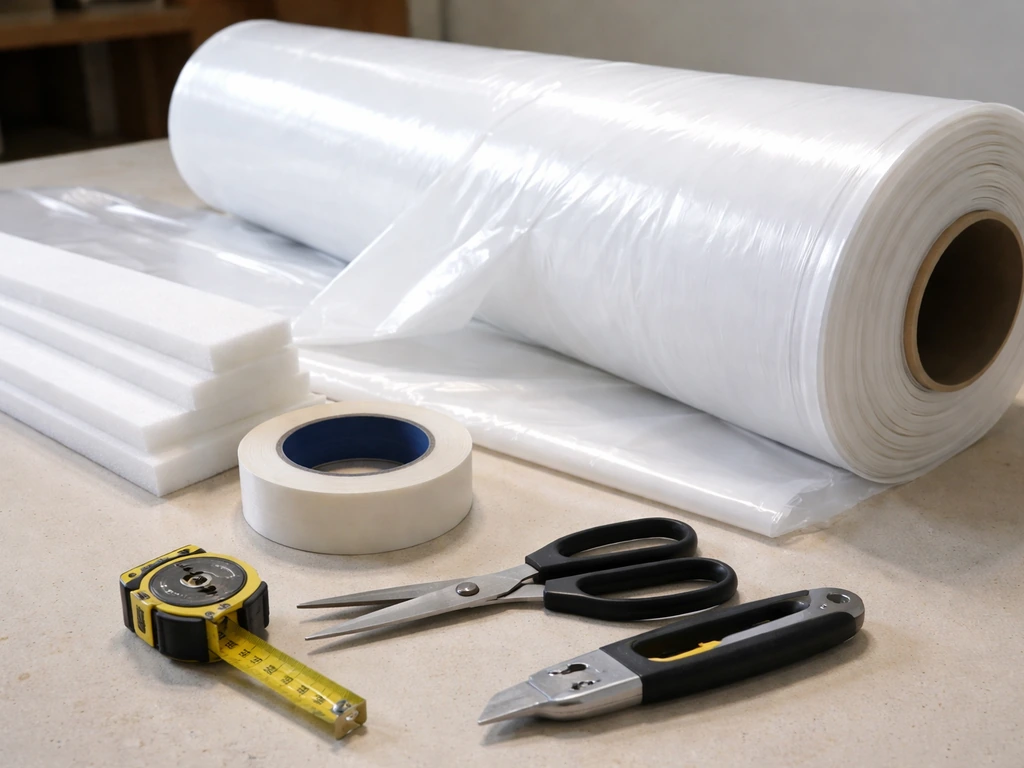
Getting the materials right matters more than technique here. Using the wrong film thickness or the wrong tape is the number one reason DIY shrink wrap jobs fail early. Here's exactly what to buy.
| Item | What to look for | Why it matters |
|---|---|---|
| Shrink film | 6 to 8 mil polyethylene with UV inhibitors; white or blue is easier to work with than clear | Thinner than 6 mil tears too easily; clear film offers less UV protection; UV inhibitors protect for 12+ months outdoors |
| Preservation tape | 10 mil UV-resistant tape, 4-inch width is easiest to work with | Standard packing tape fails outdoors in weeks; preservation tape holds through freeze-thaw cycles |
| Heat gun | 1500 to 1800 watt electric heat gun with variable settings | Safer and more controllable than a propane torch for beginners; won't char or melt the film |
| Propane torch (optional) | Shrink wrap torch with a wide flame spreader tip | Faster for large pieces; requires more practice to avoid burning through the film |
| Shrink wrap vents | Self-adhesive passive vents designed for shrink wrap | Shrink wrap does not breathe at all, so condensation will form inside without vents |
| Desiccant bags | Rated for 3 cubic feet each; silica gel or calcium chloride | For metal furniture, desiccants absorb trapped moisture better than vents alone |
| Edge protection | Foam pipe insulation, cardboard corners, or edge tape | Sharp corners and bolt heads will puncture the film the moment you start heating it |
| Scissors or utility knife | Sharp blades only | Dull blades drag and tear the film instead of cutting clean |
| Measuring tape | Standard 25-foot tape measure | You need accurate dimensions to estimate film quantity and avoid running short mid-wrap |
On film quantity: measure the height, width, and depth of each piece (or stacked group), then add about 30% to that number to account for overlap, seams, and the shrinkage that happens when you apply heat. A standard roll of 8-mil film is typically 20 feet wide and sold in lengths from 50 to 100 feet. For a set of four stacked chairs plus a table, plan on at least 50 to 60 linear feet of a 20-inch-wide roll, or adjust based on your piece dimensions.
Prep the furniture so the wrap won't fail
Here's where I see people go wrong most often: they rush straight to wrapping without doing the prep, and then they wonder why the film tears or why everything smells like mildew in March. Prep takes maybe 30 to 45 minutes and it's what makes the whole job last.
Clean and dry everything first
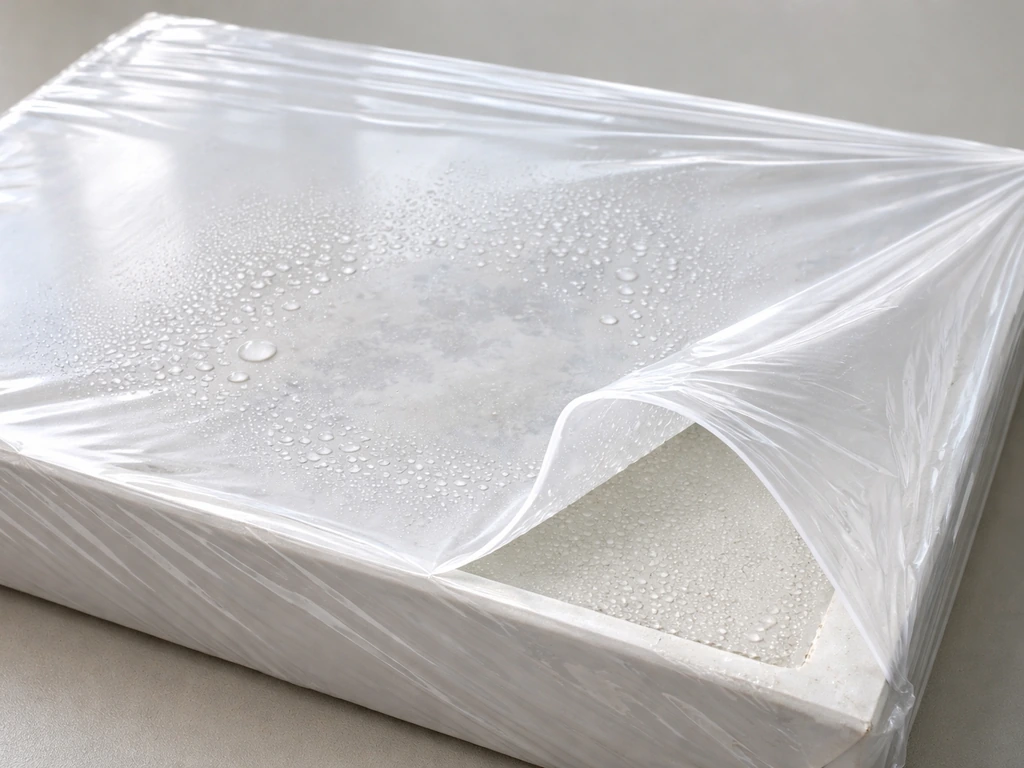
Wash every surface with a mild soap and water solution and rinse thoroughly. Pay attention to joints, under armrests, and the undersides of tabletops where dirt and organic material collect. Any dirt or moisture you seal inside the wrap is just going to sit there all winter breeding mildew. Once everything is clean, let the furniture air dry completely, ideally for a full day in sun and breeze. This is non-negotiable. Even a little trapped moisture under an impermeable shrink wrap layer will condense when temperatures drop, and that condensation can cause rust on metal frames, staining on fabric, and mold on any organic material.
Handle cushions separately
Unless your cushions are made from fully waterproof closed-cell foam with completely synthetic covers (most aren't), take them off and store them indoors or in a dry bin. Cushions trap moisture from both directions: they hold any dampness from inside the wrap and they can also wick in condensation from the cover. If you truly have nowhere to store them and must wrap cushions with the furniture, make absolutely sure they are bone dry, and plan to use multiple desiccant bags rated for the cubic footage of your wrapped area. Desiccant bags are a moisture-control approach that can help address condensation inside shrink wrap.
Protect sharp edges and hardware
Foam pipe insulation split along its length and slipped over chair legs, bolt ends, and table corners is the cheapest edge protection you'll find, typically around $3 to $5 for a pack at any hardware store. Alternatively, cut strips of corrugated cardboard and tape them over corners. Every sharp point that touches the film under heat becomes a potential puncture or tear. This step takes ten minutes and saves you from re-wrapping a whole side because a bolt poked through.
Secure or remove anything that sticks out
Fold down umbrella poles, remove finials or decorative caps that could puncture from inside, and tie or bungee-cord any loose parts so the wrapped shape stays as compact and smooth as possible. Stack chairs seat-to-seat so the legs point outward in a predictable pattern you can wrap around.
Step-by-step shrink-wrapping technique

- Measure the furniture group you're wrapping. Record height, width, and depth. Add 30% to your total surface area estimate to account for overlap and shrinkage.
- Cut a piece of film large enough to create a base layer across the bottom and up the sides by at least 12 inches. Lay it flat on the ground and position the furniture on top of it.
- Pull the base layer up around the sides and secure it temporarily with a strip of preservation tape. You want a snug but not stretched fit at this stage.
- Unroll a second length of film from the top down, overlapping the base layer by at least 6 to 8 inches. Overlap is your seam, and skimping on it is how gaps form.
- Seal every seam and overlap with 4-inch UV preservation tape, pressing firmly along the entire length of each seam. Don't stretch the tape as you apply it or it will peel back at the corners.
- Before sealing the last section, place your desiccant bags or snap in your self-adhesive shrink wrap vents. For metal furniture, place one desiccant bag for roughly every 3 cubic feet of enclosed volume. For larger or mostly plastic/resin pieces, passive vents work fine.
- Seal the final section completely with preservation tape.
- Set your heat gun to medium-high (around 1200 to 1500 watts on variable models). Hold it 4 to 6 inches from the film surface and move it in steady, slow circles or back-and-forth strokes. Do not hold it in one spot.
- Work from the bottom up and from the center of each panel outward toward the edges. You'll see the film tighten and conform to the shape of the furniture as it heats.
- After the film has shrunk and cooled, inspect every seam and tape any spot where the film pulled away from a sealed edge.
The heat gun distance is critical. Four to six inches is the sweet spot. Closer than that and you'll burn through the film in seconds, especially at seams where two layers overlap and the film is thicker. Farther than 8 inches and you're just heating air. Slow, even movement is the whole technique: think of painting a wall, not using a torch to light a campfire.
Handling tricky furniture shapes
Stacked chairs
Stack chairs four to six high, alternating their direction slightly if the legs lock together. Wrap the stack as a single unit rather than wrapping each chair individually. A standard patio furniture cover can also work for many situations, but choose breathable materials to reduce condensation buildup during winter storage. It uses less film, takes less time, and creates one solid wrapped block that's easier to vent properly. The trickiest part is the bottom, where chair legs stick out. Fold the base layer up between the legs as best you can, tape across gaps, and accept that the bottom won't be perfectly sealed. That's fine: moisture moves up, so a tight top and sides matter more than a perfect base.
Tables
Tables are awkward because of the legs. Wrap the tabletop and the leg frame separately if the table breaks down easily. If not, wrap the top first as a flat panel, then bring the film down over the legs and seal at the base. Pad each leg end with foam pipe insulation before wrapping. For glass tabletops, wrap with a layer of moving blanket or bubble wrap before shrink-wrapping over it so the glass doesn't scratch or crack from thermal contraction.
Cushions (when you have no choice)
If you absolutely must wrap cushions, stack them flat, place a desiccant bag between each pair, and wrap them as a separate unit from the furniture frames. Never wrap cushions and metal frames together: the metal conducts cold and creates more condensation right next to the porous cushion material. Seal cushion packs with extra tape at every edge.
Umbrellas
Close the umbrella fully and strap the fabric down with bungee cords or zip ties before wrapping. Slide a length of foam pipe insulation over the tip finial. Then wrap the whole collapsed umbrella as a long tube, overlapping film strips in a barber-pole spiral with 4-inch overlaps. Heat from the bottom up, letting the film shrink around the ribbing gradually. An umbrella wrap doesn't need to be airtight, just snug enough to keep debris and moisture off the fabric.
Troubleshooting common problems
The film tore during heating
This almost always happens because a sharp edge wasn't padded, the heat gun was too close, or you moved too slowly in one spot. Patch small tears immediately with a doubled-over strip of preservation tape pressed firmly on both sides of the film. For large tears, re-wrap that section. Don't try to shrink over a taped patch: heat the film around the patch, not directly on it.
There are gaps at the seams
Gaps usually mean your overlap was less than 6 inches, or you stretched the tape as you applied it and it bounced back and lifted. Run a fresh strip of preservation tape over the entire gap, starting and ending at least 3 inches past the gap on either side. If the gap is at a corner, cut a small triangle of film, tape it over the corner on both sides, then apply a strip of tape over the whole patch.
The wrap has persistent wrinkles and won't shrink tight
Wrinkles that won't tighten up mean the film isn't hot enough, or you're heating in the wrong direction. Work from the center of a wrinkled panel outward toward the nearest open edge, so you're chasing the wrinkle outward rather than trapping it. If the wrinkle is at a seam, it's almost impossible to remove without re-taping: accept it and move on. A wrinkled seam doesn't compromise protection.
You're seeing moisture or mildew inside the wrap
This is the most common and most damaging failure. Shrink wrap doesn't breathe at all, so any moisture that gets trapped inside will condense on cold surfaces when temperatures drop. If you're seeing this mid-season, don't just ignore it. Cut a small slit near the top of the wrap on a dry day, press a blank" rel="noopener noreferrer">self-adhesive shrink wrap vent over the slit, and tape the vent edges down firmly with preservation tape. Add a desiccant bag through the slit if possible before closing it up. Prevention is much better than the fix: always vent or use desiccants before you seal the wrap in the first place. If you’re trying to protect patio furniture from snow buildup, make sure the wrap is fully vented and that any trapped moisture can escape before temperatures drop.
The tape is peeling off
Standard packing tape, duct tape, and blue painter's tape will all fail outdoors within weeks. If you used anything other than UV-rated 10-mil preservation tape, that's your problem. Strip the failing tape off, clean the film surface with a dry cloth, and re-tape with proper preservation tape. This is worth getting right the first time: the tape runs about $15 to $20 per roll, and a single roll covers a lot of seam.
Maintenance through winter, removal in spring, and what to do next
Once the wrap is on, do a quick visual check every four to six weeks if the furniture is stored outdoors. You're looking for tape lifting at the corners, film punctures from wind-blown debris, and any dark spots that could indicate mildew forming underneath. Small tape repairs can be done in five minutes on any dry day above freezing.
When spring arrives and temperatures are consistently above 40 degrees Fahrenheit, cut the wrap open with a utility knife by running it lightly along the seam lines. Cut away from yourself and use a shallow angle so you're scoring the tape rather than stabbing at the film. Peel the film off in large sections and dispose of it: polyethylene shrink film is technically recyclable at many drop-off locations, though most curbside programs don't accept it. Check every piece as you unwrap it. Look for rust spots, mildew, or any moisture staining before you put cushions back or move pieces into position.
As a rule of thumb, UV-inhibited 8-mil shrink film with good seams is rated for 12 months of outdoor UV exposure, and some specialty films are rated up to three years. For most homeowners doing a single winter season, you're well within the protection window. If you want to re-use pieces from an earlier wrap job, check the film for brittleness and fading: UV-degraded film cracks when you flex it rather than stretching. Never re-use degraded film, it'll tear during the next wrap job.
Your repeatable season-end checklist
- Clean all furniture surfaces thoroughly and allow to dry completely (minimum one full day)
- Remove and store cushions indoors or in a sealed dry bin
- Pad all sharp corners, bolt ends, and protruding hardware with foam or cardboard
- Fold or disassemble any umbrella poles, side tables, or removable parts
- Stack chairs and group pieces to minimize the number of wrapped units
- Cut film with 30% extra allowance and start with the base layer
- Seal all seams with 4-inch UV preservation tape, no stretching
- Install at least one shrink wrap vent or place one desiccant bag per 3 cubic feet before sealing the final section
- Heat with a 1500-watt heat gun held 4 to 6 inches away, moving continuously
- Inspect and patch any tears or lifted tape before the first hard freeze
- Do visual checks every 4 to 6 weeks through the winter
- Remove in spring once temps are consistently above 40 degrees Fahrenheit
- Inspect all pieces before returning to use
FAQ
Can I shrink wrap patio furniture while the cushions are still on it?
If you must leave furniture outside without cushions, shrink-wrapping the frames can still work, but you need extra moisture control. Use multiple desiccant bags inside the wrapped volume and add a vent or keep the top slightly less airtight until temperatures stabilize, then reseal. The key is preventing condensation from forming directly on metal near where condensation is most likely to pool.
Is shrink wrapping safe for untreated wood patio furniture?
No, not as a main storage strategy. Untreated or unfinished wood will trap moisture against the surface under an airtight wrap, which increases risk of warping and rot. For wood-heavy sets, a properly secured breathable cover with cushions stored separately indoors is safer than sealing everything in polyethylene.
Can I shrink wrap furniture in hot weather or direct sun?
You can shrink wrap metal and resin in summer, but only if the film won’t sit in direct high-heat sun for long stretches before sealing. Heat can deform polyethylene and also increase internal condensation when the temperature later drops. Do the job in a cooler part of the day, and never wrap over damp items.
What if my furniture is not fully dry when I start wrapping?
Yes, but treat it differently from a full airtight wrap. If you can’t fully dry the furniture, use only a temporary protective approach until it’s dry, or vent the wrap immediately after sealing by adding a shrink-wrap vent and desiccant. If mildew already started, cleaning and dry time matter more than adding more layers of film.
When should I choose a breathable patio cover instead of shrink wrapping?
Covers are often better than shrink wrap when airflow is the priority. If your storage area is naturally ventilated (like a shaded porch) and your goal is condensation control, a breathable cover reduces moisture buildup and film tearing risk from wind. Shrink wrap is best when you truly need airtight weatherproofing for long outdoor storage.
How should I fix a tear once the wrap is already on?
Do not patch by shrinking over a tear. The safer method is to apply a preservation tape patch that fully bonds on both sides of the puncture, then heat the surrounding film only, keeping the heat gun away from the patch edges. For larger damage, re-wrap that section because the film may have thinned at the tear site.
Why do my UV seams fail and what’s the correct way to re-tape them?
If tape lifts, it usually means the surface was dirty, damp, or the tape wasn’t UV rated. Wipe the film clean with a dry cloth and let it warm to a moderate temperature before re-taping, then use UV-rated preservation tape and press firmly across the entire seam. Small edge lift repairs are best done in calm, dry weather above freezing.
Should I shrink wrap each chair separately or stack and wrap as one unit?
For stacked chairs, wrapping the stack as one unit is typically more efficient, but only if you can pad exposed points and keep legs aligned so film doesn’t rub at sharp edges. If chair legs lock together tightly or the stack shifts easily, wrapping individually can prevent punctures and wrinkles that are hard to fix without re-taping.
What’s the best way to wrap cushions if I can’t store them indoors?
Yes, but do not create a perfectly airtight cushion pack mixed with metal or frames. If you wrap cushions, keep them as a separate unit and include desiccant bag(s) sized to the enclosed space, then check periodically. Metal next to cushions increases condensation risk because cold metal can condense moisture on contact.
If I notice mildew or condensation mid-winter, can I save the wrap?
A partial slit with a vent is the simplest mid-season intervention, but only works if the area is dry enough that you are not venting active wetness. Add the slit near the top so humid air can escape, tape the vent edges securely, and include desiccant if you can. After a few warm dry days, evaluate whether you still need to re-wrap.
Can I move shrink-wrapped patio furniture without damaging the film?
If you’re moving wrapped furniture, secure the package so it doesn’t slide and abrade corners against other items. Use foam padding on contact points and avoid dragging, because abrasion causes micro-tears that later expand with temperature changes. Re-check seams after transport.
Can I reuse shrink film from a previous winter?
You generally can, but test for brittleness first. Flex a small offcut of the film, if it cracks instead of stretching, replace it. Do not reuse film that looks faded, chalky, or overly brittle, because it tears during shrink heating and increases the chance of seam failure.