You can absolutely make durable patio cushions without a sewing machine. The trick is picking the right no-sew bonding method for your fabric, using foam that actually drains and dries outdoors, and sealing everything so rain and UV don't destroy your work in one season. Fabric glue, iron-on fusible tape, and heat-bond webbing can all hold outdoor fabric together reliably, as long as you prep the surfaces, let bonds cure fully, and finish with a waterproofing spray. This guide walks you through every step, including the parts most tutorials skip: foam selection, corner shaping, attachment so cushions don't fly off the chair, and weatherproofing that lasts more than a few weeks.
How to Make Patio Cushions Without Sewing: Easy DIY

Maren Grady
5 Jul 2026
Materials and Fabrics That Work Without Sewing
Your fabric choice determines whether this project lasts one summer or five. Not every outdoor fabric bonds cleanly with glue or fusible tape, so start here before you buy anything else.
Best fabrics for no-sew outdoor cushions
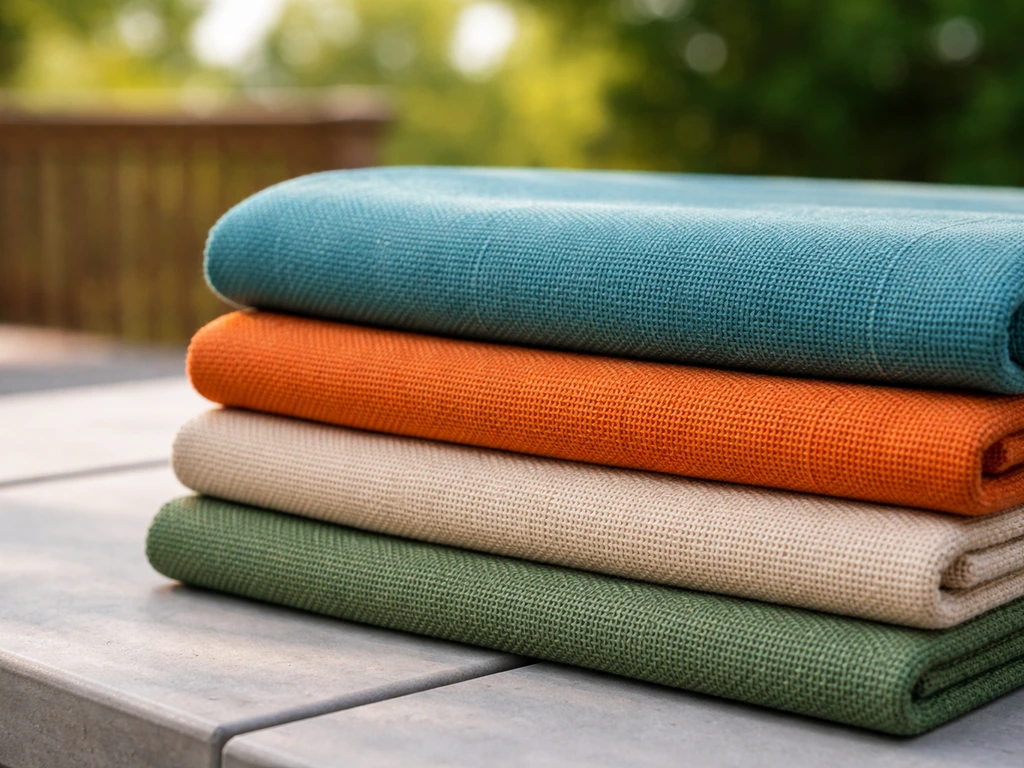
Solution-dyed acrylic fabric, most commonly sold under brand names like Sunbrella, is the gold standard for outdoor cushions. It's fade-resistant, mildew-resistant, and plays well with both fabric glue and heat-bond methods because it's a woven synthetic. Polyester canvas and outdoor-rated polyester duck cloth are also solid, more budget-friendly choices. Both bond reliably with the adhesives covered below. Avoid pure cotton canvas outdoors; it soaks up water, rots, and doesn't respond well to waterproofing sprays. Also skip most vinyl-backed fabrics for glue-based methods since the coating prevents adhesive absorption, though Loctite's Vinyl, Fabric and Plastic Flexible Adhesive is specifically formulated to handle vinyl-to-vinyl or vinyl-to-fabric bonds if you're working with vinyl.
Glues and bonding products to have on hand
- Gorilla Fabric Glue: 100% waterproof, marketed specifically as a no-sew solution. Allow at least 24 hours of full cure time before exposing to moisture. Store in a cool, dry place during the project.
- Aleene's DIY Craft Fabric and Vinyl Adhesive: bonds outdoor fabric and upholstery materials, good all-rounder for cushion-weight fabrics.
- Aleene's Insta-Fuse Fabric Fusion: heat-activated adhesive that becomes permanent after you iron over it. The advantage is you can reposition fabric while it's still wet, then lock it in place with heat.
- Loctite Vinyl, Fabric and Plastic Flexible Adhesive: waterproof and stays flexible after curing, so it handles the stress of sitting and squishing without cracking. Best option if you're using any vinyl.
Foam types that actually work outdoors
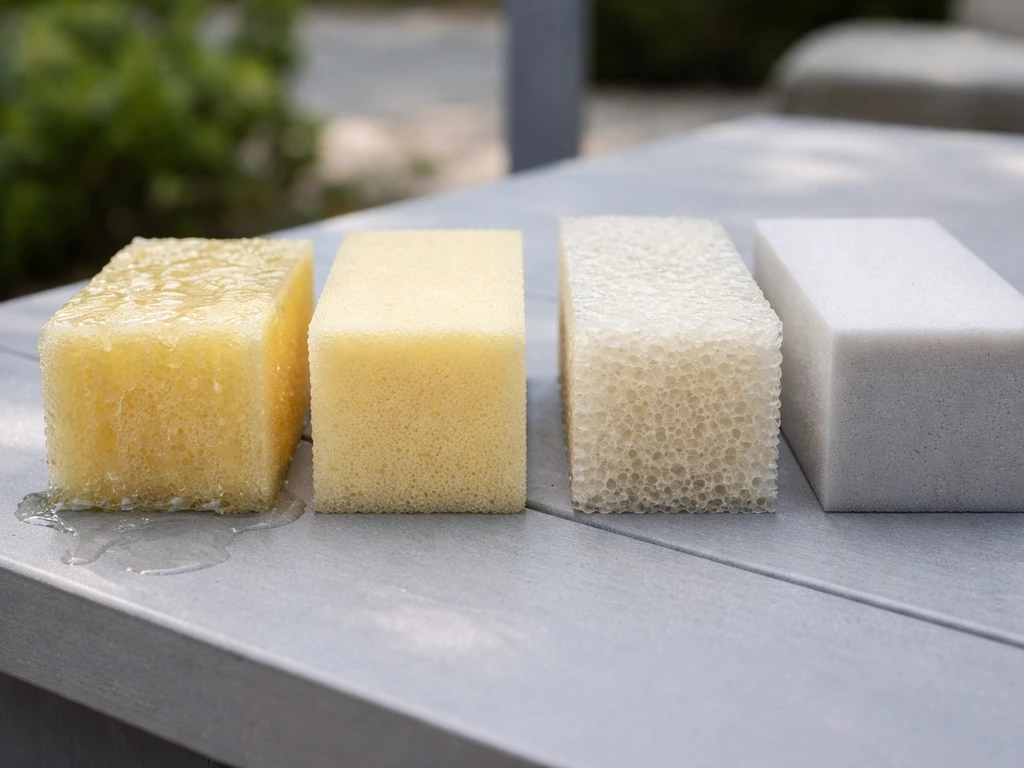
This is where a lot of DIY outdoor cushion projects fail. Standard open-cell polyurethane foam, the kind sold for indoor furniture, absorbs water like a sponge and takes days to dry out. That trapped moisture breeds mold and makes foam sag permanently. For outdoor use, you have two better options. Reticulated Dry-Fast foam (sometimes called open-cell reticulated foam) has a large, open cell structure specifically designed for fast water drainage and airflow. It's the right call for any cushion that might get rained on. High-resilience (HR) polyurethane foam sealed inside a water-resistant cover is the second option; it's denser and more comfortable for seating, and it works fine as long as your cover keeps moisture out effectively. For density, target at least 1.8 PCF (pounds per cubic foot) for seat cushions so they don't sag. Back cushions can go slightly softer. Avoid closed-cell foam outdoors even though it's marketed as waterproof; it can trap water between the foam and the cover, which is actually worse for mold than regular foam.
Other materials to gather before you start
- Iron-on fusible webbing tape (sold by the yard in fabric stores, works with most synthetic outdoor fabrics)
- VELCRO Brand Extreme Outdoor strips: these use a UV and water-resistant adhesive and are rated for outdoor exposure
- Rust-Oleum Outdoor Fabric Water Repelling Treatment Spray for post-build weatherproofing
- Sharp fabric scissors or a rotary cutter with cutting mat
- Metal ruler or measuring tape
- Fabric marker or tailor's chalk for marking cuts
- Binder clips or clothespins to hold glued seams while curing
- A household iron if you're using heat-bond tape or Insta-Fuse
Measure, Design, and Sizing Your Cushions
Measuring wrong is the most common beginner mistake, and it's really easy to avoid. The goal is to measure the furniture surface, not an existing cushion, and then add enough fabric to wrap around the foam completely with a bit of overlap for your seam or bond.
How to measure the furniture
Use a metal tape measure rather than a fabric one; they're more accurate for hard surfaces. Measure the width and depth of the seat or back frame opening where the cushion will sit. For cushions that drop into a recessed seat, measure the inside dimensions. For cushions that sit on top of a flat surface, measure the top of the frame. A useful rule of thumb: add 1 inch to each measured dimension before you cut your foam. This ensures the cushion fills the space snugly rather than shifting around inside the cover.
Deciding on cushion thickness
Seat cushions generally work best at 3 to 4 inches thick. Thinner than 3 inches and you'll feel the frame through the cushion after a few weeks of sitting. Back cushions can be 2 to 3 inches. Bench cushions typically go 3 to 4 inches as well since they support the full body weight of someone sitting. For foam, thickness and density work together: a 3-inch piece of 1.8 PCF foam will hold up better long-term than a 4-inch piece of low-density foam that compresses flat under load.
Fabric cutting math
Once you have your foam dimensions, calculate your fabric cut sizes. For a wrap-style no-sew cushion cover (the most common method), you need one large piece that wraps around all sides and overlaps at the bottom or back. The formula is: (foam depth x 2) + (foam thickness x 2) + 4 inches for overlap. The extra 4 inches gives you 2 inches of overlap on each side for your bond. Mark all cuts with chalk before you slice into fabric; cutting in one straight line beats trimming and re-trimming later.
No-Sew Covering Methods: Glue, Heat-Bond, and Tape
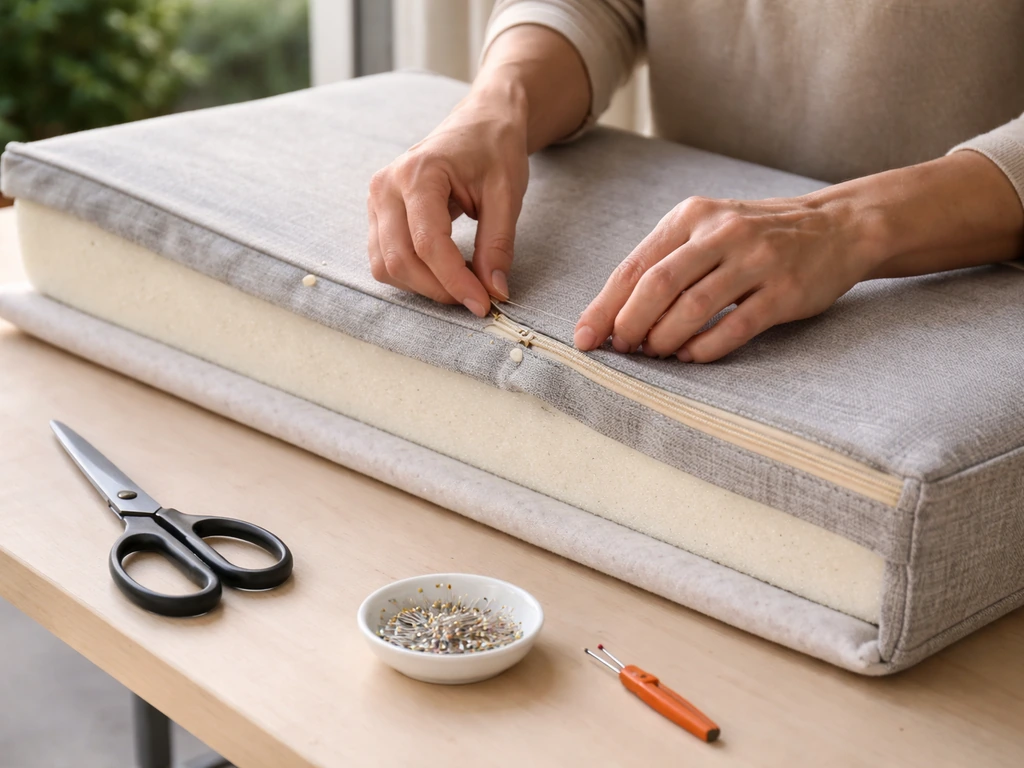
There are three main approaches to closing a cushion cover without sewing, and each has a slightly different use case. You don't have to pick just one; plenty of projects use fusible tape on the long seams and fabric glue on the corners. Here's where I messed up on my first attempt: I used a fabric glue on corners without clamping the seams while they cured. The corners peeled back within a week. Clamp everything.
Fabric glue method

Fabric glue is the most accessible no-sew method since you don't need any heat tools. Apply a thin, even bead of glue (Gorilla Fabric Glue or Aleene's) along the seam line, press the fabric layers together firmly, and clamp with binder clips. The key word is thin: too much glue creates a stiff, lumpy seam that cracks faster outdoors. Let it cure for the full 24 hours before you move the cushion or apply any stress to the seam. Don't rush this. If you're working outdoors, be aware that heat and humidity affect cure time, and Gorilla Fabric Glue should be stored away from heat during the project.
Iron-on fusible webbing and heat-bond tape
Fusible webbing tape creates a surprisingly strong bond on synthetic outdoor fabrics and gives you cleaner, flatter seams than liquid glue. Cut the tape to length, layer it between your two fabric layers, and press with a hot iron for the time specified on the packaging (usually 10 to 15 seconds per section with firm pressure). The bond sets as it cools, so let it cool completely before testing the seam. Sunbrella-style solution-dyed acrylic fabrics are heat-sealable, which is why this method works so well with them. One thing to double-check: not all irons get hot enough for heavier outdoor canvas. Do a test bond on a fabric scrap first.
Heat-activated adhesive (Insta-Fuse style)
Products like Aleene's Insta-Fuse are a middle ground between liquid glue and tape. You brush or squeeze the adhesive onto one fabric surface, position the layers, and then lock the bond with an iron. The big advantage: before you apply heat, the adhesive can be washed off with water, so you can reposition the fabric until you're happy with alignment before committing. This is genuinely useful when you're working with a large cushion cover and need to get corners lined up precisely.
Getting clean edges and corners without sewing

Corners are the weak point of any no-sew cushion. The cleanest approach is to fold the fabric like wrapping a gift: fold in the side panels first, creating a triangular flap at each corner, then fold that flap flat against the main panel and glue or tape it down. Apply glue to the folded flap, press firmly, and clamp. For box corners on bench cushions, where you want a defined square edge, cut a small notch out of each corner of your fabric before wrapping (the notch size should equal the foam thickness) to reduce bulk.
Filling, Thickness, and Shaping Without Sewing
Getting the foam into the cover without stitched openings requires a bit of planning. The wrap-and-bond method works best: lay your foam on the fabric, wrap the fabric around it, bond the seams. But there are a few shaping details that make the finished cushion look and feel like a real cushion rather than a foam block in a fabric bag.
Foam shaping and soft wrapping
For a softer, more rounded look, wrap your foam in a thin layer of polyester batting before covering it. This is the same technique used in upholstered furniture and adds maybe half an inch of softness to the profile without changing the structural firmness. Secure the batting around the foam with a light misting of spray adhesive so it doesn't shift inside the cover. If you want defined squared edges, skip the batting and go straight to fabric. If you want that soft, sink-in look, batting is worth the $3 to $5 per yard it costs.
Keeping the cover taut
A loose, wrinkly cover is a beginner hallmark. The fix is to pull the fabric snug around the foam before bonding and bond the bottom seam last, with the foam fully inserted and the fabric under tension. Think of it like stretching canvas over a frame. Bond one long side, then the opposite long side (pulling gently toward you as you press), then work the short sides. Finish the corners last. Taut fabric bonds flatter and holds better than loose fabric.
Waterproofing, Weatherproofing, and Outdoor Durability
Your no-sew seams are the first place water gets in, so waterproofing is not optional. Even if you used waterproof fabric glue, the bond line itself needs protection, and the fabric between seams benefits from a repellent coating. A product like Rust-Oleum's Outdoor Fabric Water Repelling Treatment Spray is designed for outdoor furniture cushions, and it helps protect the fabric between seams as part of your waterproofing routine waterproofing spray.
Waterproofing spray application
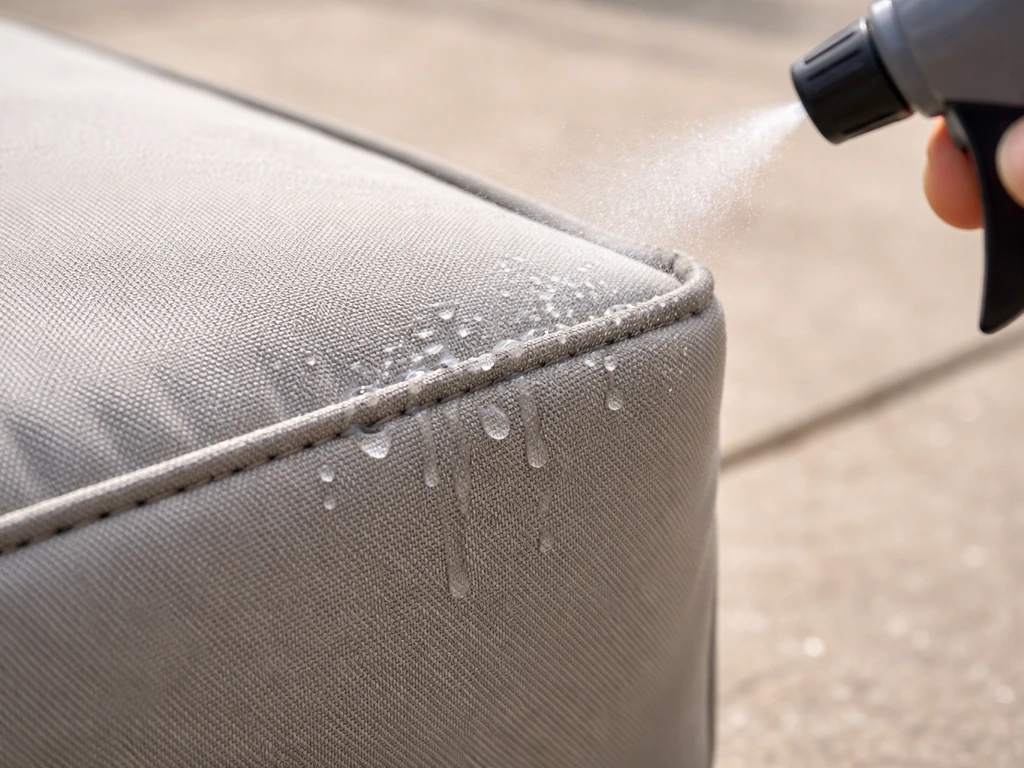
Rust-Oleum's Outdoor Fabric Water Repelling Treatment Spray is designed specifically for outdoor furniture cushions and is widely available at home improvement stores. Apply it after your cover is complete and all bonds are fully cured. Spray from 8 to 12 inches away in light, even passes. Let it dry at room temperature (the manufacturer's dry time assumes around 70°F and 50% relative humidity, so allow more time in humid or cool weather). Reapply every 6 months as part of your seasonal maintenance routine, and always reapply after thorough cleaning.
Protective liners and covers
For cushions that will live outdoors full-time, adding an inner liner before the decorative cover dramatically extends life. Cut a piece of outdoor-rated polyethylene fabric or a waterproof ripstop nylon and wrap the foam first, bonding the seams with Loctite Vinyl adhesive. Then wrap that liner-protected foam in your decorative outer cover. The liner stops moisture from reaching the foam even if the outer cover gets saturated. When you store cushions seasonally, use breathable, waterproof covers rather than sealed plastic bags. Sealed storage traps humidity and creates exactly the mold conditions you're trying to avoid.
Mildew prevention and routine care
Even mildew-resistant fabrics like Sunbrella require routine cleaning to prevent mildew buildup. A simple scrub with mild soap and water every few weeks during heavy-use months is enough. Let cushions dry fully in the sun before stacking them or storing. Mildew starts in damp, dark spots, so standing water on cushion surfaces (especially in button tufts or seams) is the enemy. Stand cushions on their edge after rain so water drains down and off rather than pooling.
Troubleshooting common failures
| Problem | Why It Happens | Fix |
|---|---|---|
| Glue seams peeling | Insufficient cure time, too much glue applied, or fabric surface wasn't clean before bonding | Re-clean the area with rubbing alcohol, apply a fresh thin bead of waterproof fabric glue, clamp for 24 hours |
| Fabric fraying at cut edges | Raw edges on synthetic fabric not sealed before bonding | Run a lighter flame quickly along cut edges to heat-seal them (for synthetics only), or apply a thin bead of fabric glue along the raw edge |
| Foam sagging after a few weeks | Foam density too low (under 1.8 PCF) for seat use, or closed-cell foam trapping moisture | Replace with Dry-Fast reticulated foam or 1.8+ PCF HR foam; stand cushion on edge after rain to drain |
| Cover slipping or shifting | No attachment method, or hook-and-loop losing adhesion due to UV degradation | Replace adhesive-backed hook-and-loop with VELCRO Extreme Outdoor rated strips; attach to cushion bottom and furniture frame |
| Mold or musty smell inside cushion | Moisture trapped in foam, likely from closed-cell foam or inadequate drying | Replace foam with reticulated Dry-Fast foam; add drainage holes in liner if present; store upright after rain |
Fastenings and Attachment Options to Keep Cushions in Place
Nothing is more frustrating than cushions that slide off the chair every time someone sits down or blow off the deck in wind. This is a solvable problem, and the solution takes maybe 10 minutes to add at the end of the build.
Hook-and-loop (Velcro) attachment
Attaching hook-and-loop to the bottom of the cushion and to the furniture frame is the most effective no-sew solution for keeping cushions in place, especially in windy conditions or deep seating where people shift around a lot. Use VELCRO Brand Extreme Outdoor strips, which use a water and UV-resistant adhesive. One critical warning: do not reposition these strips after initial placement. Once the adhesive makes contact with the surface, moving it breaks down the adhesive bond permanently. Clean both the cushion bottom and the furniture frame surface with isopropyl alcohol before pressing the strips down, and apply firm pressure for 30 seconds. Let the adhesive cure for at least an hour before testing.
For standard rubber adhesive hook-and-loop, be aware that UV exposure and moisture can degrade the adhesive over time. This is why outdoor-specific products matter here. Generic hook-and-loop from a craft store may hold indoors but fail within a season outdoors.
Ties and straps
For chairs with visible rails or slats, fabric ties are a classic and effective attachment method. Cut two strips of outdoor fabric about 1 inch wide and 14 to 16 inches long per tie. Fold each strip in half lengthwise, apply fusible webbing tape inside, and iron closed. Then fold one end around the chair rail and glue or heat-bond it to the underside of the cushion. Ties work especially well on dining chairs where the cushion needs to be removed frequently for cleaning. Position ties near the back of the seat cushion to prevent forward sliding.
Non-slip grip liners
For the simplest possible solution on flat surfaces, cut a piece of non-slip rug gripper liner slightly smaller than the cushion bottom and secure it with a few dabs of fabric glue. This works well on slatted furniture where hook-and-loop can't get a flat bond. It's not as secure in wind, but for protected patios it often does the job and costs almost nothing.
Step-by-Step Build for Common Cushion Types
Here are three complete workflows covering the most common patio cushion projects. Each one uses the no-sew methods covered above, so pick the workflow that matches what you're building and follow it start to finish. If you want a slipcovered look, the same wrap-style no-sew cover approach can be adapted to make patio cushion slipcovers.
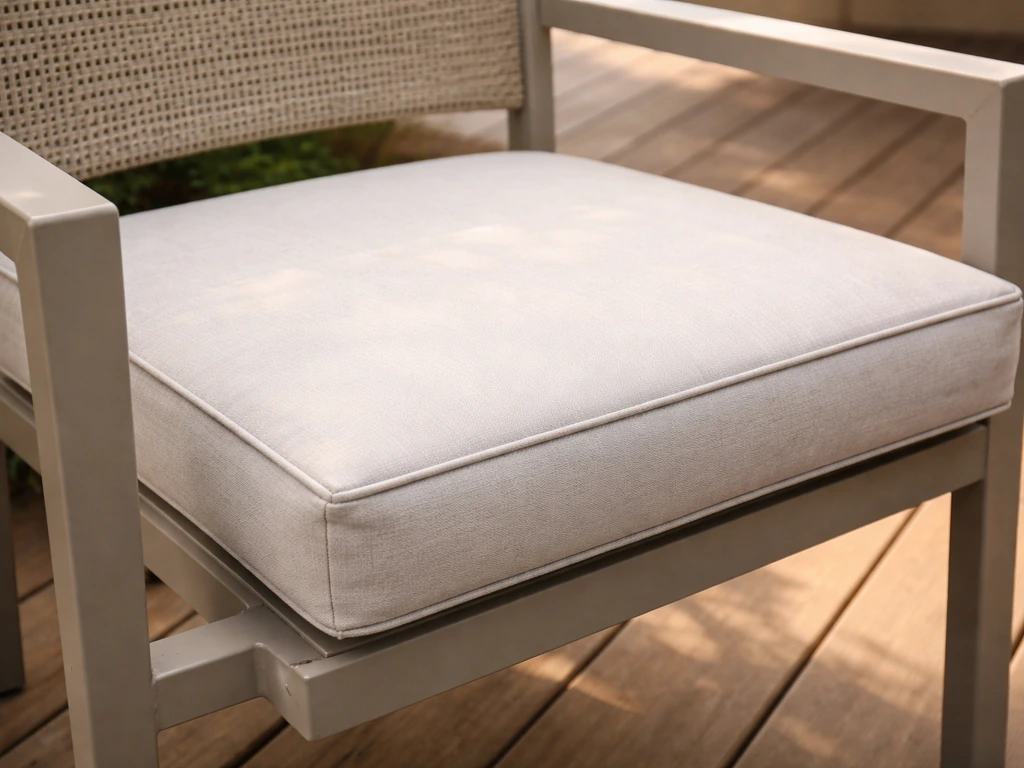
Seat cushion for a patio chair
- Measure the chair seat opening (width and depth), then add 1 inch to each dimension. Order or cut foam to this size at 3 inches thick, using Dry-Fast reticulated foam or 1.8 PCF HR polyurethane foam.
- If you want a softer look, cut a piece of polyester batting to the same dimensions as the foam top. Spray lightly with adhesive and smooth it onto the foam top and sides. Let dry 10 minutes.
- Cut your outdoor fabric using the wrap formula: (foam depth x 2) + (foam thickness x 2) + 4 inches for overlap in each direction. Cut one large rectangle.
- Lay the fabric face-down on a flat surface. Center the foam (batting-side down if using batting) in the middle of the fabric.
- Starting with one long side, pull the fabric snugly up and over the foam edge and onto the bottom. Apply a bead of Gorilla Fabric Glue along the bottom edge, press firmly, and clamp with binder clips.
- Pull the opposite long side taut and repeat. Let both sides cure 30 minutes before moving to the short sides.
- Work the short sides, pulling fabric taut and gluing. For corners, fold the fabric like a gift wrap, creating a neat triangular flap. Glue each flap down flat and clamp.
- Let the full cushion cure for 24 hours before use.
- Once cured, apply Rust-Oleum Outdoor Fabric Water Repelling spray in light, even passes from 8 to 12 inches away. Let dry completely.
- Attach VELCRO Extreme Outdoor strips to the bottom of the cushion and corresponding spots on the chair frame, pressing firmly and allowing 1 hour to set.
Back cushion for a patio chair
- Measure the chair back width and the height you want the cushion to cover. Back cushions usually run from the seat level to shoulder height. Add 1 inch to each dimension for the foam cut.
- Cut foam to 2 to 2.5 inches thick. Dry-Fast foam works well here too since back cushions also get rained on.
- Cut fabric using the same wrap formula as the seat cushion.
- Wrap the foam following the same glue-and-clamp sequence, but build in two fabric tie loops before you seal the final seam. Fold a 14-inch strip of fabric into a tie (folded in half, fusible tape inside, ironed closed), and tuck the looped ends between the fabric and the foam bottom before gluing the final seam shut. This permanently anchors the ties into the seam.
- Once cured 24 hours, tie the back cushion to the chair uprights at two points, centering the cushion on the back frame.
- Apply waterproofing spray and allow to dry fully.
Bench or dining cushion
- Measure bench length and depth. Bench cushions are often long (up to 60 inches or more), so check whether you can buy foam in one piece at that length, or whether you'll need to butt two pieces together. If butting pieces, wrap both together in batting before covering to hide the seam.
- Cut foam to 3 to 4 inches thick at 1.8+ PCF density for seating support across a long span.
- For the corners of a bench cushion, cut a notch out of each corner of your fabric before wrapping. The notch depth should equal the foam thickness (3 to 4 inches). This reduces bulk at the corners and allows for a clean box fold.
- Lay fabric face-down. Center foam. Glue the two long sides first with fusible webbing tape (easier than glue on a long straight run): position tape between fabric layers, iron in 10-inch sections, working from the middle outward.
- Fold the short ends and box corners, securing with fabric glue and binder clips. Cure 24 hours.
- Waterproof spray the finished cushion. For bench cushions on a deck that gets full weather exposure, also apply a waterproof liner wrap (polyethylene fabric layer) around the foam before the outer cover step.
- Attach VELCRO Extreme Outdoor strips or non-slip liner to the bottom so the bench cushion doesn't walk forward when people sit.
Which No-Sew Method Should You Actually Use?
If you've read through the options and still aren't sure which bonding method to reach for, here's the practical summary. These aren't equally good for every situation, so match the method to your materials and tools.
| Method | Best For | Tools Needed | Bond Strength | Outdoor Durability |
|---|---|---|---|---|
| Gorilla Fabric Glue | Quick repairs, any fabric weight, tight corners | None beyond applicator | Strong on porous fabrics | Very good when fully cured |
| Iron-on fusible webbing tape | Long straight seams, clean flat bonds on synthetic fabric | Household iron | Very strong on synthetics | Excellent on Sunbrella-type fabrics |
| Aleene's Insta-Fuse heat adhesive | Projects needing repositioning before commit | Household iron | Strong once heat-set | Good; best used with waterproofing spray over seams |
| Loctite Vinyl/Fabric Flexible Adhesive | Vinyl fabric, mixed vinyl-to-fabric bonds | None beyond applicator | Strong and stays flexible | Very good; designed for outdoor flexible materials |
| VELCRO Extreme Outdoor strips | Cushion-to-frame attachment, anti-slide | Clean cloth for surface prep | Strong adhesive to smooth surfaces | Excellent; UV and moisture resistant |
For most beginners making a first seat or bench cushion, the combination that works best is iron-on fusible tape for the long seams and Gorilla Fabric Glue for corners and closures, finished with a waterproofing spray. That combination covers the weakest points, uses tools most people already have, and holds up through multiple seasons with basic maintenance. If you want to keep costs down, prioritize affordable outdoor fabrics and no-sew supplies, which is a big part of how to make patio cushions cheap basic maintenance.
If you're trying to keep costs down as much as possible on this project, the foam is usually the biggest line item. Cutting your own foam from a foam sheet rather than ordering custom-sized pieces can save 30 to 50 percent. The tools and adhesives for a full set of chair cushions typically run $25 to $40 total, which is a fraction of what replacement cushions cost. If that cost angle matters to you, it's worth thinking through the full budget before you buy anything. Whether you should DIY depends on material costs and how much custom sizing matters for your space is it cheaper to make your own patio cushions.
Once you've built a basic seat cushion using these techniques, making deep seat or back cushions follows exactly the same logic, just with adjusted dimensions and thicker foam. And if you want the look of custom cushions without the permanent bond, building a slipcover-style removable cover using the no-sew methods here gives you washable covers that can be swapped out seasonally.
FAQ
My no-sew seams are peeling, what should I check first?
If your seams are failing, the fix is usually surface prep and bond timing, not a different product. Clean both fabric faces (especially on glossy outdoor synthetics) with a quick wipe of isopropyl alcohol, use a thin, continuous adhesive line (for glue), clamp and do not move the piece until the full cure window is done, then test a small corner after cooling (for heat-bond tape).
Can I add reinforcement to the inside to prevent water wicking?
Yes, you can reinforce the inside without sewing by adding a strip liner overlap. After the main seams bond, cut narrow strips of the same outdoor fabric (or waterproof ripstop) and bond them across the seam allowance area, then reapply waterproofing spray to seal the edges. This reduces direct water wicking through the bond line.
How do I decide between glue, fusible tape, or heat-bond webbing for my specific fabric?
Choose a method based on fabric type. Heat-bond tape works best on solution-dyed acrylic and other heat-sealable synthetics, while liquid glue is more forgiving when your fabric does not take heat well. If you are unsure, do a 2 minute test on a scrap by bonding two small squares, then tug after 24 hours and after a light mist of water.
What’s the best way to stop a cushion cover from sagging or shifting inside?
Measure and cut the foam as a snug fit, but you can also build a little extra retention. For wrap-style covers, pull fabric taut and bond the bottom seam last while foam is fully inserted, then add hook-and-loop or fabric ties to prevent shifting. If the foam is too loose, no-sew seams will see extra tension and separate sooner.
Will an inner liner make cushions trap moisture and mold?
Plan for drainage and drying by avoiding fully sealed bottoms. If you use an inner liner, leave enough seam integrity so water cannot reach the foam, but do not trap condensation under an airtight exterior. Also, stand cushions on their edge after rain so any moisture that gets trapped can escape downward.
Can I waterproof the fabric before building the cushion cover?
Not always. Waterproofing sprays can make adhesive bonding weaker if applied before the seams are formed, or if the fabric has residue. Apply waterproofing after all bonds are fully cured, and if you ever re-spray later, avoid saturating bond lines so you do not soften adhesives.
What’s the best way to make box corners look sharp with no sewing?
For the cleanest corners without bulk, use the fold-as-a-gift approach and keep glue minimal on each flap. If you are doing box corners, cutting a notch sized to the foam thickness helps reduce seam stacking. Clamp at corners longer than flat seams, corners are where peeling starts first.
I accidentally placed the hook-and-loop strips slightly wrong, can I move them?
Do not reposition outdoor hook-and-loop after placement. Press strips firmly and hold for about 30 seconds, then let the adhesive cure for at least an hour before sitting on the cushion. If you must adjust, wipe off immediately before cure (if your product allows), otherwise plan to place new strips.
My cover is wrinkly after bonding, how do I prevent it?
If you get wrinkles, it usually means you bonded with slack. Insert foam, pull each long side tight, and bond long sides first before short sides and corners. If wrinkles already set, peel is often the only real remedy, so it is worth doing dry fits and marking where seams will land before applying adhesive.
What should I do for seasonal storage to avoid mildew?
For cushions that will be removed seasonally, prioritize breathable covers rather than sealed plastic bags. Plastic traps humidity, especially during temperature swings, which accelerates mildew even on mildew-resistant fabrics. If you must store in plastic, allow cushions to dry fully for several days first and include airflow.