You can make your own outdoor patio cushions from scratch in a weekend using reticulated (Dry Fast) foam, UV-resistant outdoor fabric like Sunbrella, bonded polyester thread, and a zipper or hook-and-loop closure. The result fits your furniture exactly, costs significantly less than custom replacements, and holds up to rain and sun because you are choosing the right materials from the start rather than hoping a generic cushion survives.
How to Make a Patio Cushion DIY Guide for Outdoor Chairs

Maren Grady
1 May 2026
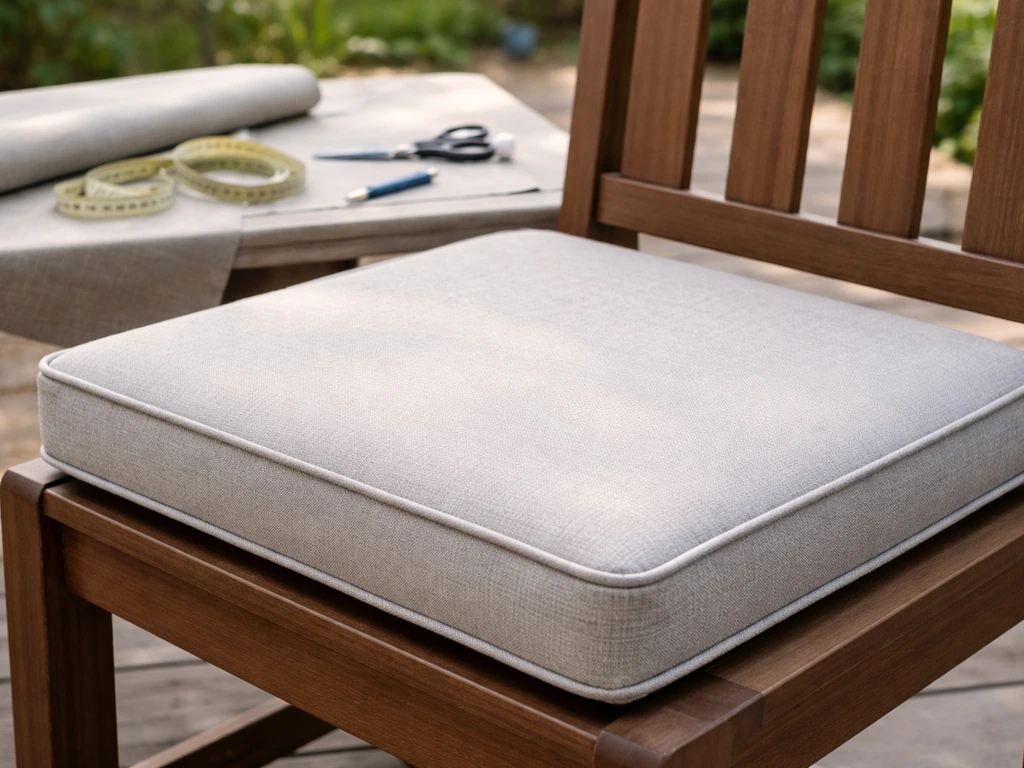
I will be honest: this project has a few steps where beginners tend to go wrong, mostly in the measuring phase and when sewing piping or boxing strips. But if you take it one step at a time and do a fit test before you final-sew everything shut, you will end up with cushions that look and feel better than most store-bought options. If you also want them to be more comfortable, focus on foam firmness and add a soft fill layer if you want extra cushioning look and feel better. Let's go through the whole process.
Step 1: Figure Out What Cushion Style You Need and Measure Your Furniture
Before you buy anything, you need to know exactly what type of cushion you are making and the precise dimensions of your furniture. This sounds obvious, but skipping a careful measurement is the number one reason DIY cushions end up too small, too thick to fit under armrests, or flopping off the back of a bench.
Decide on Your Cushion Type
Most patio furniture needs one of three cushion types: a seat pad (a flat or lightly boxed cushion for the seat only), a seat-and-back set (two separate cushions for a lounge or dining chair), or a bench cushion (a longer rectangular cushion for a bench or loveseat). Each type uses the same basic construction method, but the dimensions and any tie or strap placement will differ.
How to Measure Correctly
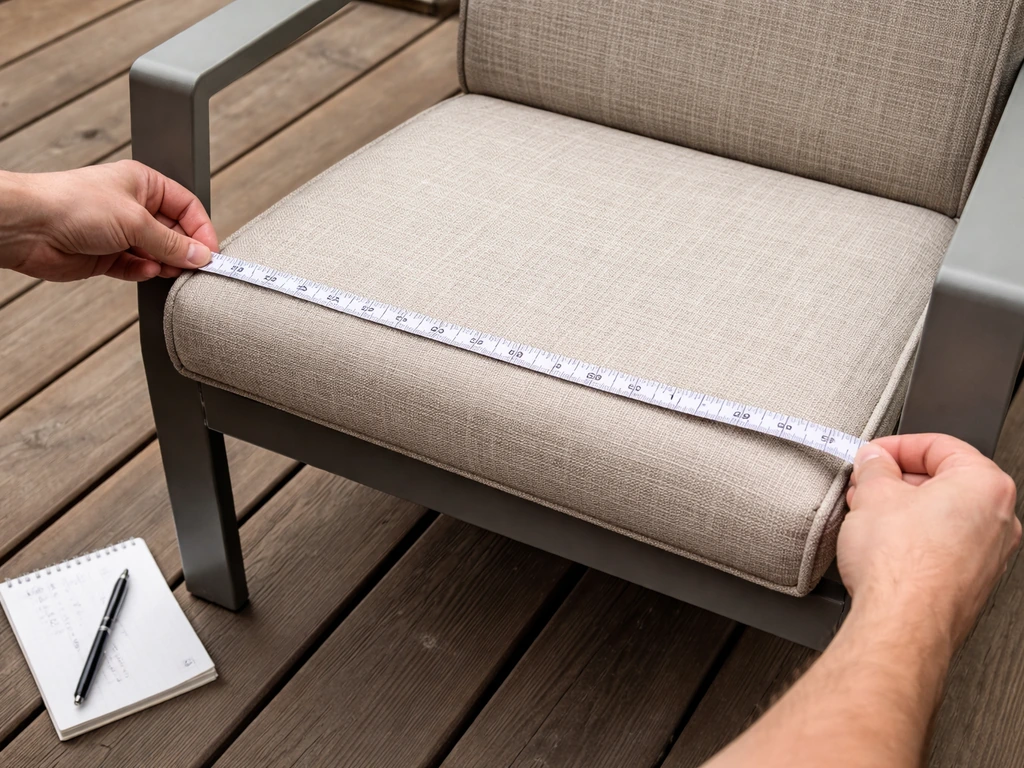
Use a flexible tape measure and write every number down immediately. Here is what to measure for each cushion type:
- Seat depth: Measure from the front edge of the seat frame to the back of the seat frame. This is your cushion depth.
- Seat width: Measure from the inside of one armrest to the inside of the other (or across the full seat if there are no armrests).
- Back height: Measure from the top of the chair back frame down to the top of the seat frame, then subtract the thickness of your planned seat cushion so the back cushion sits flush.
- Bench length: Measure the usable sitting surface from end to end.
- Thickness: Decide your target cushion thickness. For most outdoor seating, 4 inches of foam is the sweet spot—comfortable enough to sit on for hours but thin enough to fit under typical armrests. Custom cushions are usually available in 2 to 6 inch increments, and the same logic applies when you cut your own foam.
One thing that trips up beginners: measure seam to seam across the middle of the cushion if you are replacing an existing one, not just corner to corner. Depth and width are taken across the middle, and thickness is measured along the dart or corner of the cushion. Most cushion dimensions adjust in half-inch increments for width and depth, and one-inch increments for thickness, so round to the nearest logical number rather than cutting odd foam sizes.
Step 2: Choose Outdoor-Safe Materials
The biggest mistake people make when building patio cushions for the first time is using indoor materials. Indoor polyurethane foam gets soaked in rain and can take days to dry, creating a perfect mold environment inside the cushion. Indoor fabric fades within one season. If you go through the trouble of making these cushions, use materials that were designed to live outside.
Foam and Fill
Use reticulated open-cell foam, sometimes called Dry Fast foam. Its open-cell structure allows water and air to flow freely through it rather than trapping moisture inside. For outdoor seating, aim for a density of roughly 1.8 to 2.0 pounds per cubic foot and an ILD (Indentation Load Deflection, which measures firmness) of about 35 to 40. That range gives you firm, supportive seating without feeling like you are sitting on concrete. Standard closed-cell indoor foam at the same thickness will feel similar when new but will hold water and deteriorate much faster outdoors, so do not substitute it to save a few dollars.
Some people wrap their reticulated foam in a layer of polyester fiber fill before putting it into the cover. This adds a slightly softer feel and helps the cover look full and smooth rather than showing the foam's texture. It also helps the fill stay put rather than shifting around. If you want to go this route, use outdoor-grade polyester fill, not cotton batting.
Fabric
Solution-dyed acrylic fabric is the gold standard for outdoor cushions. Sunbrella is the most well-known brand, and it is genuinely worth the higher price for a long-term patio piece. It is UV-resistant, water-resistant, mildew-resistant, and stain-resistant because the color goes all the way through each fiber rather than being applied as a coating that eventually washes away. Budget-conscious alternatives include other solution-dyed acrylic fabrics or marine-grade polyester canvas, both of which outperform basic decorator fabric outdoors. If you want to go deeper on how much fabric to buy for your specific cushion size, that calculation depends on cushion dimensions and is worth working out carefully before you go to the store. If you are wondering how many yards of fabric for patio cushions you need, use your cushion measurements to estimate the yardage before you cut how much fabric to buy.
Thread, Zippers, and Closures
Use bonded polyester thread. Regular cotton or polyester thread will rot or break down from UV exposure and moisture much faster than the fabric itself, which means your cushion cover falls apart at the seams while the fabric still looks fine. Bonded polyester thread is UV-resistant and strong enough to hold through repeated outdoor stress.
For closures, you have two practical options: a nylon or polyester zipper installed along the back or bottom panel, or hook-and-loop tape (Velcro) sewn along the opening. Zippers give a cleaner look and are easier for removing the cover to wash. If you go with a zipper, choose a coil zipper rated for outdoor or marine use. Be aware that waterproof zippers with TPU sealing tape can degrade with prolonged UV exposure and should not be folded or creased sharply, so handle and store them carefully. Hook-and-loop is a simpler option for beginners and works well on bench cushions where the closure is hidden against the furniture.
| Material | Best Choice | Why It Works Outdoors | Budget Alternative |
|---|---|---|---|
| Foam | Reticulated (Dry Fast) open-cell foam, 35-40 ILD | Drains water, resists mold, dries quickly | Do not substitute indoor foam outdoors |
| Fabric | Solution-dyed acrylic (e.g., Sunbrella) | UV stable, water and mildew resistant | Marine-grade polyester canvas |
| Thread | Bonded polyester | UV and rot resistant, strong seams | No real substitute; bonded poly is inexpensive |
| Closure | Outdoor coil zipper or hook-and-loop tape | Removable cover for washing and drying | Large snaps work for lighter-duty covers |
| Fill wrap (optional) | Outdoor polyester fiber fill | Softens feel, keeps cover smooth | Skip it if budget is tight; foam alone works |
Step 3: Create Your Pattern and Cut the Foam and Fabric
This is where a lot of beginners rush and end up with covers that are too tight or too loose. Take your time here. Getting the pattern right before you cut anything is much cheaper than wasting outdoor fabric.
Understanding a Box Cushion Pattern
Most patio cushions are box cushions, meaning they have a flat top, a flat bottom, and a boxing strip (a band of fabric that runs around the perimeter and gives the cushion its thickness). To calculate your panel sizes, start with your foam dimensions and add seam allowance to each edge. A standard seam allowance for outdoor fabric is half an inch.
- Top and bottom panels: Cut these to your foam's width and depth, plus 1/2 inch seam allowance on all four sides. Example: for a 20-inch wide by 18-inch deep foam, cut panels 21 inches wide by 19 inches deep.
- Boxing strip: This wraps around the perimeter. Its height equals your foam thickness plus 1 inch (for seam allowances). Its length equals the full perimeter of the cushion plus a few inches extra to allow for joining. For a simple bench cushion, you can cut this as one long strip or piece it together.
- Zipper panel: If you are adding a zipper, cut your boxing strip in two along the back edge. The zipper is sandwiched between these two strips. Each strip should be half the boxing strip height plus seam allowance.
- Piping strips (optional but recommended): Cut 2-inch wide strips of your outdoor fabric on the straight grain (not bias for these flat-faced cushions). You will use these to cover a cording rope, creating piping that runs along the top and bottom seam lines and gives the cushion a finished, defined edge.
Cutting the Foam
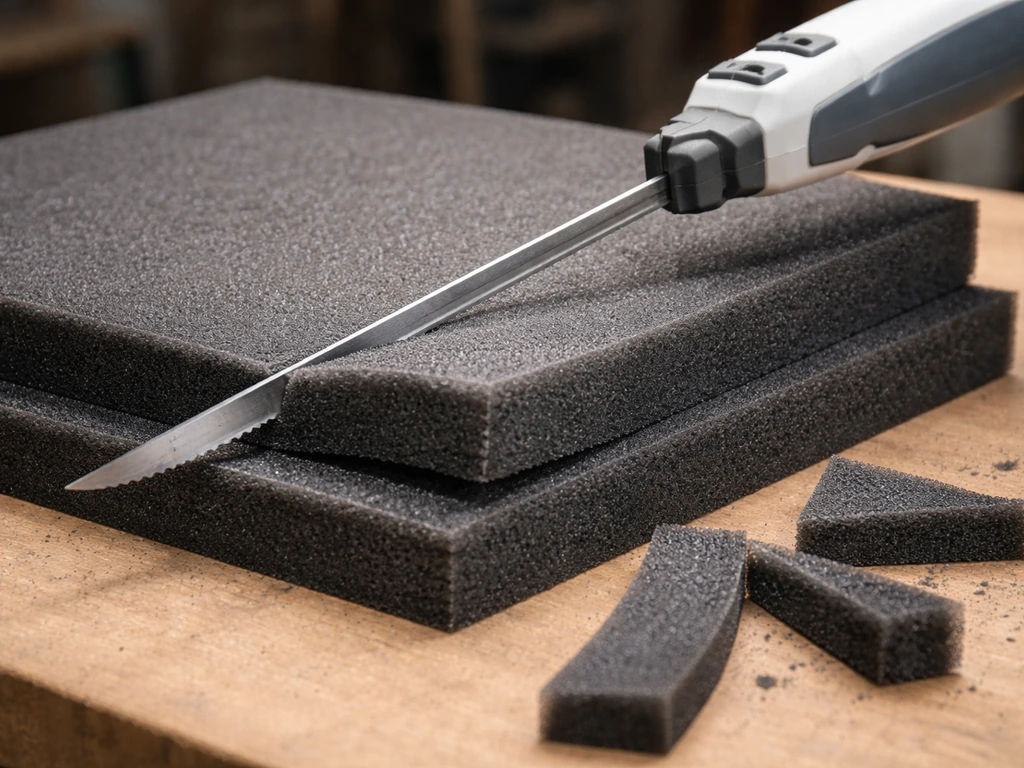
Cut reticulated foam with an electric carving knife or a serrated bread knife using long, smooth strokes. Do not use scissors; they will compress and tear the foam rather than cut it cleanly. Mark your dimensions on the foam with a marker before cutting. Cut the foam to your finished cushion dimensions without adding seam allowance. The fabric cover will stretch slightly over the foam and the seam allowances on the cover create the fitted look.
Cutting the Fabric
Cut outdoor fabric with sharp fabric scissors or a rotary cutter and cutting mat. Solution-dyed acrylic fabrics like Sunbrella cut cleanly and do not fray as aggressively as woven cottons, but you should still cut carefully along straight lines. Mark your pattern pieces on the wrong side of the fabric with a fabric marker or chalk. Label each piece (top, bottom, boxing strip, zipper panel) as you cut to avoid confusion during assembly.
Step 4: Assemble the Cushion Cover
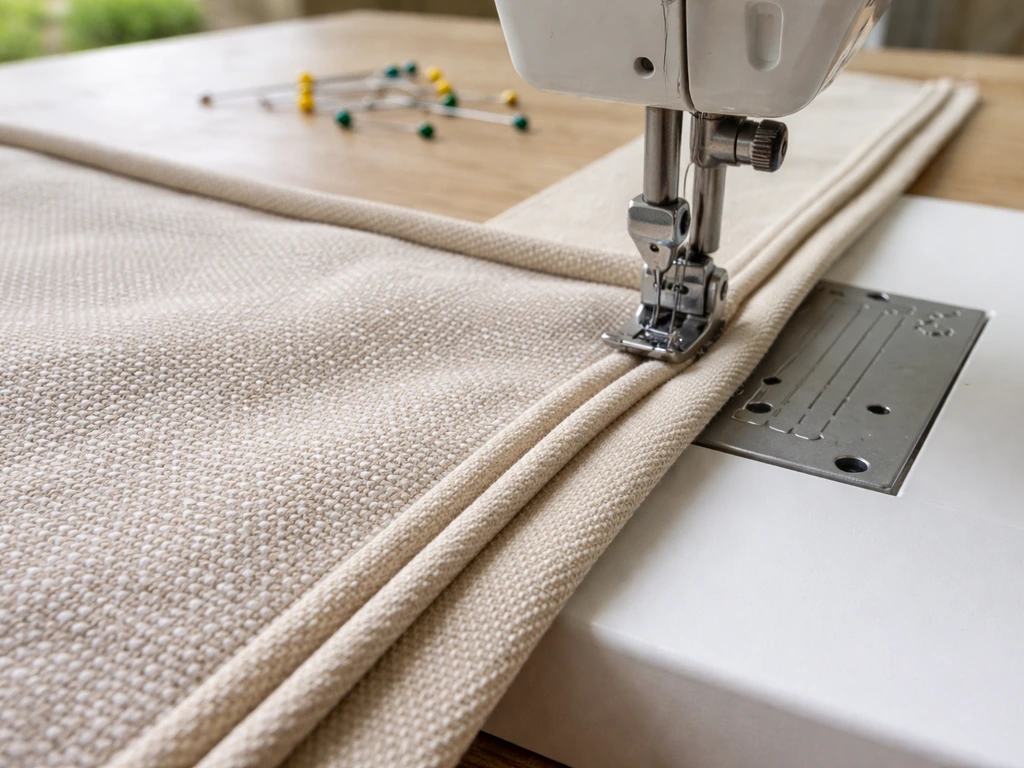
Set your sewing machine to the longest stitch length it will allow. This is a specific recommendation for outdoor fabrics like Sunbrella: longer stitches reduce the number of needle holes in the fabric (which can become water entry points) and they distribute stress across the seam better than short tight stitches. Use your bonded polyester thread in both the needle and the bobbin.
Making and Attaching Piping (Optional but Worth It)
Piping along the top and bottom seams makes the finished cushion look professional and also reinforces those seams against wear. To make piping, fold your 2-inch fabric strips around a length of cording rope (3/16-inch cording works well for most outdoor cushions) and sew close to the rope using a zipper foot. When you join the ends of the piping, angle the cut ends and overlap them carefully so the cording inside lines up without a bump. This join step is fiddly the first time, but once you get it the piping looks continuous and clean.
Installing the Zipper Panel
Sew the two zipper panel strips to each side of the zipper tape with the zipper foot. Press the seams away from the zipper teeth. Once the zipper panel is assembled, treat it as one piece that will be sewn into the back of the boxing strip. Leave the zipper open a few inches during the final assembly so you can turn the cover right-side out after sewing.
Sewing the Box Cushion Together
- Baste the piping to the right side of the top panel, raw edges aligned, clipping the piping seam allowance at corners so it curves smoothly.
- Sew the short ends of your boxing strip together (including the zipper panel) to form a continuous loop.
- Pin the boxing strip loop to the top panel (with piping sandwiched between) and sew all the way around using the zipper foot, right sides together.
- Attach the bottom panel the same way, again with piping if desired, leaving the zipper side accessible. Sew around three sides, then sew the zipper side last.
- Clip the corners, trim any excess seam allowance, and turn the cover right-side out through the open zipper.
- Use a blunt tool like a chopstick to push the corners out fully so they look square and clean.
- Stuff the reticulated foam inside (with optional polyester fiber fill wrap), zip the cushion closed, and check that the cover fits snugly without pulling at the seams.
If you are using hook-and-loop instead of a zipper, sew the loop (soft) side of the tape to one edge of the opening and the hook (rough) side to the other. Stitch all four edges of each tape piece to prevent it from peeling away with repeated opening and closing.
Chair Cushions vs. Bench Cushions: What Changes
The core sewing steps are the same for both, but there are meaningful differences in how you shape, attach, and handle each type.
Chair Seat Cushions
Dining chair and lounge chair seat cushions are usually 18 to 22 inches square and 3 to 4 inches thick. The tricky part is fitting around chair legs or frame supports, which may require notched corners on the back of the cushion. To notch a corner, measure the diameter of the frame post and the distance from the back edge of the seat to the center of the post, then cut a square notch into the back corners of your foam and fabric panels. Sew the notch closed on the cover with a straight seam before assembling the rest of the cover.
Chair back cushions are narrower and taller. They often need to be thinner (2 to 3 inches) to allow the seat cushion to slide in below them. Measure the back height carefully and account for seat cushion thickness as described in the measuring step above.
Bench Cushions
Bench cushions are straightforward rectangles, which makes them a great first project. Common lengths range from 36 to 72 inches. At those lengths, you will likely need to piece your boxing strip from multiple cuts of fabric since most fabric is 54 to 60 inches wide. Join the strips with a straight seam and press the seam open before attaching the strip to the panels.
For a long bench, consider adding an interior channel by sewing a seam through the top panel, boxing strip, and bottom panel partway across the width. This creates two or three sections that hold the foam in place and prevent it from sliding to one end over time. This technique is the same concept used in the bench cushion with piping method, and it works on any rectangular cushion shape.
Weatherproofing, Fit Testing, and Keeping Cushions in Place
Water Resistance vs. Waterproof: Know the Difference
Here is something important to set expectations correctly: solution-dyed acrylic outdoor fabric is water-resistant, not waterproof. Water beads off the surface in light rain, but in a heavy downpour or if the cushion sits in standing water, moisture will eventually work through the seams and into the foam. This is actually fine as long as you used reticulated foam, because the water drains out quickly and the foam dries fast. If you used closed-cell indoor foam by mistake, that moisture sits inside and creates mold. So the weatherproofing strategy here is not about making a sealed waterproof cushion; it is about choosing materials that handle and release water quickly.
You can apply a fabric protector spray (like 303 Fabric Guard, which is compatible with Sunbrella) to the outside of the cover to refresh the water-beading performance once a season. This is especially useful if the fabric starts to wet out (absorb water at the surface) after a few years of use.
Fit Testing Before You Commit
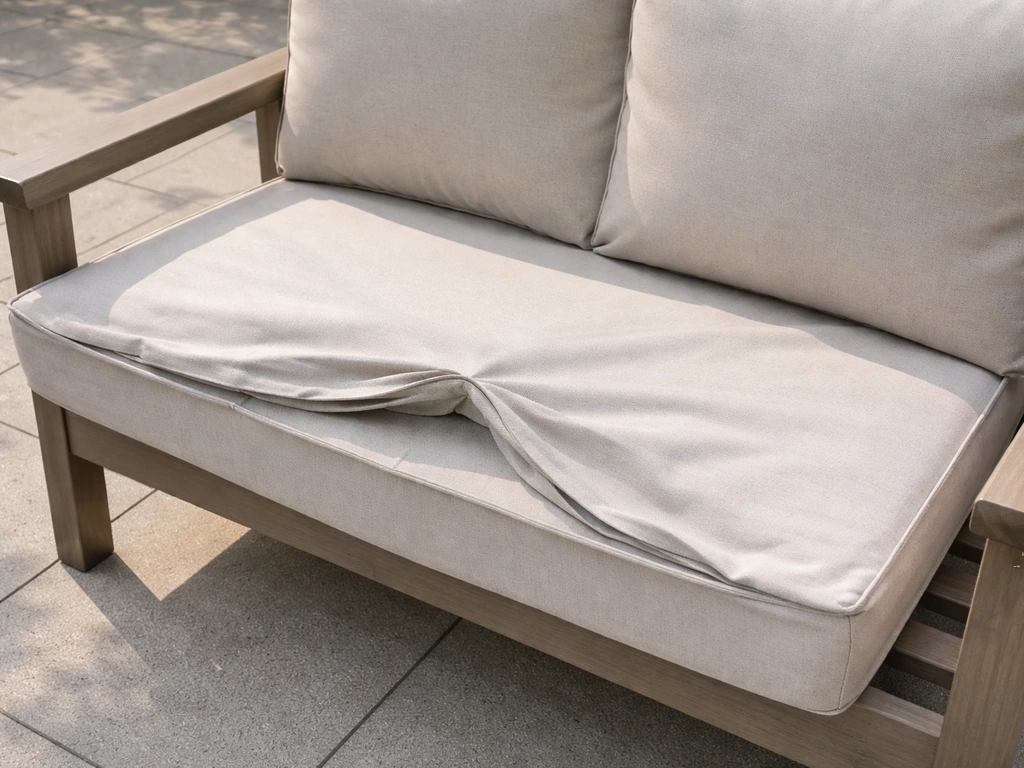
Before sewing the final seam shut or closing the zipper permanently for the first time, do a fit test. Set the assembled but unsealed cushion on the furniture and check that it sits flat, does not overhang the frame, and is the right height. If the cover is pulling tightly over the foam, your foam may be slightly oversize or your seam allowances may have been cut too small. It is much easier to trim the foam at this stage than to resew the entire cover. This kind of verification step also helps you catch piping or seam geometry problems before they are locked in.
Securing Cushions to the Furniture
Cushions that slide around or blow off the furniture in a breeze are frustrating and can damage both the cushion and the frame. Add ties or straps during the assembly phase, not as an afterthought. Common options include:
- Fabric ties: Cut 1-inch wide strips of your outdoor fabric, fold and sew them into long ties, and attach them at the back corners of the cushion bottom. Tie them around the chair frame legs or through slats.
- Hook-and-loop patches: Sew patches of hook-and-loop to the bottom of the cushion cover and attach the mating side to the chair frame with adhesive or staples. This works especially well on benches with a flat wooden surface.
- Non-slip grip pads: Sew a panel of non-slip mesh fabric to the bottom panel of the cushion. This is the simplest solution for flat bench surfaces and dining chairs with smooth frames.
- D-ring straps: For lounge chairs and chaise cushions, attach short nylon webbing straps with D-rings that loop through the frame. Sew the webbing into the seam at the back edge so it is anchored to the structure of the cushion.
Installation, Cleaning, and Seasonal Storage
Installing Your New Cushions
When you first place new cushions on the furniture, let them sit for a day or two before deciding if the fit needs adjustment. Foam compresses and settles under body weight, so a cushion that feels slightly firm on the first sit will feel more natural after a few uses. You can also make patio furniture more comfortable by dialing in cushioning thickness, using supportive foam, and adding seat-and-back coverage where people naturally lean. If the cover still feels overly tight after a week of use, check whether the foam can be trimmed slightly at the corners to reduce pressure on the seam lines.
Cleaning the Covers
One of the best reasons to make removable covers with zippers is that cleaning is easy. Remove the cover, shake out any debris, and spot-clean with a mild soap and water solution. For a deeper clean, hand wash in cool water or machine wash on a gentle cycle if the fabric manufacturer allows it. Sunbrella, for example, can handle gentle machine washing. Rehang or lay flat to dry completely before zipping the cover back over the foam. Never put outdoor fabric in a hot dryer; the heat can weaken the fibers over time.
Seasonal Maintenance to Extend Cushion Life
Outdoor cushions last longest when you treat them as seasonal items rather than permanent outdoor fixtures. Here is a simple annual routine that will add years to your cushions:
- Start of season: Inspect all seams for any thread damage from UV exposure over the previous year. Re-sew any loose seams with bonded polyester thread before they unravel further.
- Mid-season: Apply a fabric protector spray if water is no longer beading on the surface. Rinse the covers with clean water after cleaning to remove any soap residue that can attract dirt.
- End of season: Remove covers, wash them, and let them dry completely. Store foam inserts and fabric covers separately in a cool, dry location. Avoid compressing the foam under heavy objects during storage, as it may not fully recover its shape.
- Zipper care: Apply a zipper lubricant (a wax-based product or even a dry bar of soap) along zipper teeth once a season to prevent corrosion and keep the pull sliding smoothly.
- UV protection: If the furniture lives under a pergola or awning, your cushions will last significantly longer than if they sit in direct sun all day. A patio umbrella is a worthwhile investment purely from a cushion longevity standpoint.
Storage Tips
Store cushions in breathable fabric storage bags rather than sealed plastic bags. Sealed plastic traps any residual moisture and can lead to mildew even on well-dried cushions. Dedicated outdoor cushion storage boxes with ventilation slats are a good investment if you have multiple sets. If storage space is tight, the reticulated foam can be stood upright or rolled loosely without damaging its structure, which helps fit more cushions into a smaller storage area.
Making your own patio cushions is one of the most satisfying furniture projects you can do at home. You get an exact fit, materials that actually hold up outdoors, and the ability to swap covers when you want a new look without replacing the foam. Once you have the pattern and process down, making additional cushions for a bench, extra chairs, or patio pillows goes much faster. If you want to make patio pillows instead of full cushions, you can use the same outdoor-safe foam and solution-dyed acrylic fabric, just scale the pattern and closure to pillow size. Once you have the pattern and process down, you can reuse the same approach to make additional patio furniture cushions for other seating pieces. The skills carry over directly, and the cost per cushion drops significantly when you are buying materials in larger cuts.
FAQ
Can I replace only the fabric cover if my patio cushion foam is still good?
Yes, but plan for different prep. Remove the old cover first, then measure the foam thickness at the deepest part, not the outer edge. When reusing foam, check that it is dry, not crumbly, and not permanently indented. If the foam shows water staining or smells musty, replace it rather than covering it again, because the cover will trap odors and moisture during use.
What should I do if the cover fits poorly during the fit test?
If your cushion cover feels too tight after the fit test, you can safely trim foam at the corners or boxing edges by small amounts (for example, shave 1/8 inch at a time). Avoid trimming the very center of the cushion first, because that changes seating comfort. If the cover is too loose, adjust the pattern later by reducing seam allowances on the next cover rather than trying to fix it permanently by pulling fabric, which can warp piping and boxing lines.
Can I wash the outdoor fabric cover in a regular washing machine?
Outdoor fabric typically tolerates hand washing or gentle machine washing only after you confirm the manufacturer’s care instructions. Before washing the whole cover, test a small hidden area and check color bleeding or shrinkage. For removing mild soil, spot-cleaning usually preserves the water beading better than full washing.
How do I stop a bench cushion from sliding or bunching over time?
For a long bench or cushions that see heavier traffic, consider extra internal security. Add an interior seam or channel (top, boxing, and bottom) to divide the cushion into sections, and add a few ties or strap loops on the underside so the foam cannot migrate during repeated sitting. This is especially important if you use only a zipper closure without straps on the furniture.
Do I need to apply fabric protector to outdoor cushion covers, and when?
You do not need waterproofing spray if you are using solution-dyed acrylic plus the right foam, but you can boost performance. Use a fabric protector after cleaning and fully drying the cover, and reapply once per season or when the surface starts to absorb water instead of beading. Do not spray the inside seams heavily, because it can change how the fabric sticks during sewing and may reduce breathability.
What is the best way to add extra comfort without reducing water drainage?
Most DIYers should avoid thick glued-on foam because it can block water draining in reticulated foam. If you want added plush feel, use a thin outdoor polyester fiber layer you can quilt lightly or secure so it does not shift. Make sure the total finished thickness still clears the chair mechanism so the cushion can slide into place.
What sewing machine settings and needle type work best for outdoor cushion fabric?
Bonded polyester thread is strongly preferred for outdoor cushions, but needle choice matters too. Use a needle suitable for upholstery or heavy fabric (often a size around 90/14 to 100/16 depending on your machine), and test stitch on scrap because outdoor acrylic can be thicker than typical upholstery you may sew indoors. If you see skipped stitches, slow the feed and check thread tension before continuing.
How weatherproof are outdoor cushions really, and what conditions wear them out fastest?
Light rain exposure is expected, but standing water is the real problem. If your patio collects water, elevate cushions slightly with furniture risers or keep them under a cover when storms are likely. Even with Dry Fast foam, repeated submersion increases seam stress and can shorten cover life.
Which closure is better for removable covers, zipper or hook-and-loop, in the real world?
Yes, but it changes cleaning and replacement strategy. Zippered covers are easier to remove completely, but hooks and loop can tear fabric fibers if the closure is over-stretched or snagged. If you use hook-and-loop, sew it with reinforced stitching at all corners and keep the tape lengths long enough that the closure is not pulling against the fabric.
What is the safest way to store patio cushions between seasons?
Store cushions fully dry. If you remove covers for cleaning, dry them completely before reassembling or storing, and do not store foam inside a tight sealed plastic bag. Use breathable storage bags or ventilated boxes, and keep cushions off damp concrete by adding a thin breathable liner or raising them on a rack.