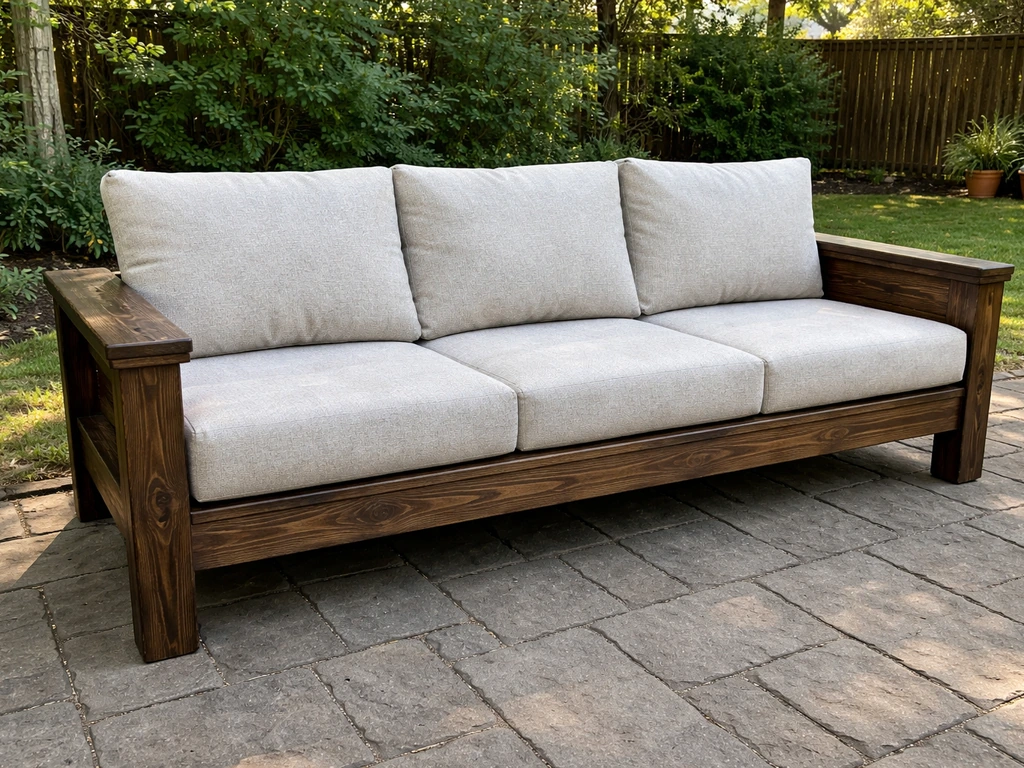
You can absolutely build a sturdy, comfortable outdoor patio couch yourself in a weekend, even with basic tools and no prior furniture-building experience. The most common beginner-friendly build uses 2x4 cedar or pressure-treated pine lumber, exterior screws, and standard outdoor cushions, and the total cost typically lands between $80 and $200 depending on your wood choice and cushion budget, compared to $400–$1,000+ for a store-bought equivalent. Here's the full plan from sizing to sealing.
How to Build a Patio Couch: DIY Step-by-Step Guide

Maren Grady
11 May 2026
Step 1: Choose Your Design and Size
Before you cut a single board, nail down your dimensions. A standard outdoor sofa runs about 72 inches wide, 32 inches deep, and 34 inches tall (including back cushions). If you're working with a smaller space or want a two-person piece, think loveseat territory: roughly 48 inches wide, 30 inches deep, and 36 inches tall. If you’re building a patio loveseat instead, use the loveseat dimensions in Step 1 and keep the same frame and weatherproofing approach. For seat height specifically, aim for 16 to 18 inches from the ground to the top of the seat frame, this is the sweet spot for outdoor lounging. Go lower and it becomes a floor couch; go higher and it starts feeling like a dining chair.
Seat depth matters just as much as width. An 18-inch inside seat depth (the usable sitting surface, not counting the frame) is what most furniture manufacturers use as a baseline for supported posture. Pair that with an arm height of about 24 to 25 inches from the floor and you get proportions that actually feel right when you sit down. I'd strongly suggest sketching your design on paper first, even a rough rectangle with labeled dimensions saves a lot of head-scratching mid-build.
For style, you have two main routes: a slatted open-frame look (very popular, good airflow, easier to build) or a solid box-frame look with a flush top surface. The slatted version is more forgiving for beginners because small gaps hide imperfect cuts. The box frame looks cleaner but requires more precision. Both work great as a base for standard outdoor cushions.
If you're planning to build multiple pieces, say, an L-shaped sectional setup or a matching loveseat, it's worth designing them all at the same time so they share the same seat height and depth. If you're going for a sectional patio couch, plan the full layout up front so the pieces share the same dimensions and cushioning L-shaped sectional setup. That makes them look intentional rather than mismatched. Building a full sectional is a bigger undertaking, and building a loveseat is a great starter project if this is your first build.
Step 2: Materials, Tools, and Budget Options
Cedar is the go-to wood for outdoor furniture because it's naturally rot-resistant, lightweight, and takes stain and sealant beautifully. It typically costs $1.50 to $3.00 per linear foot. Pressure-treated pine is cheaper (often under $1.50 per linear foot) and extremely durable, but it's heavier and can warp more aggressively as it dries, always buy kiln-dried treated lumber if you go that route. Redwood is a premium option that's gorgeous and very rot-resistant, but costs significantly more and can be hard to source. If budget is tight, pressure-treated pine framing with cedar slats on top is a smart hybrid approach that keeps costs down while giving you a nicer finished surface.
For a standard 72-inch sofa, here's a rough lumber shopping list to get you started (adjust for your specific dimensions):
- 8x 2x4x8 boards (frame construction — legs, seat rails, back frame)
- 6x 1x4x8 boards (seat slats and back slats)
- 1 box of 2.5-inch exterior-grade coated screws (galvanized or stainless steel)
- 1 box of 1.5-inch exterior screws (for slats)
- Wood glue rated for exterior use
- Medium-grit sandpaper (80 and 120 grit)
- Exterior wood stain or paint of your choice
- Exterior wood sealant or clear waterproofing finish
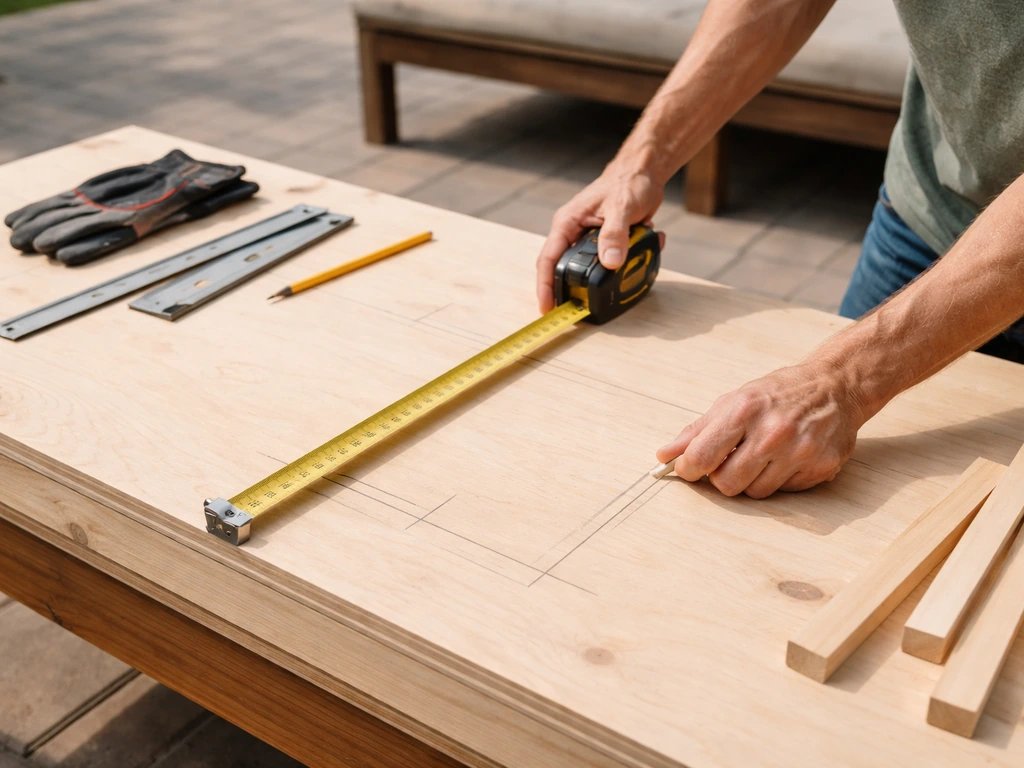
For tools, you don't need much. A miter saw (or even a circular saw with a guide) handles all your cuts. A drill/driver is essential. A tape measure, speed square, clamps, and a sanding block round things out. If you don't own a miter saw, most home improvement stores will make cuts for you for free or a small fee, just bring your cut list.
| Material | Cost Estimate | Pros | Cons |
|---|---|---|---|
| Cedar | $150–$220 for full sofa | Naturally rot-resistant, easy to work with, looks great | More expensive than pine |
| Pressure-treated pine | $80–$130 for full sofa | Very affordable, extremely durable | Can warp, heavier, chemicals in older stock |
| Redwood | $250–$400+ for full sofa | Beautiful grain, excellent rot resistance | Expensive, hard to find in many regions |
| Pallet wood | $0–$30 for full sofa | Nearly free, rustic character | Inconsistent quality, requires more prep and inspection |
Quick budget tip: pallet wood is tempting because it's often free, and you can absolutely build a great patio couch with it. But it takes more prep time, you need to inspect every board for nails, rot, and chemical treatment stamps (avoid any pallets stamped MB, which indicates methyl bromide treatment). The result can be fantastic, but go in knowing it's a different kind of project.
Step 3: Build the Frame, Seat Base and Back
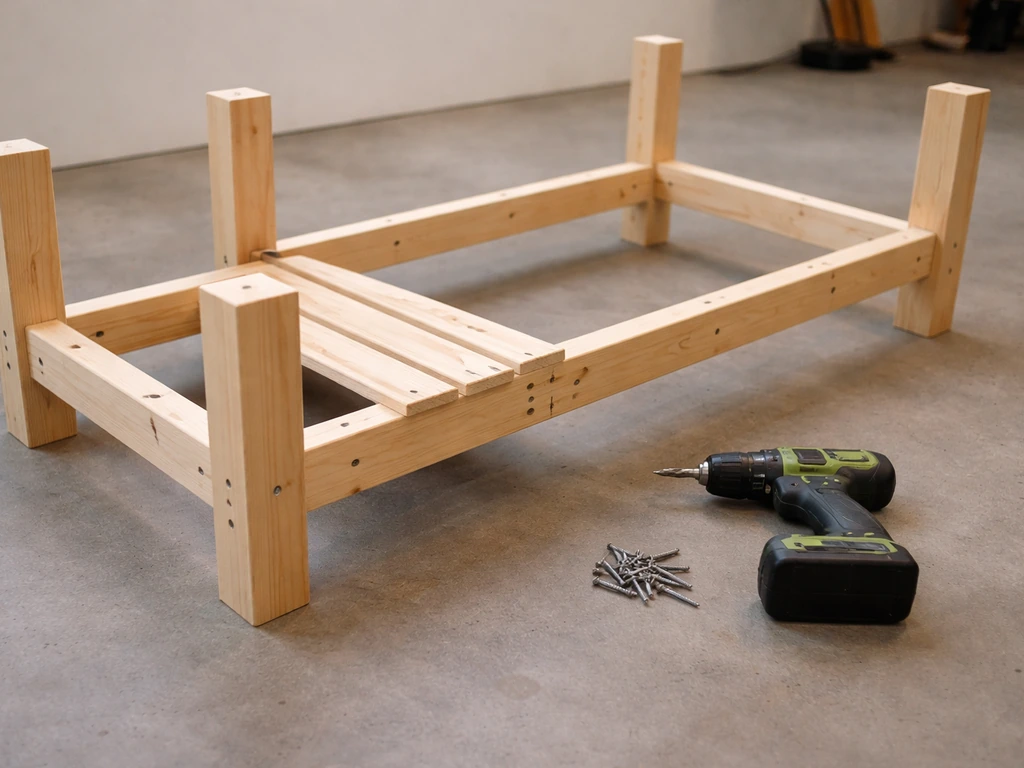
Here's where the actual building happens. Cut all your pieces before you start assembling, it's much easier to lay everything out and double-check dimensions than to cut as you go. For a 72-inch sofa with an 18-inch seat depth, you're building essentially a rectangular box with four legs, two long side rails, two short front and back rails, and a back frame that angles slightly (around 10 to 15 degrees back from vertical) for comfort.
- Cut four legs from 2x4 stock at 16 inches tall (this gives you a finished seat height of about 17 inches once slats are added).
- Cut two long side rails at 32 inches (your seat depth, minus the leg thickness on both ends).
- Cut two short rails at 69 inches (your width, minus the leg thickness on both ends — adjust for your target width).
- Assemble the base rectangle: attach the short front and back rails between the legs using two 2.5-inch screws per joint, pre-drilling to prevent splitting. Add a dab of exterior wood glue at each joint before screwing.
- Connect the two side assemblies with the long rails, again pre-drilling and gluing. Check for square by measuring diagonally corner to corner — both measurements should match. If they don't, push the frame gently until they do before the glue sets.
- Add a center support rail running front to back in the middle of the frame to prevent the seat slats from sagging in the middle.
- For the back frame, cut two vertical back posts at about 18 to 20 inches tall (measured from the top of the seat rail). Attach them to the rear legs with exterior screws. Cut horizontal back rails to span between the posts at the top and bottom.
- If you want a slight recline angle in the back, cut the top of the back posts at a 10-degree bevel before attaching. This is optional but makes a noticeable comfort difference.
Pre-drilling every single hole is the step beginners most often skip, and it's the reason most beginner frames split or crack. Especially with 2x4s, a screw driven without a pilot hole will almost always crack the wood near an end. Use a drill bit that's slightly smaller than your screw shank, this takes maybe 10 extra seconds per screw and saves you a lot of frustration.
Step 4: Add Armrests, Supports, and a Cushion-Ready Top
Armrests make the difference between a bench and a couch. Cut two armrest supports from 2x4 stock, these are vertical pieces that attach to the outside of your front and back legs on each end of the sofa. Make them about 6 to 8 inches taller than your seat rail height (so roughly 22 to 24 inches from the floor to the top of the arm). Then cut your actual armrest tops from 2x6 or 2x8 stock at whatever depth matches your frame, usually 12 to 14 inches, and attach them flat across the top of the armrest supports with screws driven from underneath.
For the seat surface, space your 1x4 slats evenly across the seat frame with a consistent gap between them, about 1/4 to 3/8 of an inch. A scrap piece of plywood or a couple of stacked pennies works great as a spacing guide. Attach each slat with two 1.5-inch screws per rail crossing, again pre-drilling. Round or lightly sand the top edges and corners of each slat before attaching, rough edges chew through cushion fabric over time. Do the same for your back slats, spacing them evenly across the back frame.
After all your slats are on, do a full sanding pass with 120-grit paper. Pay special attention to the armrest tops since those get the most contact. Run your hand across every surface, if it catches on anything, sand it smooth. This step takes maybe 30 minutes but it's what separates a finished piece from a rough one.
Step 5: Weatherproof, Seal, and Finish
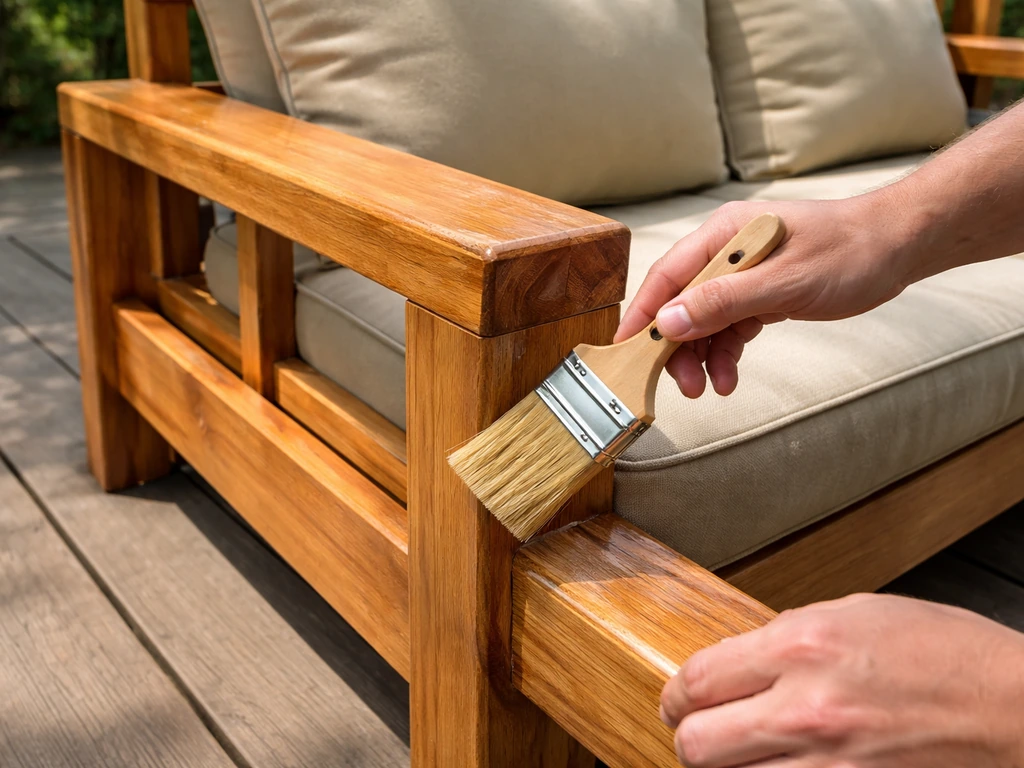
This step is not optional. Unsealed outdoor wood, even cedar, will gray, crack, and start to degrade within one or two seasons. The good news is weatherproofing is straightforward and doesn't require expensive products. Here's the sequence that works: For BEHR Premium Oil-Based Spar Urethane, the product page advises waiting about 12 to 24 hours after the final coat before light use 12–24 hour wait after the final coat before light use.
- Sand the entire piece one final time with 120-grit paper and wipe off all dust with a tack cloth or slightly damp rag. Let it dry completely.
- Apply a penetrating exterior wood stain or a solid exterior paint as your base coat. Stain preserves the wood grain and is easier to touch up; paint gives a more uniform look and is slightly more protective. Two thin coats beat one thick coat — let the first coat dry fully before applying the second.
- Once the stain or paint is dry (usually 24 to 48 hours), apply a clear exterior sealant or waterproofing topcoat. Products like a spar urethane or an exterior polyurethane add a protective layer that sheds water. Apply with a brush in the direction of the wood grain.
- Pay extra attention to end grain — the cut ends of boards absorb water fastest and are where rot usually starts. Give the end grain an extra coat of sealant.
- Let everything cure fully before putting cushions on — typically 48 to 72 hours in dry conditions.
For hardware, use stainless steel or hot-dipped galvanized screws and brackets throughout. Regular zinc-plated screws will rust within a season outdoors, leaving ugly stains streaking down your wood. The price difference between standard and exterior-grade screws is minimal, usually a few dollars per box, and it completely changes how long the piece holds up.
If you want to skip paint or stain and go for a more natural look, a teak oil or similar penetrating oil finish is a good option for cedar. It won't last as long between reapplications (plan on once a year versus every 2 to 3 years for a painted/sealed finish) but it looks beautiful and is very easy to reapply.
Step 6: Cushions and Keeping Them in Place
Standard outdoor cushion sizes are designed around common furniture dimensions, so if you built to the proportions in this guide, finding cushions off the shelf is easy. A 72-inch sofa typically uses a seat cushion set that's around 21 x 21 inches per seat section (three cushions across), and a back cushion set at similar dimensions. Look for cushions filled with quick-dry foam or polyester fiber fill rated for outdoor use, these drain water instead of absorbing it.
Keeping cushions in place is the number-one outdoor furniture frustration, especially in windy spots. Here are the most effective fixes:
- Non-slip rug pad cut to size and placed under seat cushions — cheap and works surprisingly well
- Velcro strips (hook-and-loop tape): staple or screw the hook side to the wood slats and sew or glue the loop side to the underside of the cushion cover
- Outdoor cushion ties: many cushions come with fabric ties — simply drill a small hole through a slat and thread the tie through and knot it
- Bungee cord loops run through slat gaps can also hold cushions in place without damaging anything
For back cushions, the simplest method is to add a horizontal 1x2 strip across the back frame near the top and attach cushion ties to it. Back cushions shift far less than seat cushions in wind, so even just a pair of ties is usually enough. If you want truly built-in comfort and don't want to deal with loose cushions at all, you can attach weather-resistant outdoor foam directly to the frame and wrap it with a removable cushion cover, more work upfront, but very clean and wind-proof.
Step 7: Maintenance and Seasonal Protection
A well-built patio couch can last 10 to 20 years with proper care. The maintenance routine isn't complicated, but you do have to actually do it, skipping it for even one or two seasons can accelerate deterioration significantly.
During the season, brush off debris and rinse the frame with a garden hose every few weeks. Debris sitting in slat gaps holds moisture against the wood and is one of the main culprits behind early rot. Check the joints and screw points once a year, if any screws are backing out or joints are loosening, drive a slightly longer or wider screw into the same hole to re-tighten the connection.
End of season is when real protection happens. Before storing or covering the piece, clean the frame with a mild soap and water solution and let it dry completely, at least a full sunny day. Then inspect the finish: if the sealant looks dull, chalky, or is peeling, it's time to lightly sand and reapply a fresh coat before winter. Never skip this step if you live somewhere with freezing temperatures, because water that's absorbed into unprotected wood expands when it freezes and splits fibers from the inside out.
- Bring cushions indoors for winter or store them in a weatherproof storage bin — outdoor foam degrades faster from freeze-thaw cycles than from UV exposure
- Use a breathable patio furniture cover (not plastic) to protect the frame if it's staying outside — breathable covers prevent mold and mildew buildup underneath
- Elevate the legs slightly off concrete or decking using rubber furniture feet or small treated wood blocks to stop moisture wicking up through end grain
- Re-apply penetrating oil or exterior sealant every one to three years depending on your climate and the type of finish used
- Check for any soft spots in the wood each spring — press firmly with your thumb along all the joints and leg bottoms. Soft or spongy wood means rot has started and that board needs to be replaced before it compromises the structure
If you built this piece from pallet wood or a mixed-material approach, be a bit more diligent with seasonal inspections since those materials can be less consistent in how they age. Overall though, the maintenance investment is maybe two or three hours a year, a very reasonable trade-off for furniture that costs a fraction of retail and that you built yourself.
FAQ
Can I build this patio couch if I want to leave it outside all year, no bringing cushions in?
Yes, but keep the gaps and the frame material in mind. If you plan to leave cushions outdoors year-round, choose quick-dry filling and use cushion covers rated for outdoor use, then ensure your slats have consistent spacing so water drains off quickly. Also, tilt the back slightly and avoid trapping water under any horizontal ledges.
What if I want a beefier couch, can I use thicker lumber than 2x4?
Most of the strength comes from the screw joints and how straight the frame stays while you assemble. If you swap in 2x6 or 4x4 in place of the 2x4 legs or rails, you still need pilot holes and exterior-rated hardware, but you may also need to adjust cushion thickness and seat height so the finished dimensions match your seating plan.
How many coats of sealer or stain should I plan for, and when do I know I’m done?
For weatherproofing, apply finish only after the wood is fully dry and clean, and follow the “thin coats” approach rather than one heavy application. After the first coat, lightly sand and recoat if the surface feels rough or blotchy, because a smooth topcoat helps reduce water beading failures.
How do I prevent the frame from ending up crooked or out of square after assembly?
Don’t skip rail-level inspections. A common issue is one side slightly out of square, which makes cushions sit unevenly. Dry-fit the frame, measure diagonals from corner to corner, and correct it while the assembly is still loose enough to adjust.
My cushions feel unstable or too bouncy, what changes can I make to the seat slats?
Use the slat spacing and screw pattern as a guide for comfort. If your cushions feel like they’re sinking too far, reduce the slat gap slightly or add a thin layer of exterior-rated plywood or slat decking on top, just make sure it still drains and does not trap standing water.
If I build with pressure-treated pine, will it warp less if I do anything differently before assembly?
If you’re replacing cedar with pressure-treated lumber throughout, expect more movement as it dries. Use kiln-dried treated boards if possible, pre-drill carefully, and consider letting your cut pieces acclimate for a day or two before final assembly to reduce warping.
Can I use a different wood species besides cedar or pressure-treated pine?
Yes, but make sure the new wood is compatible with exterior finishes. Some exotic woods and older pressure-treated lumber can interfere with adhesion, so test-sand a small area and do a small finish trial section first to see if the surface accepts stain or sealant evenly.
I keep splitting wood when driving screws, what am I doing wrong besides not pilot drilling?
Pre-drilling is the fix, plus correct screw length. If screws penetrate too deeply, they can blow out and split near the far side, if they’re too short they can loosen. A practical check is to drive one screw into a scrap joint and confirm the bit and screw length match the thickness of the boards.
Does slat spacing change if I live in a wet or humid climate?
Spacing slats tighter can reduce cushion sag and improve support, but it can also reduce airflow and slow drying. If you live in a very humid area, aim for your stated range but keep the wood edges sanded smooth and make sure the frame is raised slightly off the ground so airflow continues underneath.
What’s the best way to keep seat cushions from sliding, not just the back cushions?
Yes, especially for windy locations. Adding cushion ties for back cushions is usually enough, but for seat cushions you’ll want at least two tie points per cushion section, or a removable cover with elastic corners, so gusts don’t lift edges and start sliding.
Can I customize cushion thickness, and how does that affect the build dimensions?
Start by matching your frame seat height and seat depth to your cushion dimensions. If you choose a cushion thickness that’s much larger than typical, your back angle and arm proportions will feel off, so dry-fit the cushions against the frame before you finalize back slat spacing.
Should I cover the couch in winter, and does the cover material matter?
Covers help, but they are not a full substitute for sealing. Use a breathable outdoor cover so trapped moisture can escape, and elevate the couch slightly off the ground under the cover. Avoid plastic-only covers that hold condensation against the wood.
What should I do if joints loosen over time, do I just tighten the same screws?
If screws back out, first determine if the pilot hole is damaged or oversized. Then either re-tighten with a slightly longer exterior screw, or fill and re-drill if the hole is stripped, and always recheck after the first few weeks of seasonal temperature changes.
What maintenance schedule should I follow, and how do I know when it’s time to reapply finish?
A simple schedule works well. During the season, do quick inspections every few weeks in heavy rain or pollen periods, and do a full check once yearly, during the end-of-season clean and finish refresh. If you notice chalking or peeling early, recoat sooner rather than waiting for winter.