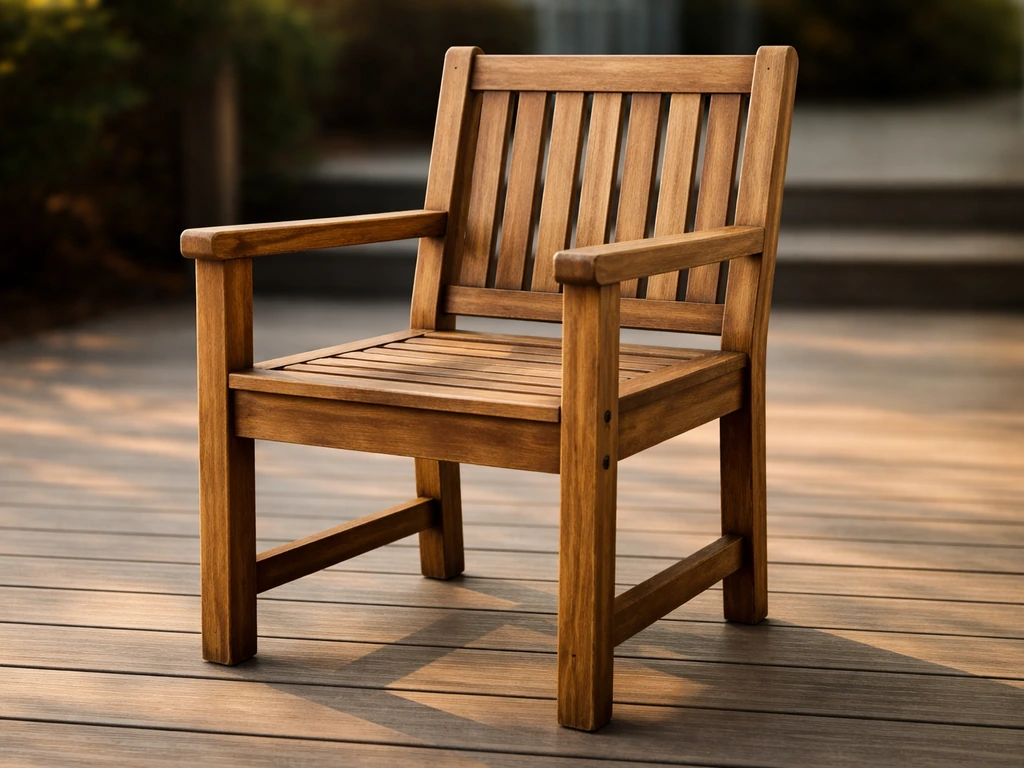
You can build a solid, comfortable wooden patio chair in a weekend using basic tools, construction-grade lumber, and pocket-hole joinery. The core build takes about 4–6 hours for a first-timer, costs roughly $40–70 in materials per chair, and produces something that will genuinely outlast anything at a big-box store if you finish and maintain it properly. Here is exactly how to do it.
How to Build a Patio Chair From Wood Step by Step

Maren Grady
11 May 2026
Upright patio chair vs. lounge chair: pick the right design first
Before you cut a single board, decide which type of chair you're actually building, because the dimensions are meaningfully different and mixing them up wastes lumber. An upright patio dining chair has a seat height of 17–19 inches (43–48 cm) from the floor to the seat surface, a seat depth of 16–18 inches front to back, and a backrest angled at a gentle 10–15 degrees of recline. That's the standard comfort range for a chair you use at a table while eating.
A lounge chair is a completely different animal. The seat sits much lower to the ground, typically 13–14 inches without a cushion (think of the Leandre-style lounge chair at around 13.5 inches seat height). The seat is deeper, the recline is much more pronounced, and you almost always need to plan cushion thickness into the final sitting height. If you're building a lounge chair and forget to account for a 3-inch cushion, the ergonomics fall apart. A patio lounge chair also has a longer footprint, often 60–70 inches overall, versus an upright chair's 28–35 inches.
| Dimension | Upright Patio Chair | Patio Lounge Chair |
|---|---|---|
| Seat height (no cushion) | 17–19 inches | 13–15 inches |
| Seat depth | 16–18 inches | 22–28 inches |
| Back recline | 10–15 degrees | 25–45 degrees |
| Overall length | 28–35 inches | 60–70 inches |
| Overall width | 20–24 inches | 24–28 inches |
| Cushion needed? | Optional | Usually yes — plan for 2–4 inch thickness |
For most people reading this, the upright patio chair is the right starting point. It's simpler, faster to build, pairs with any outdoor table, and the skills transfer directly to building a bench or storage piece later. This guide covers the upright chair in full detail, then flags the key dimension and angle changes you'll make when switching to a lounge build.
Materials and tools you'll need
Stick with cedar, redwood, or pressure-treated pine for outdoor builds. Cedar is my top pick for beginners: it's naturally rot-resistant, lightweight, easy to cut, and widely available. Pressure-treated pine is cheaper but contains preservatives that require specific corrosion-resistant fasteners (more on that below), and it can be harder to finish nicely. Avoid standard untreated pine or poplar outdoors, they'll rot within a couple of seasons no matter what you put on them.
Lumber (per chair)
- 2x4 cedar or pressure-treated pine: two 8-foot boards (legs and frame rails)
- 1x4 cedar: two 8-foot boards (seat slats and back slats)
- 1x6 cedar: one 6-foot board (optional wider seat slats or armrests)
Hardware and fasteners
- 1-1/4 inch and 2-1/2 inch pocket-hole screws, stainless steel (304 stainless is ideal for outdoor use — do not use standard zinc-plated screws outdoors, they rust fast)
- Exterior-rated wood glue (Titebond III or equivalent — must be waterproof, not just water-resistant)
- 2-inch stainless steel exterior screws for slat attachment
- Optional: 3/8-inch carriage bolts with stainless washers and nuts for leg-to-frame connections on high-stress points
Tools
- Miter saw or circular saw (for straight cuts — a miter saw makes this much easier)
- Pocket-hole jig (Kreg R3 or similar — under $30 and completely beginner-friendly)
- Drill/driver with bits
- Tape measure, pencil, and speed square
- Clamps — at least 4 bar clamps or F-clamps
- Sandpaper: 80-grit, 120-grit, and 220-grit
- Safety glasses and hearing protection
If you don't own a pocket-hole jig yet, buy one. It replaces the need for mortise-and-tenon or dowel joinery and makes clean, strong furniture joints accessible to anyone. This is genuinely the single tool that separates a beginner project that falls apart from one that holds up for years.
Cut list and measurements
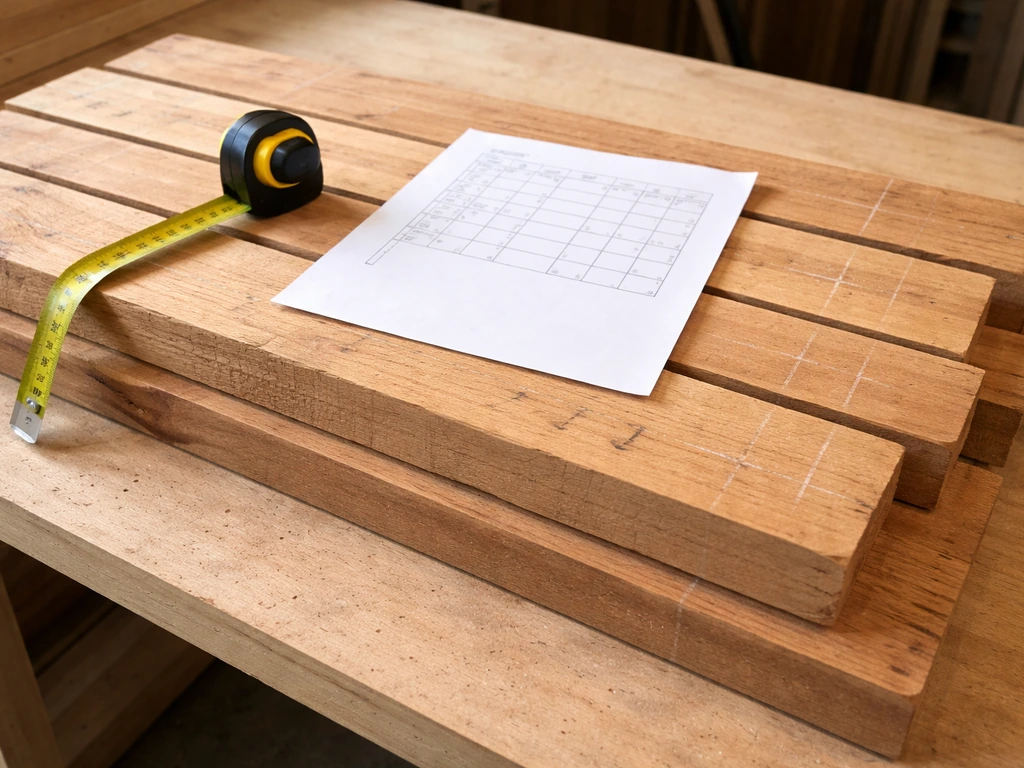
These dimensions produce a comfortable, standard-size outdoor dining chair: 18-inch seat height, 18-inch seat depth, 20-inch seat width, and a backrest that sits at about 12 degrees of recline. Print this out or write it on a piece of tape on your saw.
| Part | Material | Qty | Dimensions (L x W x T) |
|---|---|---|---|
| Front legs | 2x4 cedar | 2 | 18 inches long |
| Rear legs | 2x4 cedar | 2 | 36 inches long (angled top for backrest — see step 2) |
| Front rail (seat frame) | 2x4 cedar | 1 | 20 inches long |
| Rear rail (seat frame) | 2x4 cedar | 1 | 20 inches long |
| Side rails (seat frame) | 2x4 cedar | 2 | 16 inches long |
| Seat slats | 1x4 cedar | 4 | 22 inches long |
| Back slats | 1x4 cedar | 3 | 18 inches long |
| Top back rail | 2x4 cedar | 1 | 20 inches long |
| Armrests (optional) | 1x6 cedar | 2 | 22 inches long |
Scaling up to multiple chairs is straightforward: multiply every quantity by the number of chairs you're building and do all your cuts in batches. Cut all front legs at once, all seat slats at once, and so on. Batch cutting keeps everything consistent and saves a lot of time, a set of four chairs built this way takes about a day rather than four separate days.
For a patio lounge chair, change these key dimensions: front legs drop to 10 inches, rear legs go to 28 inches, side rails extend to 60 inches, and you'll add additional seat and back slats to cover the longer span. The back angle becomes more aggressive, cut the top of the rear legs at a 35-degree angle instead of 12 degrees.
Step-by-step build: frame, seat, and back
Step 1: Cut and prep your lumber
Work through the cut list from top to bottom. Use a speed square to mark your cut lines clearly before every cut. After cutting, sand all pieces with 80-grit to knock down any rough edges, then move to 120-grit on surfaces that will be touched (seat slats, armrests, back slats). Don't over-sand at this stage, you're just smoothing, not finishing yet.
Here's where a lot of beginners skip a critical step: seal the end grain on all your cut pieces before you do anything else. End grain soaks up moisture like a sponge and is where splitting and cracking starts. Wipe a thin coat of your spar urethane or a dedicated end-grain sealer on every cut end and let it dry. This takes 10 minutes and adds years to the life of your chair.
Step 2: Cut the rear leg angle
The rear legs do double duty, they form the back legs of the seat AND the uprights for the backrest. Set your miter saw to 12 degrees and cut the top of each rear leg at that angle. This angle is what gives the backrest its slight recline. For a lounge chair, change this to 35 degrees. Mark the angled top with a pencil so you don't accidentally flip a leg during assembly, it's an easy mistake to make and frustrating to discover after glue-up.
Step 3: Drill pocket holes
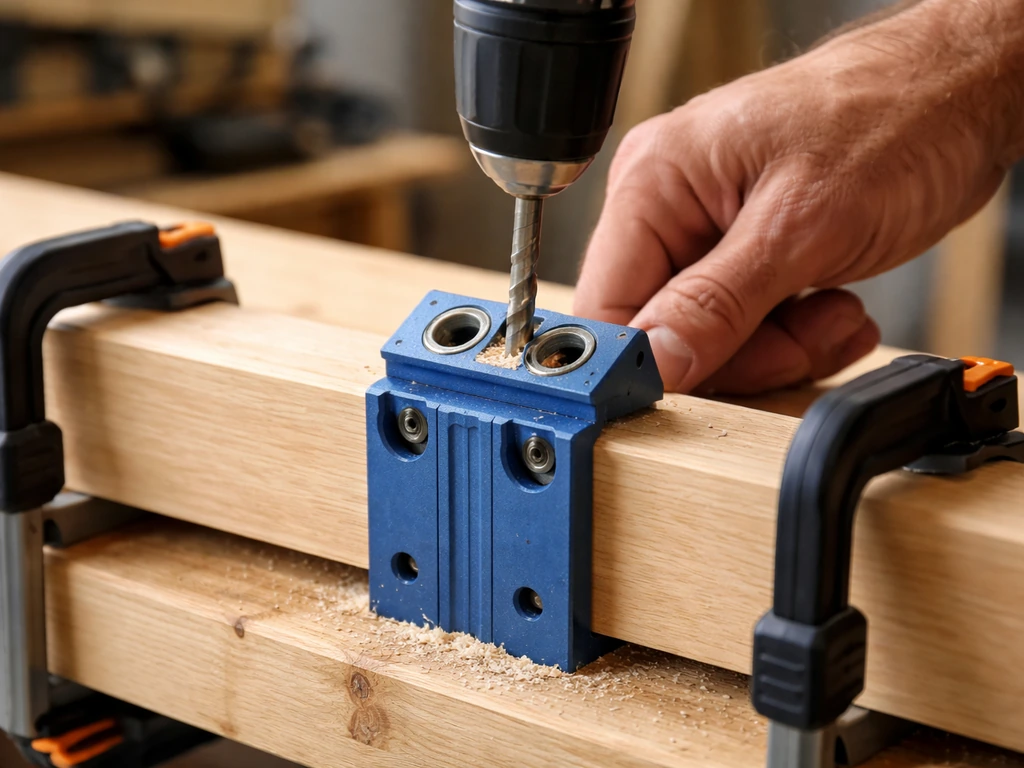
Set your pocket-hole jig for 1.5-inch stock (for 2x4s) or 3/4-inch stock (for 1x4 slats). Drill pocket holes on the ends of all your rails, front rail, rear rail, and both side rails. You'll also drill pocket holes on the ends of the top back rail. The jig uses a stepped drill bit with a stop collar; follow the depth guide on your specific jig. Clamp the jig firmly to the board before drilling, if it shifts mid-drill, the hole angle goes wrong and the screw won't pull tight.
Step 4: Assemble the seat frame
- Apply a bead of exterior wood glue to the mating surface of the front rail and clamp it between the two front legs. Drive 2-1/2 inch pocket-hole screws through the pre-drilled holes. The screw draws the joint together as it tightens — that's the beauty of pocket-hole joinery.
- Repeat for the rear rail between the two rear legs.
- Connect the two side assemblies with the side rails, again using glue plus pocket-hole screws. Check the frame is square by measuring diagonally corner to corner — both measurements should match. If they don't, push gently on the longer diagonal until they do, then clamp and let dry.
- Let the glue cure for at least 30 minutes before moving on.
Step 5: Attach the seat slats

Lay your four seat slats across the top of the seat frame. Space them evenly with a consistent gap between each slat, about 1/4 to 3/8 inch. This gap is critical for drainage: it lets water run straight through instead of pooling on the seat surface. Pooled water is the number-one enemy of outdoor wood furniture. Pre-drill pilot holes through the slats into the frame rails (prevents splitting), then drive 2-inch stainless screws. Two screws per slat end, countersunk slightly.
Step 6: Build and attach the backrest
Attach the top back rail between the tops of the two rear legs using exterior glue and pocket-hole screws. Now attach your three back slats between the top back rail and the rear seat rail, spacing them evenly with the same 1/4-inch gaps. The same drainage principle applies here, horizontal slats that trap water will rot from the back face where you can't even see it happening. Pre-drill and countersink, then drive 2-inch stainless screws.
Step 7: Add armrests (optional but worth it)
If you're adding armrests, cut your 1x6 boards to 22 inches, round the front corners with a jigsaw or just heavy sanding, and attach them flat across the top of the front and rear leg tops on each side. Glue plus two 2-1/2 inch screws per attachment point. Countersink the screws so they sit flush or just below the surface, nobody wants a screw head digging into their arm.
Assembly tips for comfort and stability
A wobbly chair almost always comes from one of two things: joints that weren't fully seated during assembly, or legs that aren't perfectly even on the floor. Before the glue cures completely, set the chair on a known flat surface and press down on each corner. If it rocks, adjust now, you have a short window. Once it's set, the only fix is disassembly.
When tightening any bolts or screws that go through multiple components, use a diagonal tightening pattern rather than going around in order. Tighten one corner a little, then the opposite corner, then the other two. This seats the joint evenly on all sides and prevents one side from pulling tight while the other stays loose, which is exactly what causes racking and wobble later.
- Always use both glue AND screws — glue carries shear load, screws carry tension. Either one alone is weaker than both together.
- Add diagonal corner blocks inside the seat frame corners if you want extra stiffness. Cut small triangles from scrap 2x4 and screw them into the inside corners of the seat frame. This resists the racking force that causes wobble over time.
- Do not fully constrain wood movement across the grain. Seat slats are attached at two points per end — don't add a third fastener in the center of a slat, because as the wood expands and contracts with humidity, a fully locked slat will split or push the frame apart.
- Leave slat gaps. That 1/4-inch gap between slats also accommodates wood movement. Slats swell and shrink with the seasons; a zero-gap fit looks great in the showroom and splits by summer.
- Acclimate your lumber. If you just bought it, let it sit in the space where the chair will live for 2–3 days before building. Wood that's acclimated to its environment moves less after assembly.
Finishing and weatherproofing your wooden patio chair
The finish is not cosmetic, it's structural protection. An unfinished cedar chair left outside will still survive a few seasons, but an unfinished pine chair will look rough in one season and start rotting in two. Do not skip this step or rush it.
Sand before finishing
Sand all surfaces progressively: 80-grit to level any rough spots, 120-grit to smooth, 220-grit for a final pass on surfaces that will be touched. Wipe down with a tack cloth or a damp rag and let the wood dry completely before applying any finish. Applying finish to damp wood is one of the most common beginner mistakes and leads to adhesion failure and peeling within months.
Seal end grain first
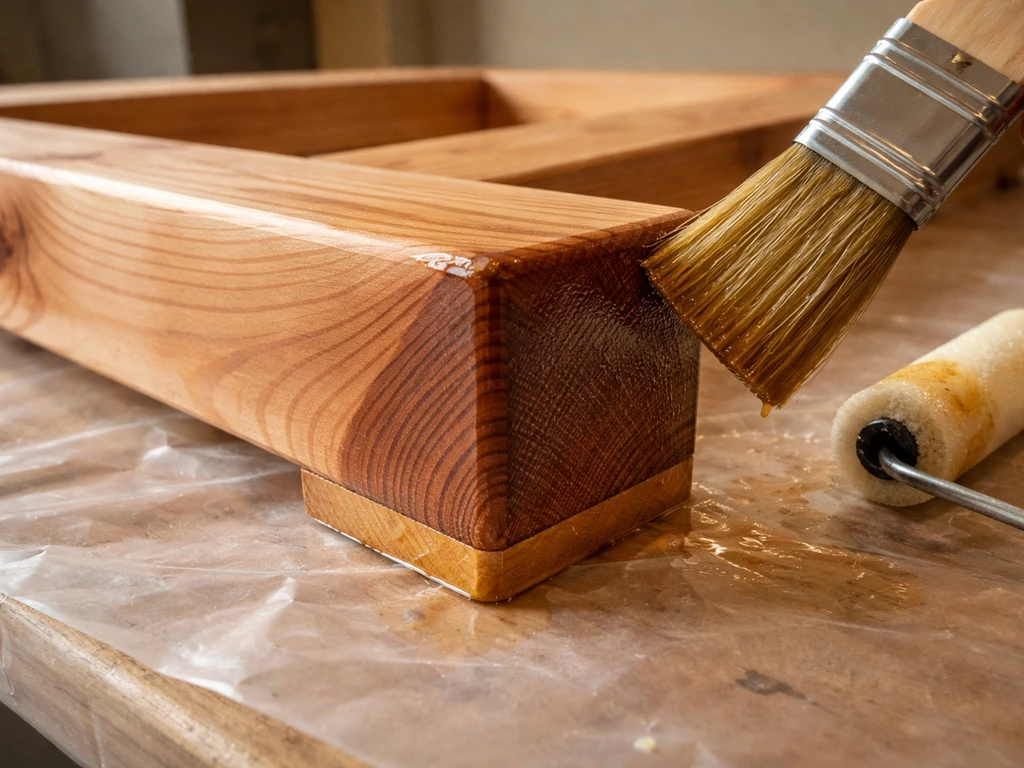
If you didn't seal end grain at the cutting stage, do it now. Pay special attention to the bottoms of the legs, this is where water sits and where rot almost always begins. A thin coat of epoxy on the leg bottoms creates a near-impermeable moisture barrier. Rockler's guidance on this is solid: seal the feet and leg ends before any topcoat goes on. Let it cure fully.
Apply spar urethane or an exterior stain
For most beginners, spar urethane (like Minwax Helmsman or Varathane's water-based spar urethane) is the most practical outdoor topcoat. It's flexible enough to move with the wood as it expands and contracts, unlike lacquer or shellac which crack and craze under weather-driven movement. Apply a minimum of three coats on bare exterior wood. Between coats, lightly sand with 220-grit if more than 12 hours have passed since the previous coat, this helps adhesion between layers. Thin coats beat thick ones every time; thick coats bubble and peel.
If you want color, apply a semi-transparent exterior stain first, then topcoat with spar urethane. Semi-transparent stains on outdoor furniture typically need refreshing every 1–2 years in most climates. Solid stains last a bit longer but can peel if the wood moves significantly. Check your finish each spring: if water stops beading on the surface, it's time to clean and recoat.
Ongoing maintenance
Once a year, hose off the chair, let it dry fully, and inspect for peeling, cracking, or graying. Lightly sand any worn areas back to bare wood, spot-seal end grain if the previous seal has worn through, and apply one or two fresh coats of spar urethane to worn areas. This 30-minute annual task is the difference between a chair that looks good at year five and one that's composting in the corner of your yard.
Common problems and how to fix them
The chair wobbles
First, check if it's a leg-length issue by setting the chair on a flat surface and seeing which leg is short. If one leg is slightly off, a piece of felt furniture pad can compensate temporarily. For a permanent fix, mark the high legs and trim 1/16 inch at a time with a hand plane or by sanding the bottom on a flat surface. If the wobble is frame racking, the whole frame twisting slightly, add corner blocks inside the seat frame corners and retighten all fasteners using the diagonal tightening pattern described above.
A joint is pulling apart
If a pocket-hole joint has opened up, it usually means the glue failed or was never applied properly. Titebond III Ultimate Wood Glue is described as “proven waterproof” for exterior applications, is FDA approved for indirect food contact, and is explicitly not for continuous submersion or below the waterline glue failed or was never applied properly. Pry the joint slightly, inject fresh exterior wood glue with a syringe or thin nozzle, clamp firmly, and let cure for a full hour. Add a second screw near the first if the original hole has stripped. If the wood around the screw hole has chewed out completely, fill with exterior wood filler, let cure, and re-drive a screw into a slightly different position.
A seat slat is cracking or splitting
This is almost always caused by a fastener driven without a pilot hole, by wood that wasn't acclimated before building, or by a slat that was installed with zero gap that couldn't accommodate seasonal expansion. Wood movement guidance notes that you usually need to allow for wood expansion and contraction, since joints and tight fits can loosen or fail when the wood moves zero gap that couldn't accommodate seasonal expansion. For a crack that hasn't fully split, work exterior wood glue into the crack, clamp or tape it closed, and let it cure. For a fully split slat, replace it, it's just one board. Pre-drill pilot holes this time.
The finish is peeling or blistering
Peeling finish almost always means moisture got under the coat before it cured, either the wood was damp when finished, or a coat was applied before the previous coat was fully dry. Strip the affected area back to bare wood with 80-grit sandpaper, let the wood dry completely (ideally in the sun for a full day), seal end grain again, and reapply thin coats of spar urethane. Don't try to paint over peeling finish, it will just peel again.
The screws are rusting and staining the wood
This happens when standard zinc or black-oxide screws are used outdoors. The fix for an existing chair is to remove the rusted fasteners, clean the rust stain with a wood oxalic acid cleaner, and replace every fastener with 304 stainless steel screws. Going forward, never use standard screws on outdoor furniture, the cost difference between zinc and stainless is small and the longevity difference is enormous.
Where to go from here
Once you've built one chair, the skills scale directly to other patio projects. The same pocket-hole joinery, slat spacing, and finishing approach applies when you build a matching outdoor bench or a storage bench to hold cushions and gear. If you want to outfit a full patio, a bench version of this same chair design is the logical next project, it uses almost identical techniques on a wider frame. A patio storage bench uses the same core outdoor-wood techniques, plus planning for the hinged lid and interior spacing. If you prefer pallets, you can adapt these same outdoor-friendly joinery and finishing ideas to learn how to make a patio bench out of pallets that lasts. And if you're thinking about what to do with those cushions when the season ends, a dedicated outdoor storage box built with the same cedar and spar urethane system will protect them perfectly.
FAQ
Can I build a patio chair without a pocket-hole jig?
Yes, but you need a different joinery plan to keep the frame square. Use mortise-and-tenon or through-dowel joinery (with correct alignment jigs), and add corner blocks where possible to resist racking. If you are building without a pocket-hole jig, spend extra time on dry-fitting and confirm squareness before glue-up.
What wood thickness should I use for the frame and slats?
The article assumes 2x4 stock for the larger structural parts and 1x4 stock for the slats. If you substitute, keep the slat thickness consistent with your screw length and countersink depth, and keep the frame members thick enough that 2-inch screws pull tight without splitting.
How much should I stagger the slats, or do I need them perfectly even?
For drainage and consistent comfort, keep spacing even from slat to slat. You can slightly vary the gap by a fraction if your lumber is imperfect, but avoid one slat with a noticeably larger gap because it can create a weak point and changes where you feel the chair flex.
Do I need to acclimate the lumber before building?
Yes, especially if your boards were stored somewhere humid or dry. Build with wood at the same moisture conditions as your outdoor season, and let it sit indoors near your work area for a day or two. This reduces movement after assembly, which helps prevent loosening at joints and slat gap problems.
What’s the best way to prevent screw holes from splitting on the slats?
Always drill pilot holes and countersink the screw heads slightly. For fragile or warped slats, clamp them in position and drill one slat at a time so you do not force alignment, that forcing is what commonly causes splits.
How do I ensure the chair stays square during glue-up?
Dry-fit everything and measure diagonally from corner to corner after you clamp. If the diagonals are off, adjust clamps before glue sets. Also, fully seat every pocket-hole joint, if a joint bottoms out crooked you will carry that twist through the rest of the build.
Should I leave the chair slightly elevated or add rubber feet?
If you want easier maintenance and longer life, add exterior-rated rubber or composite feet. They keep the leg bottoms off damp ground and reduce wear, especially on patios that stay wet. This does not replace end-grain sealing, but it helps protect the sealed surfaces.
Can I use outdoor paint instead of spar urethane?
You can, but paint systems require careful prep and correct exterior-rated primers, and they can trap moisture if the surface is not sealed correctly. Spar urethane is flexible and forgiving for wood movement, if you choose paint, plan on more frequent touch-ups where the finish cracks or chips.
How long should I wait between coats of spar urethane?
The key is to only recoat when the previous coat is fully dry to the touch, then scuff-sand if you waited longer than about 12 hours. If you recoat too early, you can get clouding, soft spots, or adhesion failure. If it feels gritty when cured, lightly sand before the next coat.
What do I do if I forgot to seal the leg bottoms at the start?
Seal them as soon as you can. Sand the bottoms lightly, apply the end-grain sealer or a thin epoxy coat to the feet and leg ends, and let it cure fully before any topcoat. Expect minor color difference where the patch sealer soaks in, that is normal.
My chair still wobbles after assembly, what’s the fastest troubleshooting order?
Start by checking leg length on a flat surface. Then check for a racked frame by pressing corners and watching if the seat frame twists. Finally, re-tighten fasteners in a diagonal pattern. Re-check gaps and that every joint is fully seated before you loosen anything.
Is 1/4 to 3/8 inch slat spacing always correct?
It is a solid range for drainage, but if your local climate is very dry or very hot, you can slightly reduce the gap for comfort. In rainy climates, keep the gap closer to the middle or upper end so water does not linger. The main rule is never install slats with zero gap, wood movement needs room.
What fasteners should I use for outdoor wood, and do I need stainless for every piece?
Use 304 stainless screws (or another exterior-grade stainless) for any screw that will see moisture. If you mix fastener types, the non-stainless ones can rust and stain around screw heads, even if the wood is properly sealed.
Can I build this chair for heavy use, like frequent daily seating?
You can, but consider reinforcing the frame with additional corner blocks or thicker rails. If you expect high loads, ensure slat spacing stays consistent and use higher-quality exterior glue, also do not reduce slat count to save material. A sturdier chair often means slightly larger structural members or an extra support rail.